Pages

Monday, 30 April 2012

Iranian Recipes

This month on Gormandize with A-dizzle and K-bobo I've been experimenting with recreating some delicious and classic Iranian dishes in a vegan friendly manner. It's been such a delicious month and I have to give a huge thank you to the person who requested that I feature Iran - what a great choice!! But now it has come to an end - so here is a recap of the tasty treats featured. I hope you enjoyed the learning journey with me. If you'd like to get in on it and request a country for me to feature then head over to this post. Here is what we ate over the last month:


~Savoury~

Artichoke and Pine Nut Dolma
I've never liked dolma very much at all, so this month I was able to do something I've always wanted to - make my own fresh ones with a filling that I knew I would love. These were filled with artichoke hearts, tomato, dill and toasted pine nuts and cooked fresh right before eating! They were sensational! Check out the recipe here.

Salad-e Shirazi
This is a light and tangy classic salad. Tomato, onion, cucumber, fresh herbs and lots of lime juice. It's not a challenging or unusual salad but it's a classic that is simple to make and you can eat it every day. Check out the recipe here.

Naaz Khatoon
This eggplant and tomato dish was delicatedly flavoured with verjuice and pomegranate molasses - classic ingredients in Iranian cooking. I had a fun time heading out to find some pomegranate molasses, and it was worth the hunt! Check out the recipe here.

~Sweet~

Yakh Dar Behesht
This delight was called Ice in Heaven - although I don't know why because it's not frozen! But that aside, this was something pretty special. Essentially it only has six ingredients in it and only takes about 10 minutes of cooking time. It's a very special treat to serve up to guests, and a very healthy dessert option. I made mine vegan by using delicious almond milk. Check out the recipe here.

Sholeh Zard
I love rice pudding in any form. This Persian one was flavoured with rosewater (of course!) and had crunchy almonds and pistachios through it. Can be served hot or cold but I much preferred it hot! This post also contains my "student's saffron" - i.e. for people too poor to afford saffron! Check out the recipe here.

~Accompaniments~

Carrot and Rose Jam
I never knew until now that carrot makes such delicious jam! This is so easy to make and it just excites all your senses! The aroma is sweet rosewater, the colour is exceptionally orange and the taste is a pleasant surprise - sweet and tangy jam which doesn't leave that sickly taste in your mouth. Check out the recipe here.

Sugar Pickled Garlic
This was the surprise hit of the month. This sugar pickled garlic was delicious and was a huge hit with all my dinner guests, they absolutely loved it! Check out the recipe here.

Torshi-havij
The second pickled vegetables I made for this month - making my own pickles was such a bonus of doing Iran this month, as it's something I've never even thought about doing. These pickled carrots were also a big hit with one of my guests commenting it was like eating a "carbonated carrot" because of the tingly sensation in her mouth! Check out the recipe here. 

Mokhalafat
This one isn't as much as recipe as it is an information post. I loved the fact that traditional Iranian tables serve  a smorgasbord of tasty accompaniments to the meal so that guests can help themselves to whichever flavours they want more of - here is a post on what I served up for my guests as mokhalafat and what you could also include. Check it out here. 


I'm also very excited to announce that starting next month I'll be featuring wonderful and veganised versions of dishes from....

Scotland!


Want a sneak peak? Here it is...


I hope to see you next month for a highland feast!


On another note - I've been nominated for the Best Australian Blogs 2012 People's Choice Award - you can vote for me by hitting up this link: http://www.sydneywriterscentre.com.au/bloggingcomp/peopleschoice.html


Saturday, 28 April 2012

Sesame Tofu Quinoa Salad


This month I'm doing a favour for a friend and playing guest host to the Holiday Recipe Club. This great club is run by Erin at Big Fat Baker, and if you'd like some information on joining the club then check out the HRC website. So if any members have any questions on this hop, just drop me a line and I'd be happy to help!

This month we are featuring Buddha's Birthday, a holiday celebrated by Mahayana Buddhists. It is actually the birthday of Prince Siddhartha Gautama, the spiritual teacher whose teachings formed the basis of Buddhist  theology. Celebrations vary from country to country, but you can be sure of one thing - they all involve food! This month our theme ingredients are Tofu, Sesame and Garam Masala - all vegetarian of course because traditionally Buddhists don't eat any meat.

I like to try and use at least two of the ingredients in my recipe for the HRC so I'm using tofu and sesame in this salad. I did for a moment think of throwing some garam masala into my marinade but I thought that might be overkill a bit!

On another note - I've been nominated for the Best Australian Blogs 2012 People's Choice Award - you can vote for me by hitting up this link: http://www.sydneywriterscentre.com.au/bloggingcomp/peopleschoice.html


Ingredients
300g hard tofu 
1/4 cup soy sauce
3 tbsp toasted sesame oil
2 cloves garlic, crushed
1/4 cup white sesame seeds
1/4 cup black sesame seeds
1 cup white quinoa
1 cup red quinoa
5 roma tomatoes, diced
2 cucumbers, diced
2 shallots (or spring onions if you are in the US), sliced
1/4 cup pepitas, toasted
Juice of 1/2 lemon
Lettuce

To Make
1. Drain the tofu and squeeze as much liquid out of it as you can. Cut into cubes and place in a bowl or plastic container with the soy sauce, garlic and sesame oil. Marinate for about an hour, shaking to mix every 10 minutes or so. Preheat the oven to 180 degrees.
2. Add the quinoa to 2 cups of water and bring to a simmer. Simmer, covered, on a low heat for 15 minutes or until all the liquid is absorbed. Remove from the saucepan and allow to cool completely.
3. Mix the white and black sesame seeds together in a small bowl. Roll each cube of marinated tofu in the sesame seeds and place on a tray lined with baking paper (keep the marinade though!). Bake for 15 minutes, turning after 10 minutes.
4. In a big bowl mix together the quinoa, tomato, cucumber and shallots.
5. Mix the lemon juice into the marinade and add as much as you like to the salad as dressing. 
6. Serve on a bed of lettuce topped with the baked tofu cubes and sprinkled with toasted pepitas.

Serves 4.

Friday, 27 April 2012

Mokhalafat (Traditional Iranian Accompaniments)


Persian cuisine is one of the most ancient and developed styles of cooking in the world. I love exploring the dishes of countries which have a rich food culture and history and Iran is certainly one of them. This is my last recipe for Iran month (how I have loved it!), and to be honest, it's not really a recipe. It's something I wanted to share and discuss. When researching Iranian cuisine and recipes I found references to Mokhalafat - the traditional accompaniments which should be served with each meal. I loved the idea so when I had my friends around to help me eat all the Iranian food I had cooked I was sure to provide a big plate of mokhalafat with it! 

Mokhalafat varies between regions and probably between families but here are some core ingredients: fresh herbs, pickled vegetables, fresh tomato and cucumber and flat bread. I didn't add flat bread to mine because I was already serving my guests a wealth of food so I didn't want them to fill up on bread! Here is what I used in my mokhalafat:

Ingredients
1/2 bunch fresh mint (chopped)
1/2 bunch fresh dill (chopped)
1/2 bunch fresh parsley (chopped)
2 tomatoes, sliced
2 cucumbers, sliced
Gherkins or pickled cucumbers

You don't really need instructions for this one - just serve along with your main dishes as accompaniments. I arranged all of mine on one big plate but you could also serve in small separate bowls which can be passed around. As you will see I made my own pickles for this - so check out my recipes by clicking on the link.

Here are some other thing you can add to your mokhalafat (I would have loved to have been able to include it all!):

Fresh herbs - basil, corriander (cilantro), fenugreek, savory, tarragon, watercress
Flatbreads - such as lavash or barbari
White cheeses (if you're not a vegan)
Yoghourt (ditto)
Sliced raw onions
Wedges of lemon
Walnuts 
Dates
Other pickles (such as pickled cauliflower, turnip, radish or eggplant)
Fresh radishes


If you come from a Persian background or have experienced a traditional Persian meal I'd love to know what was served up as mokhalafat!


On another note - I've been nominated for the Best Australian Blogs 2012 People's Choice Award - you can vote for me by hitting up this link: http://www.sydneywriterscentre.com.au/bloggingcomp/peopleschoice.html


This month I'm featuring lots of amazing Iranian recipes!
Check out my other Iranian recipe posts:

Thursday, 26 April 2012

Quadruple Hazelnut and Date Breakfast Muffins


Remember this Peach and Date Bircher Muesli post I did at the start of the month? You probably don't - so I'll recap! I admitted that I am terrible at eating breakfast in the mornings and vowed to change that! I also said I'd be posting lots of interesting new breakfast ideas. Well, I've kept half of that deal! I have been much better at eating breakfast this month and have only had 1 or 2 days this month when I have skipped breakfast, which is a big improvement. However, I haven't posted any more breakfast recipes since then - so I'm rectifying that now!

I've had fun making interesting breakfasts for myself - including a couple of different types of bircher muesli and my own vegan lemon curd (which is great on crumpets!). But I think the best idea for breakfasts is really - breakfast muffins. You can have one day a week where you make up a batch and then you are set for breakfasts for the whole week. Just get up and grab a muffin - no effort required! Muffins also make great healthy day time snacks.

These hazelnut muffins look plain and unassuming but their texture and taste are just amazing! If you are crazy about hazelnuts I recommend using hazelnut milk instead of soy milk and adding half a cup of chopped hazelnuts in - then it will be four levels of hazelnut in the one amazing muffin!

If you want more ideas for breakfast muffins check out my Blueberry Oat Bran Muffins and my Orange, Almond and Choc Chip Muffins!

On another note - I've been nominated for the Best Australian Blogs 2012 People's Choice Award - you can vote for me by hitting up this link: http://www.sydneywriterscentre.com.au/bloggingcomp/peopleschoice.html


Ingredients
1 1/2 cups wholemeal flour
1 tsp baking powder
1/2 tsp bicarb soda
1/2 cup hazelnut meal
2/3 cup sugar
1/2 tsp salt
1 cup hazelnut milk (or soy if you don't have it)
1 tsp vanilla extract
1/3 cup canola oil
1/3 cup hazelnut butter
½ cup dried dates, chopped in half

NB: If you are crazy about hazelnuts then you could also add some chopped hazelnuts to this.

To Make:
1. Preheat your oven to about 180 degrees C.
2. Put the flour, hazelnut meal, sugar, bicarb, baking powder and salt in a bowl and mix well to combine and remove lumps (a whisk or a fork work well for this).
3. Make a well in the centre and pour in the hazelnut milk, canola oil, vanilla and hazelnut butter and mix well.
4. Stir through the chopped dates.
5. Either grease a muffin tray well or cheat a bit and use cupcake liners (which I did - it's just easier!!). Fill the tray/liners to the top and then bake for 23-25 mins. 
6. Remove from the oven when they are golden on top and transfer to a cooling rack.

Makes 10 muffins.

Tuesday, 24 April 2012

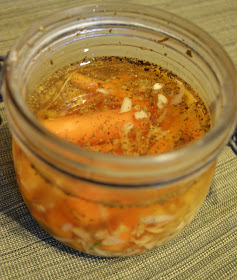
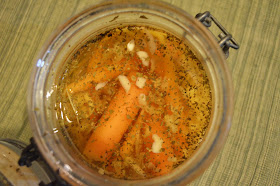
Torshi-havij (Persian Pickled Carrots)


If you read this blog much then you'll have read how excited I was when I made home made Sugar-Pickled Garlic as part of Iran month. Well - good news! The excitement doesn't stop there because I also made some other pickles! Iranian and other Middle Eastern cuisines love their pickles. I remember the first time I went to a proper Lebanese restaurant and they brought out bread, hummous, baba ghanoush and garlic dip as soon as we sat down. Then they brought out this strange small dish of brightly coloured "things". I had no idea what they were until my Lebanese companions told me they were pickled turnips, radishes and cucumbers.

Like Lebanese cuisine, Iranian cuisine includes a plethora of different pickled vegetables - pickled cucumbers, pickled cauliflower, pickled eggplant, pickled garlic, pickled onions and pickled carrots (read that list aloud really quickly and the word 'pickled' starts to sound really strange!). Although I was tempted to try all these I limited myself to two - pickled garlic and pickled carrots. Both of which I served up to my guests at my Iranian feast as part of the mokhalafat (accompaniments).


These pickled carrots (torshi-havajii) went down really well with my guests (not to mention the fact that they were amazed that I made my own pickles!) and the word that was being bandied about the table as they ate them was "zingy". That describes them pretty well! One of my guests even said it felt like a carbonated drink in her mouth. They're quite strong so I recommend serving them as a side dish with a meal  - but be warned, they will made your meal incredibly special and very zingy :)

Ingredients
1 bunch baby carrots, trimmed and washed (about 100g)
5 cloves fresh garlic, peeled
1/2 tsp dried mint
15-20 black peppercorns
1/2 tsp salt
White wine vinegar (quantity will vary depending on the size of the jar you use)

To Make
1. Wash the carrots well (there is no need to peel them, but you can if you want to) and boil for about 3 minutes in boiling water. Remove from the water and allow to cool.
2. Once the carrots are cooled, place them in a jar with a good lid or seal. As you can see from my pics I used a wide preserving jar for mine, but I think it would be better to use a tall and thin jar so that you can stand the carrots up in it without needing to use so much vinegar.
3. Grate the garlic coarsely and add to the carrots in the jar. Add all other ingredients (except the vinegar).
4. Add enough white wine vinegar to the jar to cover the carrots completely. Put the lid on and store in the fridge for at least 3 weeks.

Makes 1 jar.


Sunday, 22 April 2012

Naaz Khatoon (Iranian Eggplant with Pomegranate Molasses)


This month is Iranian Food Month on Gormandize with A-dizzle and K-bobo and even though the month is nearing an end, I still have a few wonderful recipes to share before the time is up! This is one of them - delicious, easy and very easy to eat your way through a whole pot of it!

Eggplant forms a key part of Middle Eastern cuisine, from Baba Ghanoush to Khoresh Bademjan. In this Naaz Khatoon it is roasted, peeled and then cooked with tomatoes, verjuice and pomegranate molasses - all classic Iranian ingredients. I had to make a special excursion to buy myself the pomegranate molasses, as I've never used it before! Luckily, a lovely friend of mine is Lebanese and took me shopping with her to areas which I haven't been to that are a haven for buying Middle Eastern groceries! I had such a fun time and only my budget stopped me from buying a bit of everything that looked delicious :)

On another note - I've been nominated for the Best Australian Blogs 2012 People's Choice Award - you can vote for me by hitting up this link: http://www.sydneywriterscentre.com.au/bloggingcomp/peopleschoice.html

Naaz Khatoon
Adapted from the Iran Chamber Society website.


Ingredients
4 medium eggplants
4 large tomatoes
1/4 cup pomegranate molasses
1 tsp dried marjoram
1 tsp dried mint
1/2 tsp salt
1/2 cup verjuice

To Make
1. Wash eggplant and dry thoroughly. Bake in a moderate oven for about 30 minutes. Remove and let cool.
2. Peel the skins off (they should come away easily now) and dice the eggplant flesh (should be nice and juice after the baking so try and keep all the juices in by peeling them over the saucepan you're going to use).
3. Finely dice the onions and tomato.
4. Put all the ingredients except the verjuice in a large saucepan and put over a low heat. Cover and simmer over a low heat for 10 minutes. Remove from the heat and stir the verjuice through. Serve immediately.

You can eat as it is or serve with rice, pasta or bread.

Serves 4.


Friday, 20 April 2012

Salad-e Shirazi


It's classic of Middle Eastern feasts to have a beautiful fresh tomato and  herb salad and Iran is no exception. Iranian food is generally packed full of chopped herbs (sabzi) which make for incredible fresh and tangy salads. This recipe isn't the most unusual or remarkable salad you've ever come across, but it's one that you'll go back to and make again and again and again!

On another note - I've been nominated for the Best Australian Blogs 2012 People's Choice Award - you can vote for me by hitting up this link: http://www.sydneywriterscentre.com.au/bloggingcomp/peopleschoice.html

Ingredients
4 tomatoes
1 small onion
2 Lebanese cucumbers
Juice of 2 limes
1/2 bunch fresh mint
1/2 bunch fresh parsley
2 tbsp olive oil
1 tsp cracked black pepper
Salt to taste

To Make
1. Finely dice the tomatoes and then put in a strainer to strain out some of the juice while you prepare the rest of the ingredients (seems a shame to waste I know, but if you don't your salad will be very mushy!).
2. Peel the onion and dice very finely. Dice the cucumber.
3. Finely chop all the herbs.
4. Mix all the ingredients together in a bowl and allow to sit for about 20 minutes in the fridge. Serve.

Serves 2 (or 4 as a side salad).


Thursday, 19 April 2012

Sholeh Zard (Iranian Rice & Rosewater Pudding)


This is my latest offering in April - in which, I am featuring recipes from the amazing cuisine of Iran (check out the other recipes in the links below). Rice pudding is one of my favourite desserts, it's hearty, filling and warming for a cooler evening (and the evening have started to get a lot cooler here over the past week!). When I was young I didn't like rice pudding at all, but I think that I would have liked this deliciously simple sweet rosewater pudding. Sholeh Zard is a traditional Iranian dessert flavoured with rosewater and coloured with saffron. Traditionally it is served cold, however, I much preferred mine hot and would recommend it that way.

Talking Saffron....
Now comes the confession... I'm not exactly flush with money at the moment so I had to substitute my saffron! I know, true foodies would be horrified, but real saffron just wasn't an option for me! I'm also very conscious never to buy cheap saffron because it is usually fake, and some types of fake saffron are actually made from gelatine and food colouring (which horrified me when I found out!), therefore wouldn't be suitable for vegetarians or vegans (or anybody who doesn't consume animal products for religious or cultural reasons). I know that using turmeric instead of saffron is considered a culinary sin by high brow foodies, but sometimes needs must. However, I don't use just turmeric because it will go the wrong colour, so I add a pinch of sweet paprika as well to get a slightly more orangey hue. The recipe below includes options for saffron and for "student's saffron".

On another note - I've been nominated for the Best Australian Blogs 2012 People's Choice Award - you can vote for me by hitting up this link: http://www.sydneywriterscentre.com.au/bloggingcomp/peopleschoice.html

Ingredients
250g long grain or basmati rice
1.5L cold water
400g sugar
1/2 tsp real saffron (OR 1 tsp tumeric plus a pinch of sweet paprika)
1/2 cup hot water
1/2 cup rosewater
1/2 cup slivered almonds (plus extra for garnish)
1/2 cup pistachios

To Make
1. Prehead your oven to 150 degrees C. Place the rice in a strainer and rinse under cold running water until the water runs clear.
2. Place the rice and the water in a big saucepan and put over a medium heat. Simmer, uncovered, for about 15 minutes (or until the rice is just cooked). 
3. Add the sugar and stir well to dissolve. Transfer to a large baking dish (one that has a lid because you will need to cover it!).
4. Steep the saffron (or tumeric/paprika) in half a cup of hot water. Add the saffron, rosewater and almonds (except those which you will use to garnish). Stir well and cover.
5. Bake in the oven for half an hour. Let stand a bit to cool down before serving as it will be very hot coming out of the oven!
6. Roughly chop the pistachios (or pulse in a food processor). Garnish each serving liberally with slivered almonds and chopped pistachios before eating.

Serves 6.

Tuesday, 17 April 2012

Vegan Lemon Curd Cake Sandwiches


I've been doing a lot of blog hopping at the moment, in fact I had three over three days. It started with my own blog hop - The Soup-Off Challenge which was my first ever so I was a bit worried about whether it would work. It turned out to be a flop unfortunately, but c'est la vie! Next time I will know just to sit back and enter other people's hops rather than have any of my own. Nevertheless, I made an awesome soup which you should check out here - Green Tea Noodle Soup with Leek and Shitake Mushrooms.

Then, the very next day I participated in the Eat-the-Alphabet Blog Hop, a monthly group which featured E and F as the letters this month. The idea is to base the dish around a fruit, vegetable, bean, grain or pulse that starts with E or F. I made Vegan Fig and Red Wine Ice Cream - yum!

So, I almost didn't get time to make anything for the Sweet Adventures Blog Hop, which this month is lemon themed and hosted by a favourite blogger of mine, Delicieux.  But I decided that I should try and get something in because I believe in supporting the blogging community by trying to make the culinary projects of other bloggers a success.


Lemons are a delicious theme! I don't know anybody who doesn't love lemon desserts. Several ones immediately spring to mind: lemon cake, lemon tart, lemon cupcakes, lemon meringue pie, lemon pudding, lemon pie etc. All delicious and classic recipes. However, I like to challenge myself with themes which is why I decided to invent something completely new which (to my knowledge) has never been done before. My answer was....
The Cake Sandwich.

These gorgeous tea party delights look very unassuming. In fact, they look like fairly plain and boring brown bread sandwiches. However, they are actually made from light lemony cake filled with wonderfully tangy lemon curd. They are perfect for a tea party because they combine two classic afternoon tea/tea party elements - cakes and triangle sandwiches. They can be almost completely prepared the day before and just assembled on the day - plus they are finger food so don't require plates or forks (=less washing up!).

Also - the lemon curd was to die for.


On another note - I've been nominated for the Best Australian Blogs 2012 People's Choice Award - you can vote for me by hitting up this link: http://www.sydneywriterscentre.com.au/bloggingcomp/peopleschoice.html


Lemon Curd Cake Sandwiches
Vegan Lemon Curd Recipe from vegnews.com


Ingredients
Lemon Curd:
Zest of 1 lemon
1/2 cup fresh lemon juice (should be about 2 lemons - note: zest lemons before juicing!)
3/4 cup coconut milk
3 heaped tbsp cornstarch
1/2 cup sugar
1 tsp vanilla extract
1/8 tsp turmeric

Cake:
Zest of 1 lemon
2 tbsp lemon juice
1 cup soy milk
1/2 cup sugar
1/3 cup apple sauce
1 tbsp canola oil
1 tsp vanilla extract
1 tsp orange essence
1 1/4 cups wholemeal plain flour
1 tsp baking powder
1/2 tsp bicarb soda

To Make
Lemon Curd (must be made a day in advance)
1. Zest the lemon. (You may as well go ahead and zest the other lemon as well and set it aside for later as you will need it for the cake.) Then juice the lemons.
2. Combine all the ingredients in a small saucepan and stir well.
3. Place the saucepan over a medium heat for 2 minutes, stirring continuously, to bring to a warm temperature (at no point should it simmer/boil - it it starts to simmer turn it down immediately).
4. Reduce the heat to low and continue stirring constantly. Leave over the low heat for 7 minutes. Remove from heat and transfer straight into a clean empty glass jar (don't leave it sitting in the hot saucepan).
5. All to cool and then refrigerate over night before using.

The Cake (can be made a day in advance)
1. Preheat the oven to 180 degrees.
2. Mix the lemon zest, lemon juice and soy milk together and allow it to curdle for a few minutes.
3. Add the sugar, apple sauce, canola oil and extracts and mix well.
4. Sift the remaining ingredients into the batter and mix well.
5. Lightly grease a square 20cm x 20cm baking dish and line it with baking paper (mine was actually 21cm x 21cm, so don't worry about a few cm difference). Pour the batter in and smooth the top over evenly.
6. Bake for 25 minutes, or until golden on top and a skewer comes out clean.
7. Allow to cool completely before using.

Assembly
1. Take out your cooled cake and cut it into even quarter squares. Then cut each square along both diagonals so that you have 4 small triangles in each quarter. If you are having difficulty visualising what I just described then here is a (not to scale) drawing:

2. Cut each small triangle in half lengthways (like you would slice open a bread roll) so that now you have two small pieces of cake which look just like brown bread. Now here is the clever trick - you want it to look just like brown bread so you need to spread the lemon curd (the sandwich filling) on the darker "crust" of the bread so that the middle bits of the cake are facing out. (If you find that a bit confusing just have a look at the pics of the finished products - you will see the softer middle parts of the cake form the look of the bread whilst the top and bottom edges of the actual cake face inwards with the lemon curd filling.
3. Continue filling sandwiches until you use up all the cake (you will have lemon curd left over but that's just a bonus!).
4. For best results refrigerate the made sandwiches for about 10 minutes to help them stay together.

Serve with tea of course! 
Makes 16 triangle sandwiches (and 2 small jars of lemon curd).


Sunday, 15 April 2012

Vegan Fig and Red Wine Ice Cream


Over summer all my local greengrocers were stocking the most beautiful ripe figs for great prices. As soon as I saw these beautiful figs I instantly bought six. Then I got home and I couldn't decide what to do with them. It was tempting just to eat them all fresh in all their delicious fresh figgy goodness. But I have never made anything with figs so I decided that I wanted to use them in something. The first thing I thought of was The Kitchen Crusader's wonderful looking No Bake Fig and Chocolate Tart. But I'm trying to cook less rich and decadent desserts to be honest. I live with my partner and there are only so many rich desserts we can handle - so I thought I would make something which didn't have to be eaten all at once. My solution was fig and red wine ice cream (vegan, of course).

This is also my first time participating in the Eat-the-Alphabet link up blog hop - which I think it such a great idea. This month the letters E and F are being featured so I'm using Figs! For this recipe you'll need chilled coconut cream so be nice and organised and put the coconut cream in the fridge a few days before hand - I just keep a couple of tins in the fridge at all times so that I can pull them out and use it whenever I want.

On the subject of blog hops - I've decided that I should have one of my own since I have been participating in so many others' hops. Just trying to give a bit back into the community. It's open right now! The Vegan Soup-Off Challenge Blog Hop - don't be put off if you're not a vegan, it's open to everyone and vegetable/grain/pulse/noodle/pasta soups are for everyone - not just vegans. Please check it out and enter here.

On another note - I've been nominated for the Best Australian Blogs 2012 People's Choice Award - you can vote for me by hitting up this link: http://www.sydneywriterscentre.com.au/bloggingcomp/peopleschoice.html


Ingredients
1 tin coconut cream, chilled for at least 24 hours (several days is even better)
1 cup red wine plus 3 tbsp
1 cinnamon stick
1/2 cup soy milk
175g silken tofu
1 tbsp vanilla extract
5-6 fresh figs, skins removed

To Make
1. Place the cinnamon stick and the 1 cup of red wine in a small saucepan and bring to a gentle simmer. Simmer until the liquid has reduced by half to 1/2 cup. Remove the cinnamon stick and allow to cool.
2. Open the can of coconut cream and scoop out the solid cream on the top. Set the liquid parts down the bottom of the can to use in another dish (I usually add mine to curries or soups).
3. Place the coconut cream, simmered red wine, soy milk, tofu, extra tbsp red wine, vanilla extract and the fresh figs in a blender. Blend to combine (don't over blend).
4. Pour the ice cream into an ice cream maker and process according to the instructions that come with your maker. If you don't have an ice cream maker - like me :( - pour the ice cream into a wide chilled dish. Then remove from the freezer every half hour and mix well - breaking up the frozen edges. I use a whisk or a large metal spoon, just make sure you break up all the frozen bits so that large ice crystals don't form. Do this at least 6 times, the more the better! Then leave to freeze overnight.
5. Once the ice cream is firm you can serve. I recommend removing it from the freezer 5-10 minutes before serving so that it's easier to scoop.


What is your favourite unusual ice cream flavour?


Saturday, 14 April 2012

Green Tea Noodle Soup with Leek & Shitake


Recently I was on a jaunt to my local Asian supermarket stocking up on anything that looked cool to try out. You know what I found? Green sago! But that is a tangent - one that you can read about here. I also found Green Tea Noodles! They rather excited me. My favourite Japanese restaurant, Jazushi, makes an amazing green tea noodle salad and also served green tea noodles with their amazing Agedashi Tofu (which I always order). So when I was looking for inspiration I immediately grabbed the green tea noodles and cooked them up with a big fresh leek from my garden.

On another note - I've been nominated for the Best Australian Blogs 2012 People's Choice Award - you can vote for me by hitting up this link: http://www.sydneywriterscentre.com.au/bloggingcomp/peopleschoice.html


Ingredients
1 packet of green tea noodles
1 leek, thinly sliced (just use the white parts and save the green parts for another meal)
500g fresh Shitake mushrooms, trimmed and sliced
1 bunch broccolini, cut into 1 inch length pieces
1 litre water
2 sachets of kombu dashi (mine come in 10g sachets)
3 tbsp soy sauce
3 tbsp sesame oil
1/4 cup sake (or substitute 2 tbsp mirin)
Shallots to garnish

To Make
1. Cook the green tea noodles according to the packet directions (should just be boiling them in water for 5 mins). Drain and rinse well under cold water. Set aside.
2. Heat 2 tbsp sesame oil in a saucepan and sauté the leeks until soft. Add the mushrooms, water, dashi powder, soy sauce and sake. Bring to a simmer and simmer, uncovered, for 5 minutes.
3. Add broccolini and the other tablespoon of sesame oil and simmer for a further 5 mins (until the broccolini is just cooked). 
4. Divide the noodles evenly amongst two bowls, sprinkle with chopped shallots and ladle the vegetables and broth over the top. If you like you can drizzle some more sesame oil over the top.

Serves 2.


I've submitted this recipe to the Vegan Virtual Linky Potluck - click here to see the other entries.

Thursday, 12 April 2012

Iranian Sugar-Pickled Garlic


At the end of last month, when I announced that I would be featuring Iranian recipes all this month in this post, I hinted that you might be seeing something very garlicy from me - well here it is! Sugar pickled whole garlic cloves. You might be thinking that this just sounds a bit too overpowering and strong, but you'll just have to trust me (and all my dinner guests who loved this) when I tell you that it was amazing!

As a cook, I constantly reach little milestones of the development of my skills (I'm sure other cooks are alike),  these are mostly about doing things for the first time by hand (instead of buying things in jars, tins and packets from the supermarket). Things like making my own jam, making my own home made pasta (and then home made ravioli!), making my own pesto varieties or making my own infused spirits! All of these have been small milestones in my development as a cook and here is another one: making my own pickled vegetables!


This Iranian pickled garlic recipe was a great introduction, as it was very easy and didn't need to be stored for a long amount of time (as the garlic was cooked). This allowed me to prepare it in time to post as part of this month's Iranian recipes.


I served this pickled garlic and my torshi-havaj (recipe to come later!) to my dinner guests as part of mokhalafat (traditional Iranian table accompaniments) and it went down so well with my guests that some of them went so far as to say that it was their favourite dish of the night!

What is your favourite pickled vegetable?


Sugar Pickled Garlic
Adapted from www.food.com

Ingredients
3 whole heads of garlic
1/2 cup sugar
1 cup red wine vinegar
1 cup water
8 whole cloves
20 black peppercorns
1/2 tsp salt

To Make
1. Peel all the garlic cloves (I know! This is a pain but worth it!).
2. Place peeled garlic cloves with all other ingredients in a small saucepan. Place over a medium heat.
3. Bring to a boil and simmer, covered, for 10 minutes.
4. Remove lid and simmer for a further 5 minutes. Remove from heat and allow to cool.
5. Transfer to a glass jar with a tight lid and store in the fridge for at least 3 weeks before serving (1-2 months optimum).

Serve as an accompaniment, add to wraps and salads, add to a cheese platter or antipasto platter.