Friday, 31 August 2012

Swedish Food Month


It has been a bit delayed this month but I'm finally posting my summary of all the delicious Swedish Food that I've featured this month. I love writing these summary posts at the end of the month - they remind me of all the good (and some bad) things I've learnt from exploring a culture whose cuisine I previously knew very little of. I didn't know much at all about Swedish Food, except for Swedish Meatballs and that they eat a lot of fish. So it has been a lot of learning going on for me in August!

It has generally all been very positive though, albeit very heavy foods! The creamy dishes loaded with carbs did sit a bit heavy in my stomach - but that is probably because I ate them all together! I'm sure that having one or two of these rich dishes a week wouldn't feel nearly so heavy. I'm also glad to report that everything that I tried this month worked very well! Usually every month I make about 8-10 dishes and inevitably at least one is a but of a dud, or sometimes my "ingenious" vegan modifications just don't work out that well. But Sweden is only the second month so far (the other was Bosnia Month) that I have posted every recipe which I made.


~Savoury~

Yellow Split Pea Soup
I started Sweden Month with a soup which was lovely for a chilly Sydney winter. This common Swedish soup is sometimes made vegetarian and sometimes made using ham or bacon to flavour. It is traditionally eaten for lunch and served with pancakes and whipped cream! I didn't have time to whip up pancakes for my lunch with this, but I hope to try the combination one day! Check out the recipe here.

Vegan Smorgastarta
This smörgåstårta was definitely the hit of the month - both with my readers and with my dinner guests! It's a Swedish sandwich cake, made with layers of bread filled with traditional sandwich ingredients and "frosted" with cream cheese and avocado before being adorned with colourful delicious fresh ingredients. It was so much fun to make and absolutely impressive to serve up to guests! Check out the recipe here.

Vegan Swedish Meatballs
Sweden was requested for me to feature on the blog by three separate readers, and amongst them it was specifically requested that I should post up some vegan Swedish meatballs. I did a lot of research at the recipes that were already out there and none of them seemed like they would be quite what I was looking for - so I devised my own. They were absolutely delicious, although I won't lie to you and tell you that it was just like eating actual meatballs. Delicious in their own right! Check out the recipe here.

Jansson's Temptation
Finding good vegan-appropriate recipes from Sweden was difficult. The food is heavy on meat (especially fish) and cream. So, in order to experiment with Swedish savoury dishes I have to do a bit of adapting. This Jansson's Temptation is the ultimate adaptation! The original dish is a creamy potato bake flavoured with sprats (a salty preserved fish similar to anchovies). I made this creamy and rich vegan version using capers instead to give the little bursts of tangy salty flavour. It turned out great and is going into my regular meal repertoire. Check out the recipe here.

Cardamom Braid
One thing I certainly did plenty of when cooking Swedish dishes this month is baking bread! This cardamom braid was fantastic, I am definitely going to make it again. It's also a very easy, no-need-to-knead recipe, which makes it a good choice for first time bread makers. Check out the recipe here.

Garlicy Field Mushrooms with Rödkål 
Rödkål was also requested to me by a reader, and I was happy to oblige! Rödkål is a delicious sweet and sour cabbage and apple dish which is quick and easy to prepare. I felt, however, that an accompaniment was in order so that I wasn't just sitting down to lunch to eat a bowl of cabbage! The juice garlic field (portobello) mushroom was the perfect partner and it made a great lunch! Check out the recipe here.

~Sweet~

Chokladdarraksbolls
Chocolate balls, or chokladdbolls, are (according to the internet!) a common sweet from Sweden. When I first read about them I knew I definitely wanted to include them this month! However, then I read about Arraksbolls, balls flavoured with arrak, an aniseed flavoured spirit. I couldn't decide which ones to make! Then I realised I didn't have to decide - I just made Chokladdarraksbolls :) Chocolate balls flavoured with aniseed. Easy and delicious. Check out the recipe here.

Cranberry and Almond Semla
One thing that my friend who had recently visited Sweden raved about was Semla. Cream buns filled with almond paste or lingonberry jam. So I knew that I had to give it a try - although my version is far from anything you are likely to find in Sweden, I imagine! Firstly, I substituted vegan cream of course, secondly, I don't actually like almond paste and I can't buy lingonberry jam anywhere near me! So I used chopped almonds and cranberry sauce instead. They were delicious, even if a little removed from the traditional dish! Check out the recipe here.

Kladdkaka
Last but definitely not least! This was my favourite of all the Swedish desserts, although it's a tough call! But I'm a sucker for a chocolately, rich, gooey cake! This cake is a bit like a big round brownie. The idea behind kladdkaka is that it is slightly undercooked, which makes the inside deliciously gooey whilst the edges are cooked and chewy. To me it is perfection on a plate and I couldn't recommend it more! Check out the recipe here.


So, that's all of them! Tell me, what did you think of Sweden Month? Which dish do you think looks the best?

So - What's next?

Next month I'm glad to announce that I'll be heading back to the middle east and featuring dishes from the wonderful cuisine of Afghanistan! I'm really excited about this one, I can't wait to try their dishes and share them with you as I go! Normally I try to be a bit organised and have something already cooked and photographed so that I can give you a sneak peak, but I haven't managed that this time. So - here is a hint at what you're going to be seeing a lot of this month!


Garlicky Field Mushrooms with Rödkål (Swedish Sweet and Sour Cabbage)


It's time to shed a tear and close another chapter on the wonderful world food challenge. This month I have been learning so much about cooking Swedish food - a cuisine I had never even thought about cooking before. I've discovered some amazing dishes which I never would have known about - so thank you to Zane (and the 2 other people) who requested Sweden to be featured

I'm ending the month with a real gem, it's easy to prepare and makes a fantastic lunch, or dinner (just add some steamed green to the side and you're done for dinner!). I'm posting it at the very last minute this month, because it was a late addition. Rödkål was requested of me by a reader who particularly loved my Smörgåstårta, so I obliged with a version of my own.  Rödkål is very simple -it's red cabbage with vinegar, red wine, brown sugar, apple and some spices. Very easy.

I've chosen to use ground caraway in this recipe, so that the caraway flavour is more evenly incorporated into the dish. You can also used caraway seeds in it's place, which will change the dynamic slightly as you will get little bursts of caraway flavour as you chew the seeds. Both options are nice. I have also included the caraway  in this dish because it has carminative effects, making it the perfect partner with cabbage. However, if you're still worried about the gassy nature of cabbage then you should accompany this dish with some of my Cabbage-is-my-friend Tea, which I devised back when I was doing Croatia Month and eating a LOT of cabbage!

I have to thank my amazing friend Oscar who lives in Sweden - not only for being a sounding board for my ideas on Swedish dishes, but also for sending me fantastic Sweden themed cooking aids for my birthday!


Finally, I decided that rather than sit down and eat a bowl of tangy sweet and sour cabbage (it is more suited to a side dish than main meal), I would need something to accompany it. Mushrooms are a perfect choice because all the things that go fantastically well with mushrooms are already in the cabbage (balsamic vinegar, red wine), so it was a logical pairing. It was delicious - you really must eat it with the mushroom because the compliment each other perfectly!

Ingredients
Don't worry too much about quantities, just add more or less of whatever you like until you get it the way you like it!

Rödkål
1/4 red cabbage, cored and shredded
1 large green apple, peeled, cored and sliced.
1 cup red wine
3 tbsp balsamic vinegar
2 tbsp brown sugar
1/4 tsp ground cloves
1/2 tsp ground caraway

Mushies
4 large field mushrooms (also called Portobello)
2 medium cloves garlic, peeled and sliced
2 tbsp nuttelex (or other non dairy margarine)
Salt and pepper to taste


To Make
1. Preheat an oven/grill to 150 degrees.
2. Place all the ingredients for the rödkål in a saucepan and cover with a lid. Place over a medium heat and simmer for about 40 minutes.
3. While that is cooking, wash your mushrooms and trim any of the stem that is woody and tough.
4. Cut about 8-10 slits in the top of your mushrooms and insert the slices of raw garlic, you may have to cut out a little wedge of mushroom in order to fit the garlic slices in.


5. Melt the nuttelex in a frypan and lightly fry the mushrooms for a few minutes on either side. 
6. Prepare a baking tray with a spray of cooking oil or with a sheet of baking paper. Transfer the mushrooms to the tray and bake in the oven for about 15 mins.
7. Place a mushroom on each plate, season to taste with salt and pepper and then pile it up with a big heap of rödkål.

Serve immediately, serves 4.


This month I'm featuring lots of amazing recipes from Sweden!
Check out my other Swedish recipe posts:


Thursday, 30 August 2012

Vegan Kladdkaka (Gooey Swedish Chocolate Cake)


Only 2 days left of August! The year is going by so fast, we're almost into all the months that end with "ber" and to me that means that Xmas is practically here. There are also only 2 days left in Swedish Food month on this blog, which is sad in a way - although I'm sure my body won't mind eating less carbs, rich foods and chocolatey creamy desserts! It is just as well that Sweden month fell in winter, as I'm not sure how I would have coped with the rich and heavy foods during Sydney's summer months!

I've left my favourite Swedish dessert of the month until last. It's absolutely deliciously decadent! Kladdkaka is essentially a rich chocolate cake which is left slightly undercooked, so that the outer edge is chewy like a brownie and the inside is still gooey. It is very easy to make and is one hell of a fantastic comfort food! It's just like a big gooey chocolate brownie. What is not to love about that?

Ingredients
1 1/2 cups wholemeal flour
1 1/2 cups sugar
1/4 cup almond meal
1/8 tsp nutmeg
150g nuttelex (or other non dairy margarine)
2 tbsp golden syrup
1/2 cup almond milk (you can sub soy milk)
100g dark chocolate (vegan variety), chopped up
Chopped almonds to garnish (or other nuts if you like)

To Make
1. Preheat the oven to 180 degrees.
2. Combine the flour, sugar, almond meal and nutmeg in a large mixing bowl.
3. Put the nuttelex and golden syrup in a saucepan and put over a low heat to melt.
4. Stir in the almond milk and heat until it is almost simmering, the milk should be hot but not simmering.
5. Remove from the heat and stir through the chopped chocolate. Stir continuously until all the chocolate has melted.
6. Pour the chocolate mixture into the dry ingredients and mix well.
7. Grease a 22-23cm springform cake tin and line the bottom with greaseproof baking paper.
8. Pour the batter into the tin and bake for 20-22 minutes. The edges should be cooked and a skewer/knife should come out clean when inserted. The middle will be gooey.
9. Allow to cool a little. Sprinkle with chopped nuts. Can be eaten warm or cold, great served with vanilla ice cream.

Makes 1 cake.

~TIPS~
~ Remove the sides of the springform pan and then just serve it still resting on the base. As the middle is gooey it is not very stable and your cake may not respond well to being moved, so just leave it on the base to serve.


This month I'm featuring lots of amazing recipes from Sweden!
Check out my other Swedish recipe posts:


Wednesday, 29 August 2012

Swedish Cardamom Braid (No Kneading Needed!)


I love making my own bread. It feels so homely and satisfying! However, it also takes a bit of practice to get it right unfortunately. One of the things that I always used to struggle with is finding a nice warm spot in which to let the dough rise. If you also find this difficult then you should check out the solution that I've developed here. But if you have always shied away from making bread because you think it might be too hard - then this is the bread for you. It has no kneading involved, doesn't actually need to rise and it absolutely delicious.

Sweden has been a rather 'bready' month for me actually! I began by baking my own bread for the absolutely fantastic Smörgåstårta (click on that link just to check it out - seriously you'll be missing out if you don't!) and then I made my own little cardamom buns for the lovely Cranberry and Almond Semla. So this is the third bready instalment for this delicious month. I thought it was particularly delicious and I will be definitely making it again! I think I might trying to put some nuts or seeds in it next time to give it some crunch, or perhaps some dried fruit to make it a fruit loaf.

This recipe actually isn't mine, one of the very first recipes I've put up here that I haven't created myself. I found the recipe here when doing research for Swedish food month. I made some minor changes, but it is largely the same because I tend not to mess too much with bread recipes. If you start to diddle with the quantities of things or add or remove too many things then you run the risk of it simply not working.

Ingredients
Adapted from Vegetarian Times
2 cups almond milk
2 tbsp flaxseed meal
1/4 cup agave nectar
1/3 cup canola oil
1 tbsp dried yeast
1 tsp salt
2 tsp ground cardamom
5 1/2 cups unbleached white flour

To Make
1.Stir together the almond milk, flaxseed, agave nectar, canola oil, yeast, salt and cardamom together in a non reactive bowl.
2. Add flour and mix well with a wooden spoon. Cover with plastic wrap or a lid and leave to rest at room temperature for 4-6 hours. You can refrigerate it after the first few hours if you want, but I didn't find it necessary.
3. Line a baking tray with greaseproof paper.
4. Turn out the dough and divide into three equal portions. Roll into thick ropes about 40-50cm long.
5. Move the three pieces of dough onto the lined tray side by side. Pinch the ends together at the top and braid the ropes together, pinching the ends together when you get to them.
6. Cover the braided loaf with a tea towel and leave to rest for 30-40 mins.
7. While it is resting preheat the oven to 190 degrees C. Bake for 30-45 minutes, or until nicely golden on top.

Makes 1 loaf.


This month I'm featuring lots of amazing recipes from Sweden!
Check out my other Swedish recipe posts:


Tuesday, 28 August 2012

Vegan Jansson's Temptation (Creamy Potato Bake)


Jansson's Frestelse (Jansson's Temptation) is a Swedish potato bake which is traditionally flavoured with sprats, which are a type of salty preserved fish. In most Anglicised versions of this dish the sprats are replaced with anchovies (much more readily available). However, this is a vegan version - so it obviously doesn't use either sprats or anchovies. In their place I have used tangy salty capers, which were absolutely delicious - even if they're not that authentic!

A creamy potato bake is something which is generally missing in a vegan's repertoire! So, it's nice to have created this one to fill that void! It's delicious! Creamy potato with bursts of tangy capers all flavoured with a sprinkle of dill. Try this - it's easy and very satisfying!


Ingredients
1 kg potatoes, peeled and sliced (1 cm width)
1 lg onions, thinly sliced (still round)
400g silken tofu
1 cup blanched almonds (soaked in water for 30-60 mins, then drained)
1 clove garlic, crushed
4 tbsp lemon juice
1/2 tsp salt
1 tsp arrowroot
Pinch of nutmeg
1 1/2 cups almond milk
2 tbsp chopped dill
1/3 cup capers

To Make
1. Preheat the oven to 180 degrees.
2. Combine the the almonds, garlic, lemon juice and 1/2 cup almond milk in a food processor. Process until smooth and the almonds aren't gritty.
3. Add the tofu, salt, nutmeg, arrowroot and the rest of the almond milk. Process to form a smooth creamy sauce.
4. Layer half the sliced potatoes on the bottom of a large baking dish. Top this with a layer of the sliced onions.
5. Sprinkle the capers and the chopped dill over the top of the onions. Layer the remaining potatoes over the top.
6. Pour the creamy sauce over the top of all of it, covering all the potato evenly.
7. Cover with aluminium foil and bake for 20 minutes, or until the potatoes are tender to pierce.
8. Remove the foil and bake for another 5-10 minutes or until the top is browned (if you have an oven with elements that separate then you may wish to switch it to a "top-only" setting to aid this). Serve.

Serves 4, or 6 as a side dish. Perfect to bring to a family gathering or a potluck!


Sunday, 26 August 2012

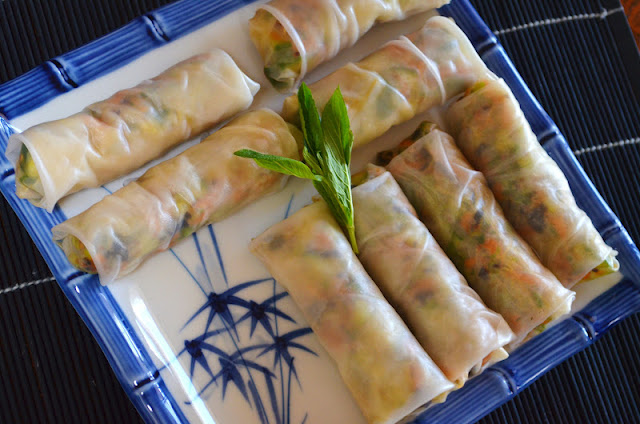
Salad and Seaweed Rice Paper Rolls


Things are starting to warm up a bit here! The sun is out most days which is incredibly exciting. Of course, spring isn't quite here yet, the evenings are still pretty chilly and being anywhere except directly in the sun is far from warm. I'm such a sucker for spring though, and therefore I have completely over reacted to this mild sunny weather. The other day I woke up and the sun was out so I joyously donned a t-shirt. It was a silly idea, I ended up putting a big jumper over it.

Similarly I have completely moved into a summer foods frame of mind since the arrival of the sun. For me summer means salads, chilled soups, fruit salads, daiquiris, ice tea and rice paper rolls. Yum! Bring on that summer! So today when thinking about what to have for lunch I went straight to a summer favourite - rice paper rolls (also called Summer Rolls). Summer rolls are a wonderful avenue of creativity because you can put whatever you like in them (check out my Cambodian Ginger Tofu Summer Rolls).

These rice paper rolls are a bit different to the norm. I essentially just made a shredded salad and then rolled them up in rice papers. The idea behind this was that you can just dress the salad and then you won't need to make a dipping sauce with them, which just saves a bit of hassle (and ultimately saves you throwing out half a bowl of dipping sauce because you invariably have to make too much!). It worked perfectly, the rolls are juicy and delicious on the inside of a neat little bundle of noodle.

I recommend these highly as a tasty entrée, savoury afternoon tea or a lunch for one. If you want to double the recipe they'd be great as part of a picnic, or just a lunch for two :)

Ingredients
8 rice paper rolls
1/2 cup shredded baby cos lettuce (or use other firm lettuce)
1 carrot, grated
1 cucumber, finely diced
1/2 cup alfalfa sprouts, separated with your fingers (so they don't clump)
1 sheet dried nori seaweed (the kind you make sushi with)
2 tbsp chopped fresh mint
1 tbsp white sesame seeds
Juice of 1/2 lime
1 tbsp soy sauce
1 tsp sesame oil
1 tsp rice wine vinegar

To Make
1. Combine the lettuce, carrot, cucumber, alfalfa sprouts and fresh mint in a bowl and mix together well.
2. Finely shred the nori seaweed and mix through the salad.
3. Add the lime juice, soy sauce, sesame oil and rice vinegar and stir though. Set aside while you prepare your other things to let the dressing soak into the ingredients.
4. Lightly toast the sesame seeds in a non stick saucepan for about 30 seconds, or until browned (do not take your eyes off them or they will burn!). Allow to cool and then mix through the salad.


5.  The packet of rice paper rolls will most likely have instructions on the back on how to use them, you can follow these (and skip ahead to step 7). If yours doesn't - here is what you do:
6. Get a deepish dinner plate and fill it with boiling hot water. Carefully slide your dry rice paper roll under the water (don't just place it on top - this will make it curl up) and leave in for about 5-10 seconds. Carefully pick it out and spread it out on a board ready to roll. You will find that as the water in your plate cools down a bit you will need to leave them in for longer to cook properly. You will probably have to replace the hot water after every 3-4 rolls.
7. Now you have your rice paper ready add about 2 tablespoons of the salad to the middle of the bottom of the paper.


8. Roll the bottom of the paper over the filling and then fold in the sides. Continue to roll until it is all together (like you would roll a spring roll, or a cigar - because we all roll cigars all the time!).
9. Repeat for the other 7 rolls.

*TIPS*
~ Stir the salad before making each roll, this ensures that the dressing doesn't just sink to the bottom to make the last roll very soggy and juicy
~ When I fold the sides of the rice paper roll in during the rolling, I always taper the fold inward slightly, so that it forms a nice neat roll with no untidy bits on the sides
~ These are best eaten the day that they are made (preferably within a couple of hours of having been made)
~ If you want to make these slightly more filling you can add a slice of avocado to each roll -yum!

Makes 8 rolls.

Thursday, 23 August 2012

Vegan Lingonberry and Almond Cream Buns (Swedish Semla)


I recently had the pleasure of catching up with a good friend who I hadn't seen for years! Amy and I constantly miss each other because we are both travel fanatics, so it seems that one of us is always overseas. Luckily we managed to find a time to finally have lunch together, and not surprisingly, we talked most of the time about travel.

Amy, conveniently, had spent six months studying in Sweden - so I was able to pick her brain a bit about Swedish food - which was well timed because August is Swedish food month on Gormandize. It has thus far been a delicious exploration of dishes - see the links at the bottom of this post for other recipes. Most of my past recipes have focused on the savoury side of Swedish cuisine. However, not including some amazing desserts would be doing Sweden an injustice, as Amy reports that the Swedes "have an insane sweet tooth".

During our catchup Amy raved about Semla. Cream buns filled with almond paste which are eaten in Sweden only during certain times of the year. Reportedly (by wikipedia - so likely it's false) King Adolf Frederick of Sweden died in 1771 of indigestion after consuming a feast which included fourteen servings of semla!


This recipe is dedicated to Amy then, and to all Swedes! I hope I did it justice - however, I have made some slight changes from the traditional. Firstly, I don't actually like almond paste - so there was no way I was going to put it in my buns, so I did something very un-traditional and opted for chopped almonds instead. Another fabulous friend of mine who lives in Sweden told me that sometimes Semla can be filled with lingonberry jam. You might not find it that easy to find, though. I am told that the best substitute is cranberry sauce, as it is tart and traditionally used in savoury dishes (as is lingonberry jam). So I went with Almond and Lingonberry Semla filled with vegan whipped coconut cream.

For a more authentic dish, fill with marzipan. 

Ingredients
(Adapted from The Vegan Swedes)
75g Nuttelex (or other vegan margarine)
250ml almond milk
1 tbsp dried yeast
1/4 tsp salt
1/4 cup sugar
1 tsp ground cardamom
2 3/4 cups plain white flour
1/4 cup whole almonds
8 tsp lingonberry jam (can substitute cranberry sauce)
1 can coconut cream, chilled in the fridge overnight (minimum- a few days is optimum)
1 tablespoons soft confectioners sugar

To Make
1. Melt the nuttelex in a small saucepan and add the almond milk. Heat until just warm and then remove from the heat. Add the yeast and set aside for a few moments.
2. Add the salt, sugar, cardamom and mix though.
3. Add most of the flour and mix through. Add enough of the flour that the dough clings together and doesn't stick to the bowl (don't add too much).
4. Cover with a cloth and leave to rise for 45 minutes in a warm spot with no draught (not sure where this spot is or how to make it happen - read this post to get it right every time).
5. After 45 minutes it should have doubled in size (if not leave a little longer). Turn out onto a flour bench and gently knead it (add more flour if it is still sticking to your fingers).
6. Divide into 8 even round buns. Place on trays covered with baking paper, with plenty of space in between for them to rise again.
7. Cover over with a cloth and leave again in your nice warm spot for another 45 minutes, they should rise again to almost double their size.
8. Bake in an oven at 220 degrees C for 5 minutes, turning them halfway to ensure even cooking.
9. Remove and cool completely.
10. While they are cooling you can whip the cream -


Coconut Cream Topping:
1. When you open the tin you will notice that the top is a very solid thick cream. Scoop out all of the solid thick cream on top (you can reserve the rest of it to use in another meal – like a curry).
2. Put the thick cream into a bowl and mix well using a hand held electric mixer. Move the beaters up and down to try and get as much air into the cream as possible. Add the sugar and beat until it pretty much resembles thick cream.


11. Once the buns are completely cool, cut the tops off and scoop out the middle crumbs.
12. Chop up the almonds and mix them with some of the crumbs that you scooped out the middle.
13. Place a teaspoon of lingonberry jam in the cavity of each bun. Top this with as much of the almond and crumbs mix that you can cram on top.
14. Place big dollops of whipped cream on the top and place the top of the bun back on. Dust it with icing sugar and eat with joy!

Makes 8 Semla, best eaten on the day you make them.


Monday, 20 August 2012

Sugar-free and Vegan Raspberry Fudge


I'm trying my best to cut back on sugar these days. Not completely eradicate, just reduce my intake! It's tough because I have a habitual sweet tooth after dinner. Once I've finished eating my dinner my brain immediately switches to "right, what is for dessert". Normally that would be one of whatever batch of cupcakes I have recently made, but I'd like to kick that habit in favour of something without wheat and sugar! So I've been experimenting with sugar free and wheat free healthy treats - and this one is a winner!

It's a winner because it's easy, quick, delicious and both sugar and wheat free! You can watch this space for a lot more fudge too - because now that I have this basic recipe I'm going to be experimenting with a lot of different flavours! I'm thinking my next may be chocolate and pecan, or maybe chocolate peanut butter swirl, or maybe lime and coconut. Haha, I can't decide - what should I make? :)

This fudge is not super sweet - which is how I like it. But if you like your fudge sweet then you can add some sweetener to it, such as stevia or agave nectar. But try the original first, as all the people I gave it to commented that they liked the fact that it wasn't as sweet and sickly as regular fudge.


Finally, this post is part of the Sweet Adventures Blog Hop's "Berry Nice To Meet You" Hop, so click on all the thumbnails below the post to check out everyone else's inspiring berry desserts. Plus a thank you to the fabulous Christina at The Hungry Australian for hosting.


Ingredients
2 cups dessicated coconut, unsweetened
1 ripe banana (the more ripe the better), chopped
1 tsp vanilla extract
1 pinch cinnamon
3/4 cup whole fresh or frozen raspberries

To Make
1. Put the coconut in a food processor and churn to make coconut butter. The length will depend on your food processor. If you have a regular food processor it should take about 10-12 minutes. If you have one of those super fancy new-fangled type ones then I think it will take about 5 minutes (I only have a standard food processor - so mine took about 12 minutes). In any case just keep an eye on it, scrape down the sides regularly and then stop it when you have a mixture about the consistency of peanut butter. Note: if you do it for a bit longer it will turn runny - this is fine too, as it will set later the same consistency).
2. Add the vanilla, cinnamon and chopped banana and process again until it makes a thick but smooth paste.
3. Remove the blade and stir through the raspberries with a spoon - gently, so that they stay as whole as possible.
4. Take a smallish square container (plastic is fine - I hypothesise that silicone would be great as it will be easier to get the fudge out of) and spoon the fudge into it. Press it down with the back of a spoon as if it were a slice and smooth it over on the top.
5 Put in the freezer for 10 minutes.
6. Remove, slice and eat. 

A perfect after dinner snack!


Sunday, 19 August 2012

Vegan Swedish Meatballs


I apologise - this is not the best photo that I have ever posted! The main reason behind this is because I cooked these for a dinner party which meant that a) it was evening when I finished them - so the light was bad, and b) we just wanted to eat it and not wait around while I took glam shots. It's just meatballs with 'creamy' gravy anyway, so not the most glamorous subject to photograph!

When Sweden was requested as a country I was specifically asked to create a vegan meatball recipe, and here is my best shot! There are a couple of recipes on the net for vegan meatballs, I looked around a bit as I started. But none of them really looked good to me. Most of them were basically meatball recipes which used some sort of vegan "mince" product - i.e. heavily processed soy or TVP which generally costs more than actually buying meat. I prefer something a bit more original and a little less processed. I did find one recipe that used black beans, which I'm sure would have been delicious but I don't think would have been quite the right texture.

What I ended up was a completely original concoction which made surprisingly delicious meatballs! I'm not going to lie to you - they don't have exactly the same texture of meat meatballs. I'm not sure anything would have the same texture as meat meatballs. What I can say is that they were delicious! They also held together perfectly when I rolled them and fried them even with absolutely no "egg substitute", which just shows that you don't need one! Swedish meatballs are traditionally served with a creamy gravy, which I have managed to adapt here using almonds to create the creaminess

Nutmeat! In case you haven't met it yet!

I used nutmeat as one of the main elements of my meatballs. I'm not sure how familiar people out there are with nutmeat - I remember my father (not a vegetarian!) used to make a delicious vegetarian nutmeat bolognaise which I love so much that I preferred it to meaty bolognaise even as a child. It has a great flavour, and is very adaptable into any recipe in which you might use mince meat.

I love nutmeat. In fact, while I was living overseas in China, nutmeat was pretty much the only thing that I couldn't get my hands on. So, when my wonderful friend Paul came to visit me in the Middle Kingdom I asked him to bring me some nutneat so that we would make bolognaise. He carried the tin of nutmeat through Thailand, Vietnam and Laos before it arrive in China with me, a well travelled tin of nutmeat! If you'd like to see the photo journal of this then check it out here!


Ingredients

The Meatballs
1 x 415g can of nutmeat
1 cup burghul
1 1/2 cups boiling waters
1 tsp 'beef' stock powder (use a vegan brand, like Massel)
1 onion, diced
1 large field mushroom (about 150g), chopped
3 slices wholemeal plain bread
2 tsp nutmeg
1/2 tsp ground cardamom
1 tsp cracked black pepper
1-2 tbsp chopped continental parsley
1 tbsp soy sauce
Spray of vegetable oil for cooking.

The Gravy
1/3 cup vegetable oil
1/3 cup flour
3 cups boiling water
2 heaped tsp 'beef' stock powder (Massel)
1 tbsp soy sauce
1/4 cup blanched almonds, soaked in cold water for an hour or two and then drained
Juice of half a lemon
Pinch of nutmeg

To Make:
1. Mix burghul and stock powder. Add boiling water and leave for 15 minutes.
2. Pulse bread in a food processor to form fine soft breadcrumbs. Put in a mixing bowl.
3. Sauté onions and mushrooms in 1-2 tsp water until the onions are soft and transparent. Process in the food processor briefly and then add to the mixing bowl.
4. Process the nutmeat until it is a mince like texture. Put in mixing bowl.
5. Process the soaked burghul for 1-2 minutes and then add that to the bowl as well. Add the spices and parsley and mix well with your hands.


6. Form into meatballs with your hands. It should make about 35ish walnut sized meatballs.
7. Fry in batches until browned and then transfer to a baking/casserole dish.
8. Then, make the gravy:
9. Puree the almonds with the lemon juice until it forms a smooth paste.
10. Heat the oil in a small saucepan. When hot, add the flour and stir well. Cook for 2-3 minutes, stirring frequently.
11. Add the stock powder and they soy sauce to the boiling water. Add this a little at a time to the flour in the saucepan, stirring vigorously the whole time to prevent lumps forming. Continue until you've added all the water. Add the pureed almonds and stir well. At your own discretion you can add more water if you want to make it thinner.
12. Pour the gravy all over the meatballs and serve immediately.

Serves 4-5 people.


This month I'm featuring lots of amazing recipes from Sweden!
Check out my other Swedish recipe posts:


Wednesday, 15 August 2012

Roast Pumpkin & Chickpea Salad with Nasturtiums


The weather has really started to warm up during the day here lately, which has been so lovely! It's almost enough to lull you into the notion that spring has arrived (cue sudden cold snap). It's also made me really start to feel like eating salads again! This coincides nicely with the Eat The Alphabet blog challenge - which this month is featuring vegetables and grains which start with the letters M, N and O.


There are a lot of choices for M, N and O - so I'm sure we're going to see a great variety of recipes. I wanted to take the opportunity to share an ingredient that I've always loved, but many people don't even know about - Nasturtiums. I always remember having nasturtiums in the garden as a kid, it was fun to know that some of the plants were edible and that we could use them when we were playing and actually eat them!

I've never seen nasturtiums for sale at any green grocers, but they are incredibly easy to grow and they thrive on neglect. You can buy seeds at any garden centre or from many places online - they are a great addition to your salads especially since they're not readily available - so are a great thing to serve for guests. You'll probably want to plant them somewhere contained, otherwise they will spread all over your garden. Here is a picture of them in my veggie garden:


The best thing about nasturtiums is that you can eat the leaves and the flowers - so they make your salad very pretty. Nasturtium leaves have a slightly peppery taste, so start with a few and add them to your own taste. If you can't buy or grow nasturtiums then you can use baby spinach in this salad instead, it won't taste the same - but it will still be nice!

Ingredients
1 1/2 cup cooked chickpeas (soaked for 24 hours, rinsed, boiled and drained OR a tin of chickpeas which has been drained and rinsed)
400g pumpkin, peeled, chopped and roasted for about 20 minutes (will vary depending on how big you chopped it)
150g penne pasta
4 tomatoes, chopped
1/2 cup pepitas
Generous amount of nasturtium leaves and flowers
2 tbsp grapeseed oil
1 tsp agave nectar
1 tbsp wholegrain mustard
1 clove garlic, crushed (optional)
1 tbsp soy sauce (or more to taste)
Cracked black pepper to taste

To Make
1. If you haven't already done so, cook the pre-soaked (for 24 hours) chickpeas (unless using canned) until tender, drain and rinse under cold water. If using canned, drain and rinse well. Similarly, roast the pumpkin as above and allow to cool (or use warm).
2. Bring a pot of water to the boil and boil the pasta until al dente - this is usually 1-2 minutes less than what the packet says. Drain and rinse with cold water.
3. Combine the pumpkin, chickpeas, pasta, chopped tomatoes and nasturtium leaves in a bowl. Toss.
4. Heat a small frypan over a high heat. Add the pepitas to the dry saucepan and toast for 2-3 minutes, stirring/tossing often. They will puff our slightly and start to brown. Keep your eye on them at all times, as they burn quickly. Once toasted take of the heat and allow to cool.
5. Combine all the remaining ingredients in a small bowl or jar and mix/shake well to make the dressing.
6. Add the cooled pepitas and the dressing to the salad and mix well. Serve immediately, placing the nasturtium flowers on top before serving.

Serves 4


Tuesday, 14 August 2012

Nutmeat travels though Asia to get to my belly! - A Photographic Diary


I might have mentioned before that a couple of years ago I was living in China, studying and generally experiencing a whole different culture! As I've been posting other photo diaries lately about my travels in relation to food (check them out here, here and here if you like), I though I might share this lovely story with you.

The food in China was very variable - there was a lot of pretty ordinary and not very nice stuff around, but after living there for a while I got to learn what to order and what not to order. After finding my feet I found a lot of amazing food, but living there for an extended amount of time meant you end up just wanting to cook for yourself - some of the basic and staple things that remind me of home, like pasta and minestrone soup!

Luckily we rented an awesome apartment which had a small but excellently functional kitchen! So we bought a couple of pots and pans and started to cook a lot of our own meals, which was nice - and much cheaper overall. My fun flatmate Emily and I were able to buy almost anything we wanted in the foreign section of the supermarket - most importantly pasta! We also experimented with some unusual fusion (like making ravoili with fresh oyster mushrooms and wonton wrappers)!

Our little green kitchen - so many good memories
After almost a year abroad and away from the things I usually eat I started to miss something which I most certainly couldn't buy in China! That was nutmeat. I don't know how many of you know much about nutmeat. My father used to make a fantastic nutmeat bolognaise when I was a kid which I loved more than meaty bolognaise - and now I make it for myself all the time! After almost a year of noodle soups, rice and stir fried vegetables, I just had a hankering for some nutmeat bolognaise!

Luckily my best friend Paul was coming to visit me, and he asked me if I had anything I'd like him to bring over from home. Yes, Nutmeat!

So, Paul (who is awesome) packed himself a tin of nutmeat and took it on a trip through Asia to get to me! He travelled from Sydney through Thailand, Laos, Vietnam and South China before meeting me in Hangzhou and staying with us. He carried the nutmeat all the way and boy did that nutmeat get to see some sights!! That tin of nutmeat was more well travelled than half the people I know, and here is a photographic diary of it's journey!

NOTE: These aren't the greatest photos, they were taken with a camera phone along the way. Special thanks to Paul!

Packed and ready to see the world!!


Blurry pic of the nutmeat on the long distance bus


Tucking in for the overnight train


After the Nutmeat finally arrived in Hangzhou, where I lived, we showed it a good time. We took it to karaoke.....


Then I thought I we might actually eat it.....


But then we realised something that temporarily cramped our style.... we didn't own a tin opener! Time to improvise....


Ha! Nothing holding us back! Now to cook it....


And guess what? It was DELICIOUS!!! Yes!!


Yep - you won't find this dish anywhere else in China!! Thanks Paul!!

NOTE: This is not commissioned or endorsed by Sanitarium in any way! But they're welcome to send me some money anyway haha!