Friday, 30 November 2012

Indonesian Cuisine: Vegan Indonesian Recipes


Salam! Apa Kabar? I hope you've been enjoying the feast of Indonesian inspired food this month as much as I have. November has been all about Indonesia, so I'll recap all the great recipes for you! Sadly I didn't get to make all the ones that I had planned, I actually went out to China Town and especially tracked down some pandan extract to use in a couple of recipes - and then I didn't get time to make them! So you'll probably be seeing some pandan recipes appearing on the blog fairly soon.

Ingredients of the month: coconut, chilli, green beans, shallots and peanuts!


~Savoury~

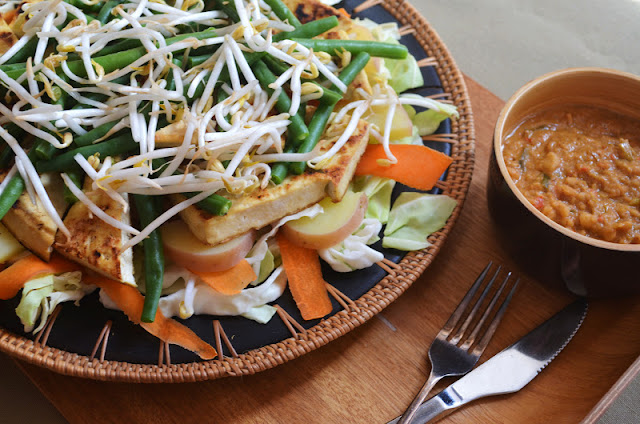
Gado Gado
A classic Indonesian salad of crisp vegetables covered in spicy peanut sauce. This salad was a huge hit with dinner guests, and very quick to prepare. Check out the recipe here.

Acar Kuning
Brightly coloured fresh vegetables cooked in a zingy sauce which is hot, sour and sweet? Oh, and yellow! This stir fry vegetable dish is quick and easy to make and well worth the (minimal) effort. Check out the recipe here.

Rujak
Rujak is an Indonesian fruit salad with a spicy chilli syrup dressing. Right up my alley, but I could never find anyone to tell me if it was meant to be served as a savoury dish or as a sweet? I took a punt with mine and served it with the savoury, hence my including it in here! But if anybody knows then I'd love you to let me know! Check out the recipe here.

Lawar Ayam
This fresh and light bean and coconut salad was made possible by my amazing coconut grater that I bought in Sri Lanka. I love it, even if it looks a bit like a torture implement (photos in the post). I'm glad, because this salad was worth a bit of effort. Check out the recipe here.

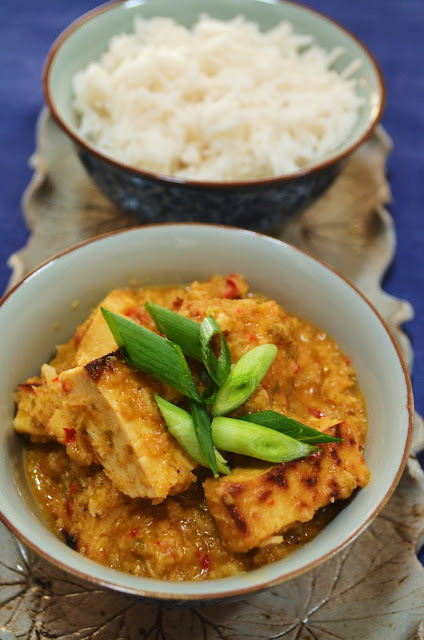
Rendang Tofu
My version of a classic Indonesian curry, I made some changes to the traditional methods and the result was fantastic. This meal is going into my regular meal rotation! Check out the recipe here.

~Sweet~

Triple Threat Coconut Cake
Given how much coconut was going around this month, I had to include a vegan coconut cake. "Coconut Cake" might sound a little bit plain, but I can assure you - not this one! It has three types of coconut in it and then some smooth sticky coconut glaze drizzled on top! This is not just coconut cake - it's COCONUT cake! Check out the recipe here.

Longton Paris
I'm not sure where this tasty treat gets it's name, but I do know where it belongs - in my tummy. It's a tough call but I think this was one of the standout recipes of the month. Melt in your mouth vanilla biscuits dipped in caramel and coated with chopped peanuts. I decided to use salted peanuts, so you get a salted caramel hit into the mix. I couldn't recommend these more! Check out the recipe here.

Jus Alpukat
A fresh avocado milkshake was recommended to me as a must try of Indonesian recipes - although I have to admit some apprehension. I wasn't sure if I was going to like it, and the first taste was a bit of a hurdle. But after than I was draining the glass and going back for more. It's perfect for the hot summer we're heading into! Check out the recipe here.


So - what did you think of Indonesia Month? What looks the best?


So, What Next?
Next month I have had a reader request to feature the cuisine of Southern USA. I'm glad he specified, because just doing "USA" would be a big task! I'm sure my American readers will enjoy seeing what I come up with for this one!

Rendang Tofu


I have something to celebrate today - this is my 200th blog post! *Fireworks*

I'm so glad that I'm celebrating with this recipe, as well, because it was one of my absolute favourites from Indonesia Month. It's Rendang Tofu, with a few slight changes. Rendang is traditionally made with meat, cooked in a curry sauce thickened with ground coconut and cooked down until it becomes very dry. Clearly, I've made mine with tofu. I also replaced the toasted dried coconut with fresh coconut (because I had a fabulous coconut grinder) and because it was such lovely fluffy fresh grated coconut I just didn't want to grind it up in the food processor, so I didn't. Finally, I didn't actually cook this dish down as much as I could (as you can see from the picture it's not that dry). This was for 2 reasons, 1) I was impatient to eat it because it looked SO yummy and 2) cooked down and dry doesn't sound that appealing to me. But you could easily cook it down another 40-60 minutes to make it dryer if you want to.

Despite (or maybe because of?) all the changes I made, it was quite spectacular. It was definitely a highlight of my Indonesian dinner party and one that I will definitely be making again - although next time I'll probably be making it with the dried coconut so that I don't have to spend time grating a fresh one! However, if you are substituting dried coconut you will probably end up with a thicker dryer sauce without increasing the cooking time, as the dry coconut will absorb some of the liquid.


Ingredients
400g hard tofu, drained
2 tbsp vegetable oil
400ml coconut milk
2 cups vegetable stock
1 cup freshly grated coconut (or substitute 1/2 cup dessicated)

Curry Paste
2 fresh chilli
4 shallots
4 cloves garlic
1 onion
1x 2cm piece of ginger, peeled and chopped
1x 1cm piece of galangal, peeled and chopped
1 lemon grass stalk, while part only (tough outer layers removed)
2 kaffir lime leaves
1 tsp ground coriander
1 tsp ground cumin
1/2 tsp fennel seeds
1/4 tsp ground nutmeg
1 tsp tamarind puree, dissolved in 1/3 cup hot water

To Make
1. Slice the tofu in half both horizontally and vertically, so that you end up with 4 large pieces about 1.5cm thick.
2. Heat the oil in a large wok or frypan and fry the tofu slices, turning half way, until browned on both sides. Drain on some kitchen paper. Chop into bite sized cubes.
3. Combine all the ingredients for the curry paste in a food processor and purée until you have a smooth paste.
4. Reheat any remaining oil in the wok (if there is no oil left, add another tablespoon). Add the curry paste and fry for 2-3 minutes.
5. Add the coconut milk, vegetable stock and tofu to the pot and bring to a boil. Reduce the heat and simmer for 10 minutes. 
6. Add the coconut and cook, uncovered, for at least 10 minutes. You may increase the cooking time by 10-20 minutes if you want to cook down the sauce and make it dryer.
8. Serve.

Serves 4, over rice.

This month I'm featuring lots of amazing recipes from Indonesia!
Check out my other Indonesian recipe posts:

Thursday, 29 November 2012

Lawar Ayam (Indonesian Coconut and Bean Salad)


I secretly wish I could own all the cool cooking utensils which have very limited use. I'm not talking about electrical appliances - I have no desire for large electric stand mixers which take up heaps of bench or cupboard space. Nor do I covet the strange electrical appliances like pie makers, popcorn makers, egg cookers etc - because you don't really need those things, I can bake pies in the oven and I can make popcorn in a saucepan. If I ate eggs I would cook them in a pan. No, I'm not talking about appliances - I'm talking about utensils.

Here is an example - cannoli tubes. I'd LOVE to have some cannoli tubes - so I could make cannoli! But honestly, I wouldn't make cannoli very often and since they have such a specialised use I can only conclude that they would sit in my draw and never get used. I still want them though.

But why am I talking about this when there is a picture of bean salad at the top of this post? Good question. It's because I'm going to introduce you to a very specialised utensil that I bought on my recent trip to Sri Lanka, and I'm so glad that I did! It's a coconut grater. That's all it does, grate coconuts. It might seem excessive to have a utensil just for grating fresh coconut, after all I don't buy them that often. But, if you have ever tried to use a fresh coconut in your cooking before then you'll know what I'm talking about.

The first time I bought a fresh coconut it seemed like such a great idea - they were $1.99 each! I thought, "awesome - we can have lots of things with fresh coconut!". So, I bought it and brought it home - where it proved to be somewhat of a struggle. You might think that getting into the coconut is the hardest part - I admit, it was challenging. As we don't have a machete in our kitchen (mores the pity), we eventually managed to get it open with a hacksaw. But then the real challenge started: how do you get the flesh out?

I once read a recipe on the internet which said: "scoop the flesh out of the coconut". This is laughable, because if there is one thing that coconut flesh isn't - it's "scoopable". The flesh is hard and it very keen on staying attached to the outside shell. I ended up hacking away at it viciously with a knife, slightly dangerous. This yielded some randomly sized chunks of coconut flesh, but I made do with it. But then - the recipe said "grated coconut", so I wasn't finished battling with the coconut yet. My traditional grater was useless against it, it was too hard. In the end I tried it in my food processor, which worked slightly better but the pieces were still too hard for the processor to grate finely.

The whole experience really put me off using fresh coconut in cooking. I hung up my apron and declared "never again!".

Until.... during my trip to Sri Lanka in July of this year, we took a cooking class in Unawatuna. The first thing we did in the class was to grate up some coconut and make our own fresh coconut milk and coconut cream. She had an amazing contraption for grating her coconut which simply worked like a dream (she also showed us how to crack it open without a machete or a hack saw!). Here it is:


I bought one from her on the spot and, despite it looking like some sort of horrible torture device, didn't get any questions from customs on the way home to Sydney. So now fresh coconuts are no longer as daunting, which was lucky - because I found a lot of recipes during my research for Indonesia Month which called for fresh grated coconut. No problem, I thought, I've got it covered!

Grating coconuts with ease in Sri Lanka
This recipe uses fresh grated coconut, courtesy of my coconut grater. However, most kitchens don't contain such a contraption, so you may have to substitute. Fresh grated coconut can be bought in some Asian supermarkets, or you can substitute desiccated - however I recommend steaming it to put some of the moisture back in otherwise your dish will be too dry.

Lawar Ayam

Ingredients
200g green beans, trimmed
1 tbsp vegetable oil
2 shallots, finely chopped
3 cloves garlic, minced
1 red chilli, minced
1 tsp red curry paste
3-4 tbsp water
1 cup fresh grated coconut (probably sub 1/2 cup desiccated, and steam to rehydrate)
Juice of 1 lime
Salt and pepper to taste

To Make
1. Cut the beans into 2 inch lengths and blanch in boiling water until just tender, about 3 minutes. Drain and rinse with cold water until completely cold.
2. Heat the oil in a small frypan and add the shallots, garlic and chilli. Cook for about 4 minutes. Add the curry paste and water and simmer for about 2 minutes.
3. Remove the frypan from the heat and stir the coconut through. Combine this with the cooked green beans in a bowl and mix well. Finally, add the lime juice and season to taste with salt and pepper.

Serve at room temperature. Serves 2, or 4 as a side.


This month I'm featuring lots of amazing recipes from Indonesia!
Check out my other Indonesian recipe posts:


Sunday, 25 November 2012

Rujak (Indonesian Fruit Salad with Chilli Dressing)


When I heard about rujak it went immediately on my Indonesian meal plan. It's everything I love about south east Asian food - fresh, brightly coloured and laced with chilli! An admission though - I cheated a bit. I know, I feel terrible. But the thing is, that I just happened to find a jar in my cupboard that had been sitting up the back unopened for a while. It was labelled Sambal Rujak! Great, makes it easier for me AND uses up one of the many jars in my over crowded pantry!

It still feels like cheating though, and I realise that this may be an ingredient not available to a lot of people. So, for those who don't have an Asian grocer nearby, I have included a recipe for the sambal rujak which comes from the lovely SBS Feast Magazine, which also has a beautiful recipe for Rujak in it's October edition. I'll definitely have to give it a try myself sometime, because I'm sure that making a fresh sauce is much nicer than getting it out of a jar.


Despite a lot of recipes and references for rujak around on the internet, not one of them mentioned when this dish is traditionally served. Is it a dinner or dessert? Or maybe just a snack. It could really go either way in my opinion - the fruit makes it light and sweet and good for dessert, the chilli sauce lends a savoury flair. I couldn't find an answer so I served it up with my savoury dishes at my Indonesian feast. So, if any Indonesians read this, please let me know!

Ingredients
2 mangoes
1/2 papaya
1 small pineapple
1 400g can of lychees
2 pink grapefruits
(Starfruit - sadly I couldn't get this, but I really wanted to put it in mine!)
Sambal Rujak (either from a jar or use the recipe below)
Juice of 1 lime

To Make
1. Cut the mango flesh, into large chunks. Remove the skin and seeds from the papaya and also chop into big chunks.
2. Remove the skin from the pineapple, remove the woody core and chop into large pieces. Peel the skin off the grapefruit and divide into segments.
3. Drain the can of lychees and combine in a bowl with the mango, papaya, pineapple and grapefruit. Drizzle sauce over to taste (I used about scant 1/4 cup). Drizzle the lime juice over and mix through. Serve.

Serves 4, or 6-8 as part of a buffet.

Sambal Rujak (from SBS Feast Issue #14)
3 tsp sambal oelek
1/3 cup grated palm sugar
1/3 cup kecap manis
1 tbsp lemon juice

To Make: 
1. Whisk ingredients together until combined. Pour over fruit.


This month I'm featuring lots of amazing recipes from Indonesia!
Check out my other Indonesian recipe posts:

Saturday, 24 November 2012

Jus Alpukat (Indonesian Avocado Milkshake)


It's time again for the fun of the sweet adventures blog hop! This month's theme is possibly the best theme ever - desserts which use vegetables. Or rather, desserts that use foods which are traditionally considered savoury. I clarify this because, of course, things like tomatoes, cucumbers and avocados are actually fruits. 
The possibilities of this theme made me incredibly excited, however, I had to curb my enthusiasm slightly because I am desperately trying to bake less cakes and eat less desserts. Immediately a hoard of cupcake and brownie ideas sprung to mind - and maybe if I was a fatter person I would have gotten carried away with them. But I exercised a little self constraint and set to thinking of something a tad healthier. I decided I wanted to steer clear of vegetables that I would normally put in desserts - beetroot, sweet potato and pumpkin mainly. Carrot was definitely out - I've already posted carrot cake, carrot pudding and carrot jam!

I decided it would be tomato - a challenge! Discarding my initial idea of tomato basil cupcakes (I will make these one day though!), I set to it and made some Watermelon Tomato Ice Pops. Quite simple - fresh watermelon, fresh tomato, a dash of rum and a touch of sweetener. I thought surely I was onto a winner! Here is how they looked:


Sad news though, they tasted weird. Not awful. Just not that nice. I was very disappointed! I also have a policy on this blog that I don't post things which don't turn out - nobody wants a recipe which is average to bad right? So, out the window they went (not literally), though I'm sure the idea still has potential!

Luckily, I had a backup plan. In my archives ready to go was my creamy Indonesian Avocado Milkshake. Phew, avocado saves the day. You might already know this, but November is Indonesian Food Month on my blog. I put out the feelers on twitter at the start of the month to see if anybody had any suggestions as to which Indonesian dishes I should try and the answer came back - Avocado Milkshakes. I can't argue with that so I went out to buy myself some avocados and set to work. 


I wasn't sure how much I would like it, but I was pleasantly surprised. I'm not going to lie to you, the first sip I thought it was a bit weird but then I finished the glass and went back for more straight away. If you hate avocado, then this is not your shake. If you like avocado, then you really should try this! Avocado is naturally very sweet, and it's rich creaminess makes it perfect for milkshakes.

Ingredients
2 small ripe avocados
2 cups almond milk (or you can use other non dairy milk)
2 tbsp sweetener of your choice (you can use maple syrup, agave or just plain sugar)
2 cups ice
Chocolate sprinkles, for serving.

To Make
1. Scoop the flesh out of the avocados and put in a blender. Add the milk, sweetener and ice. Blend well.
2. Serve sprinkled with plenty of chocolate sprinkles.

Serves 2.

This month I'm featuring lots of amazing recipes from Indonesia!
Check out my other Indonesian recipe posts:

Thursday, 22 November 2012

Lontong Paris (Caramel & Peanut Coated Biscuits)


I tend to get overwhelmed by options. Whenever I have an array of options in front of me I just have so many things that I want to do that I find it hard to focus and choose one. Like choosing electives in high school (even though that was a long time ago now), I couldn't pick just two - I wanted to learn it all! I could have picked ten. I'm the same with choosing degrees, choosing careers, choosing classes. I just want to do so many different things, and learn as much as I possibly can!

I've been getting a lot of requests lately from readers to make a cookbook, which is something I have thought about doing for a little while. Since I am working only two days a week at my clinic at the moment, I decided recently to use that time to make it happen. Nothing huge, just a small, fun ebook. But, of course, being me, I have so many ideas on what kind of cookbook to write that I'm having difficulty focusing on one! So I need some help, please jump onto this facebook poll and vote for or suggest a theme. You can also like this page on facebook so you can get my recipes and news updates straight into your newsfeed. Your help is much appreciated!


But now to the finger-licking point - these little balls of heaven. Well, I say little, but I actually made mine rather big. They are called Longton Paris, an Indonesian sweet comprising of a soft melts-in-your-mouth biscuit coated in crisp caramel and rolled in crunchy chopped peanuts. I used salted peanuts for this, so it has the added flavour sensation of salted caramel. They were quite special, and the guests I was feeding them to expressed unmasked adoration for them - i.e. they were a HUGE hit.

They're a little bit fiddly, I grant you. However, definitely worth the effort. If you want a little less effort you can skip rolling them in peanuts and just put one on top (like I did to some of mine, above), but they don't quite have the same amazing bang of flavour in your mouth without the salted peanuts.


Ingredients
250g non dairy margarine,butter
3 cups self raising flour
1/2 cup cornstarch
3/4 cup powdered confectioners sugar (or use soft icing mixture)
Egg replacer for 2 eggs (I used Orgran), plus a little extra water to make the mixture stay together.
2 tsp vanilla extract

Caramel and Coating
4 tbsp non dairy margarine
1 tbsp golden syrup
300g sugar
2 cups roasted salted peanuts

To Make
1. Preheat the oven to 170 degrees C.
2. Combine the margarine, flour, cornstarch, powdered sugar, egg substitute and vanilla and beat with a hand held electric mixer until smooth and combined (I'm sure you can do this with a wooden spoon and some elbow grease if you don't have an electric mixer).
3. Line a baking tray with greaseproof baking paper. Roll out piece of the dough about the size of a ping pong ball (you can make them smaller if you wish, just reduce the cooking time). Place on the baking tray, you will most likely need to do two batches.
4. Bake for 18 minutes, remove and allow to cool for 5 minutes on the tray before transferring to a cooling rack. Repeat using any remaining dough.
5. While the second batch is cooking you can get started on your caramel: place the margarine, golden syrup and sugar in a saucepan over a medium heat. Leave on the heat, stirring often, until all the sugar is dissolved. This may take up to 30 minutes.
6. Chop the peanuts up finely and place in a bowl ready to roll.
7. Once the biscuits are cooled and the caramel is ready, start rolling. The caramel will be hot so you'll need to use a couple of forks to dip them in the caramel and then transfer them straight to the peanuts and coat generously. Transfer to a serving plate. You'll want to work quite quickly, as the caramel will thicken as it cools. If you find it becomes too thick to roll the biscuits in, you can put it back on the heat for a few minutes to melt it again.

And then you're done!
Makes 30 biscuits.


This month I'm featuring lots of amazing recipes from Indonesia!
Check out my other Indonesian recipe posts:

Tuesday, 20 November 2012

Acar Kuning (Indonesian Hot, Sweet and Sour Vegetables


It's not hard to get into cooking lots of Indonesian dishes this month. Fresh bright vegetables with strong hot, sour and sweet zing? Yes, please. This easy and quick dish of vegetables makes a great stir fry over rice or a  great veggie dish to serve at a buffet/potluck/family dinner.

I'm keeping this one short and sweet, as I've been a bit hectic over the last few days. Apologies for being so brief - but here is a recipe to appease you :)

Ingredients
4 cloves garlic, peeled
2cm fresh ginger, peeled
1/2 tsp turmeric 
1 tbsp vegetable oil
1 lemon grass stalk, tough outer parts removed
1/4 cup water
1 tbsp vinegar
2 tsp sugar
Salt to taste
3 carrots, cut into strips
2 cucumbers, cut into strips
10 small shallots, roots cut off and cut into 4cm lengths
100g green beans, ends trimmed
4 long red chillis, cut into long strips

To Make
1. Put the garlic, ginger and turmeric in a food processor and purée to a smooth paste.
2. Heat the olive oil in a wok or large frypan and add the paste and the lemongrass. Fry for 1-2 minutes, until fragrant.
3. Add the water, vinegar, sugar and salt. Bring to a simmer and taste test (you can adjust the sweet and sour balance at this point by adding more sugar or vinegar).
4. Add all the vegetables and chilli, stir through until well coated with all the sweet and sour sauce. Cook until the vegetables are just cooked but still crisp.

Serves 4, or 8 as a side dish.


This month I'm featuring lots of amazing recipes from Indonesia!
Check out my other Indonesian recipe posts:


Friday, 16 November 2012

Almond & Goji Berry Chocolate Snaps


Sometimes the simplest sweet treats are really the best - not to mention being a lot less effort! I guarantee that if you spend ten minutes whipping these divine chocolate snaps up for guest they will be praising your ingenuity and calling for more.


This recipe post is for the eat the alphabet challenge, which I almost didn't end up entering, but got in a little late with these in the end. The theme letters are U, V and W. Quite a challenge. I decided to discount any ingredients which had "wild" or "white", because it felt a bit like cheating, but after discounting that the pickings were slim. My first thought was watermelon (coming into season), watercress and water chestnuts. All great options, but then I had an inspired thought.

Ever eaten Goji Berries? They're an ingredient we use in Chinese Herbal Medicine often (isn't it great when medicine tastes so delicious?). Well, their Chinese name is Gou Qi Zi, but their English name is Wolfberry - which starts with a W!

A quick note before we get to the nitty gritty of this recipe: I used a rather obscure ingredient in mine - pickled plum flavoured salt which a friend of mine brought back from Japan. I don't expect many other people have this ingredient lying around in their pantry, so I've written this recipe using coarse regular salt.


Ingredients
100g 70% cocoa dark chocolate
2 tbsp coarsely chopped almonds
2 tbsp wolfberries (goji berries)
Coarse salt flakes

To Make
1. Melt the chocolate in a double boiler (I just use a metallic bowl with it's bottom resting in some boiling water) until no lumps remain. 
2. Lay out a sheet of greaseproof paper over a tray or plate.
3. Divide the melted chocolate into 8 rounds on the baking paper and sprinkle the tops with almonds and goji berries (press them down gently to make sure they stick in the chocolate). Then sprinkle a pinch of salt over the top and place the plate in the fridge.
4. Leave in the fridge until the chocolate has completely hardened again, at least 20 minutes.
5. Serve. Too easy!

Makes 8 (serves 4).


Thursday, 15 November 2012

Gingery Chocolate Truffles


Yes, it's the latest in my series of amazing and easy vegan chocolate truffles! You can also check out the other varieties:
Cracked Pepper Chocolate Truffles
Jalapeño Chocolate Truffles
Truffles in 3 Flavours: Smoky Paprika, Strawberry Gum and Double Sesame (with amazing Tahini centres!)
Chokladdarraksbolls (Swedish Chocolate Arrak Balls!) 

What is next? Super gingery chocolate truffles. You can adjust the gingery-ness according to taste preference, I personally love them super gingery and can highly recommend it.

Gingery Chocolate Truffles

Ingredients:
250g of dark chocolate, coarsely chopped
¼ cup of soy milk
6-7 pieces of glace ginger, chopped finely (you could also use crystalised)
1-2 pinches ground ginger (depends how gingery you want it, add more or less to taste)
Cocoa powder for dusting (optional: to make it even more gingery add a pinch of ground ginger to your rolling cocoa)

How to make:
1. Heat the soymilk in a small saucepan until small bubbles appear and steam rises off the pan.
2. Take off heat, add the chocolate and ground ginger and stir vigorously until the chocolate has melted and the ganache is smooth.
3. Stir through the chopped glace ginger. Place in a container and leave to chill in the fridge for 8 hours or overnight.
4. Remove ganache from the fridge. Place about ¼ cup of cocoa powder on a small bowl, and using a teaspoon or a melon baller (these are perfect!), place a spoonful of the ganache into the cocoa, tossing it in the cocoa until covered. Then dust your palms with some of the cocoa and roll the ganache piece into a ball, and place on a serving plate/whatever plate you like. Repeat until you run out of ganache.

Note: If you're doing it on a warm day they you're going to want to keep these babies in the fridge as much as possible!

Makes about 30 truffles (depends how big you roll them)


Wednesday, 14 November 2012

Triple Threat Vegan Coconut Cake


Coconut cake looks and sounds very unassuming and not particulary special. Don't let that fool you! This coconut cake is special with a capital spec. It's my second Indonesian inspired recipe to go up this month, and my first sweet offering. A small heads up, if you are allergic to coconut then Indonesian month might not be your month, as it's all loaded with coconut!

So, why is this cake a triple threat? Yes, it can sing, dance and act, but there's more. It's not just a cake with some coconut, oh no, it's a cake with coconut, coconut cream and coconut oil. It's also drizzled generously with coconut glaze, so maybe it's a quadruple threat? The result of this combination is really triple the goodness - the texture of the cake is exceptional. It's moist and dense and packed with flavour.


Triple Threat Vegan Coconut Cake

Ingredients
1/3 cup coconut oil
1/3 cup palm sugar (liquid)
1 x 400ml can coconut cream (minus 1 tbsp for the glaze)
2 tsp vanilla extract
1 cup wholemeal flour
1/2 tsp baking powder
1/2 tsp bicarb soda
1 cup dessicated coconut (you could probably sub fresh grated coconut if you have it)

And for the glaze:
1 tbsp coconut cream (just reserve it from the can you used for the cake)
1 cup soft icing mixture
Pinch of cinnamon (optional)


To Make
1. Preheat the oven to 170 degrees C.
2. Heat the coconut oil over a low heat until melted. Remove from the head and place in a large mixing bowl.
3. Add the palm sugar and stir well.
4. Shake up the can of coconut cream well before use. Open it and set aside 1 tbsp of it to use for the glaze. Add the rest to the bowl along with the vanilla extract. Whisk to combine.
5. Add the flour, baking powder and bicarb and whisk through. Finally, stir through the dried coconut.
6. Line a well grease medium square baking dish with greaseproof paper on the bottom and pour the batter in.
7. Bake for about 30 minutes or until springy to touch and a knife inserted into the centre comes out clean.
8. Set aside to cool while you whip up some glaze.
9. To make the glaze: place the icing mixture and 1 tbsp of coconut cream in a small bowl and stir well with a fork or spoon until smooth.
10. Once the cake is completely cool, cut into slices and drizzle the glaze liberally over the top. Ready to eat!

*TIPS*
~ If your coconut cream comes out of the can a little lumpy, don't worry. Just whisk it well when you add it to the bowl to get rid of lumps
~ If you're going to make this cake in advance, I recommend NOT storing it in the fridge. Putting this cake in the fridge will cause the coconut oil to solidify making the cake much harder. I advise storing it in an air tight tupperware container in the cupboard, and the same goes for any leftovers.


This month I'm featuring lots of amazing recipes from Indonesia!
Check out my other Indonesian recipe posts:


Tuesday, 13 November 2012

Gado Gado (Indonesian Salad with Peanut Sauce)


I know I'm terrible! We are 13 days into November and I haven't posted any world food month recipes yet!  I'm very excited that November is Indonesian food month and now that I have done my big feast of cooking up Indonesian food (I have some friends over on Friday night to help me eat it all and they were very happy) I will make up for the fact that I haven't posted any Indonesian recipes yet by posting at least 8 over the remaining days of the month. How does that sound? Do you forgive me?

I'm starting off with an Indonesian classic. Gado Gado is something I'm sure most of you will have heard of. I've seen it in cookbooks and online for years and always thought to myself that I really wanted to try it. But, I would then forget about it which is why I had actually never even tried it before Friday. I was definitely missing out, because this salad is something special. It's also very easy.


Ingredients
The Salad
350-400g hard tofu
1 tbsp vegetable oil
1 large desiree potato (or other waxy variety)
2 handfuls green beans, ends trimmed
2 cups thinly sliced green cabbage
1 carrot, thinly sliced (I used a peeler to create nice ribbons)
A handful of fresh bean sprouts

The Sauce
3 cloves garlic, peeled
2 shallots (scallions)
2 long red chillis (this will make the sauce "medium", just 1 if you want mild or as many as you want for hot)
1 tbsp vegetable oil
1 cup roasted salted peanuts
1 heaped tsp tamarind puree, dissolved in 1/3 cup hot water
3 tbsp soy sauce

NOTE: I made my sauce quite chunky, so I just roughly pounded it up in a mortar and pestle. If you want a smoother peanut sauce, you can just puree the whole sauce in a food processor at the end. Alternatively, you can substitute a food processor for the mortar and pestle in every instance in the below recipe, and your sauce will be smoother.

To Make
1. Drain the tofu and gently squeeze as much liquid out of it as you can. Cut it once horizontally and once longitudinally (so that you end up with 4 large thin pieces).
2. Heat 1 tbsp vegetable oil in a wok and fry the 4 pieces of tofu, turning over half way, until they are brown and crisp on both sides. Remove from pan and set on some absorbent paper to soak up some of the oil. Set aside.
3. Slice the potato in half and then into 1cm thick slices. Bring a saucepan of water to the boil and then add the potatoes. Cook until just tender. About 1-2 minutes before the potato is cooked, throw in the trimmed beans.
4. Drain the potatoes and beans and rinse well under cold water immediately.
5. To make the peanut sauce: Roughly chop the chilli, garlic and the shallots and place in a mortar. Pound with the pestle until you have a thick paste.
6. Heat 1 tbsp vegetable oil in a small frypan. Add the paste and fry over a low heat for a few minutes.
7. While it's frying, pound up the peanuts using your mortar and pestle. You can pound them however fine you like them, I left mine a bit chunky.
8. Add the peanuts, tamardind (in water) and soy sauce to the pan and bring to a simmer. Simmer gently for about 3 minutes. Now add as much water as you like so that the sauce is thinner and pourable (probably between 1/2-1 cup). If you add lots of water, taste for seasoning and add more soy sauce as needed. (If you want a smooth sauce, add the whole thing to a food processor now and puree until smooth).
9. Layer a large plate with the cabbage, carrot, potato, tofu, beans and bean sprouts. Pour the sauce all over the top and serve immediately.

Serves 4.

Thursday, 8 November 2012

Vegan Mulberry Hazelnut Muffins


As the weather warms up our mulberry tree is groaning with fruit. Well, I say our mulberry bush, but actually it's on our neighbours property. It's SO massive, though, that there is a monster of a tree growing over onto our yard which bears bowlfuls and bowlfuls of gifts every November. Around now every year we start having mulberry everything - mulberry smoothies, daiquiris, mulberry crumble, mulberry pie, mulberry jam and, of course, fresh juicy mulberries by the handful. 


With the mulberries being plentiful, it seemed natural to introduce them to my next batch of muffins. I love making muffins! I especially have fallen in love with hazelnut muffins - using hazelnut meal and hazelnut butter (for an even more hazelnut-y muffin check out my Quadruple Hazelnut & Date Muffins). The mulberries were sensational in these muffins, and you should seize the opportunity during this brief period that mulberries are available in most fruit and vegie stores. If you don't have mulberries, the best substitute would be blackberries. Failing that, go with blueberries or raspberries. 

If you're one of my Northern Hemisphere readers, then mulberries are most definitely not available for you! I recommend bookmarking this recipe for next spring and in the meantime cracking out the frozen berries and pretending you basking in the warm spring sunshine, as you bask in the warm autumn sunshine.


Ingredients
1 1/2 cups wholemeal flour
1 tsp baking powder
1/2 tsp bicarb soda
1/2 cup hazelnut meal
1/2 cup sugar
1 cup rice milk (or soy)
1 tsp vanilla extract
1/3 cup canola oil
1/3 cup hazelnut butter
1 cup fresh muesli

To Make:
1. Preheat your oven to about 180 degrees C.
2. Put the flour, hazelnut meal, sugar, bicarb and baking powder in a bowl and mix well to combine.
3. Make a well in the centre and pour in the rice milk, canola oil, vanilla and hazelnut butter and mix well.
4. Trim the stems off the mulberries and wash them. You can chop them up a bit but I like to leave them whole so you get a big juice bit of mulberry.
5. Either grease a muffin tray well or cheat a bit and use cupcake liners (which I did - it's just easier!). Fill the tray/liners almost to the top and then bake for 23 mins. 
6. Remove from the oven when they are golden on top and transfer to a cooling rack.

Makes 12 muffins.


Want more tasty muffins?