Showing posts with label chocolate. Show all posts

Monday, 29 June 2015

Chocolate Oat Hazelnut Chewy Biscuits (Vegan)


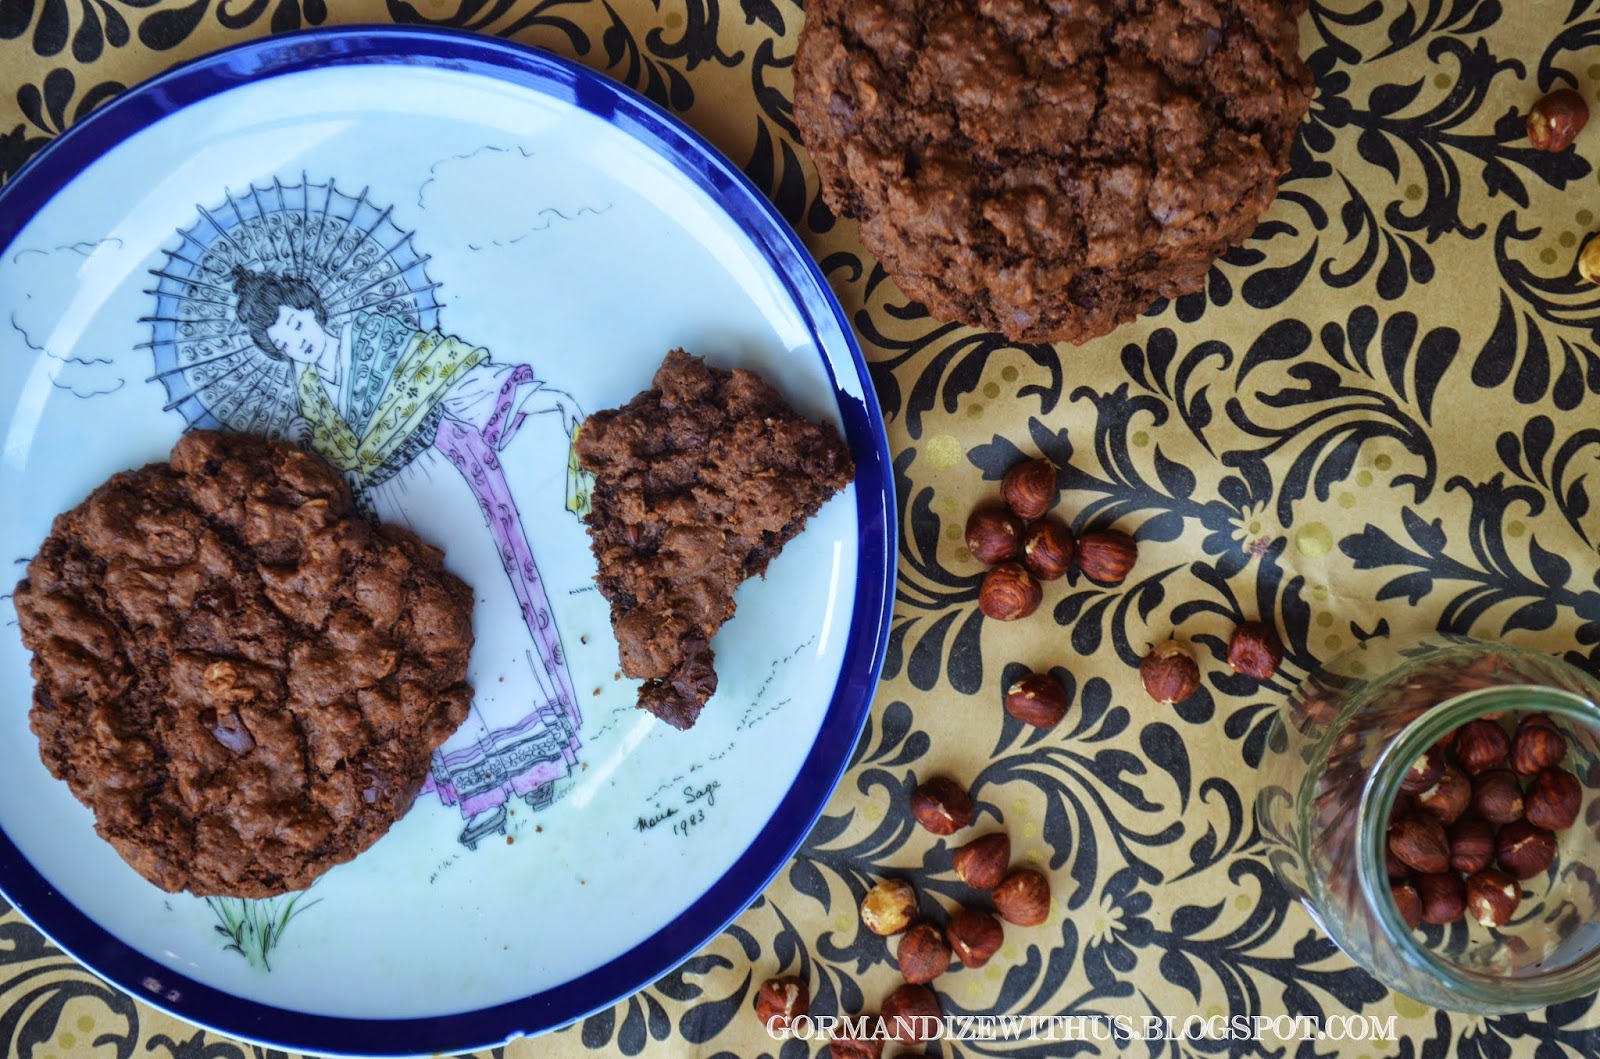
Oh, chocolate biscuits - how heavenly you are. I try my best not to cook biscuits, because there are only two of us here and of course that means we would eat them all. Very easily.

But sometimes you just need a big giant home made chocolate biscuit, the kind with everything in it and which is chewy and fudgy and rich and spectacular. These are those biscuits, they were incredible.


Chocolate Oat Hazelnut Chewy Biscuits

Ingredients
2 tbsp ground flaxseeds (linseeds)
2/3 cup oat milk (you can sub soy or almond or hazelnut milk)
2/3 cup apple sauce
1 tbsp canola oil
1 tsp vanilla extract
1 2/3 cups wholemeal flour
2/3 cup cocoa powder
2 cups rolled oats
1/2 tsp baking powder
1/2 tsp bicarb soda
1 1/4 cups sugar
2/3 cup roughly chopped hazelnuts
3/4 cup roughly chopped dark chocolate chunks

To Make:
1. Preheat the oven to 180 degrees C.
2. Whisk together the ground flaxsees and oat milk and then add the oil and the vanilla extract.
3. Add in all the dry ingredients, leaving the hazelnut and chocolate chunks til last and then folding them through.
4. Line a baking tray with non-stick baking paper. Drop about 3 generous tablespoons of batter onto the paper for each biscuit, leaving plenty of space between them (at least 2 inches) for them to expand as they cook. I could only fit six onto my rectangular tray. 
5. Bake for 12 minutes (they should have spread out and be cooked on the outside, but still a bit soft in the middle when you gently press on them), then remove from the oven and let them cool on the tray for 5 minutes before transferring to a cooling rack. 
6. Continue until you have used up all the batter.

This makes about 8-10 really big biscuits, but you can make them smaller if you like, just reduce the cooking time by a couple of minutes. 


Thursday, 6 March 2014

Chocolate & Grapefruit Marmalade Vegan Cupcakes


Today I'm baking. It's a big, big baking day involving loads of cupcakes. Why? Because I'm donating my time and my delicious cupcakes to the wonderful Swopera. Swopera is a great event created by best friend to raise money for promoting equal marriage rights in Australia. It's a really fun night in which singers choose arias from opposite gender roles to perform. You can get all the details on the Swopera facebook page. I'm really excited about it and am thrilled to donate my time to a cause I feel so passionate about.

If you're in Sydney this weekend & not doing anything on Saturday night then come on down to Paddington Uniting Church (Oxford St) for a really fun night. You can also get one of these badass cupcakes to go with your bitchin' cup of tea. You know you want to!

I used my own homemade grapefruit marmalade for this, but you can use store bought (if you can find it anywhere). If you can't get it anywhere I recommend making your own, it's very easy and the grapefruit marmalade gives the cupcakes a delicious depth. The hint of bitterness of the grapefruit rind compliments the chocolate beautifully and makes a really sohpisticated flavour. If you don't want to make the grapefruit marmalade you can try substituting 1/2 cup grapefruit juice instead of half of the oat milk.

These can also be made with other marmalades - try it with orange, lemon & lime, or even ginger marmalade (yum!). I've iced mine with orange buttercream icing, but you can use chocolate icing if you want to make them even more chocolatey.

Chocolate & Grapefruit Marmalade Cupcakes

Ingredients
1 cup oat milk (or soy milk)
1/2 cup sugar
1/3 cup canola oil
1 tsp vanilla extract
1/2 cup grapefruit marmalade
1 cup wholemeal plain flour
1/2 teaspoon baking powder
1/2 teaspoon bicarb soda
1/2 cup cocoa powder

To Make
1. Preheat the oven to 180 degrees C.
2. In a large bowl whisk together the oat milk, sugar, canola oil, vanilla extract and grapefruit marmalade.
3. Add the remaining ingredients and whisk until all combined.
4. Fill your cupcake baking tray with liners and fill them 3/4 full of batter.
5. Bake for 23 minutes, or until a skewer inserted in the middle comes out clean.
6. Allow to cool. To serve, dust with icing sugar or ice with orange buttercream icing (recipe below) or chocolate buttercream icing.

Makes 12 cupcakes.

Orange Buttercream Icing


The Icing:
1/2 cup nuttelex (or other vegan margarine)
2 2/3 cups soft icing mixture
1 tsp vanilla extracty
The zest of 1 orange

1. Mix the nuttelex, lemon juice, zest and icing mixture together in a bowl using either an electric mixer or a knife and some good old elbow grease (nice workout).
2. Once the cupcakes are cool, pipe the icing on in a spiral generously on the top of the cakes and decorate as you like (I used fresh blueberries).


I've entered this dish in the Vegan Virtual Linky Potluck.

Friday, 20 December 2013

Pizza de Brigadeiro (Brazilian Chocolate Pizza) with Fresh Strawberries & Cream Cheese


I've always been somewhat enchanted by the idea of a chocolate pizza, although I had never made one before I made this. It seems that dessert pizzas are very popular Brazil - even their fast food pizza franchises offer sweet pizzas. I read online that Dominoes in Sao Paolo has a chocolate pizza and a banana pizza, so dessert pizza was definitely high on my list of things to try this month.

The dough recipe makes enough dough for 3 big pizzas, but the topping quantity is just for 1 pizza. So you can freeze the other 2/3 of the fresh dough, or use it to make a couple of savoury pizzas for dinner to go with your dessert pizza. The toppings are completely rich and decadent, so you'll probably only need one slice!

The one thing I don't know though - is whether Brazilians eat them hot or cold? I googled it and couldn't find any answers, so I served mine cold for convenience. I think it would be really nice either way though. Any Brazilians out there want to enlighten me?


Ingredients

Pizza Dough
2 tsp dried yeast
1/2 cup warm water
2 tbsp olive oil
2 cups room temperature water
1kg plain flour
1.5 tsp salt

Brigadeiro Topping
400ml vegan condensed milk
3 tbsp cocoa powder
1 tbsp margarine
1 punnet strawberries
Vegan cream cheese
Chocolate sprinkles

To Make
1. Whisk the yeast with 1/2 cup of warm water and set it aside for 10 minutes until foamy on top.
2. Add the 2 cups water & olive oil and whisk to combine. Then add the salt and all the flour, mixing gently. Flour up your hands and start mixing the dough with your hands until it comes together. It should be dry enough not to stick to your fingers, wet enough to stay together in a ball. If you need to, add more flour or water to get it to the right consistency.
3. Flour a benchtop and turn the dough out. Knead for 10 minutes, at which point the dough should be smooth and springy to touch. Wash, dry and lightly oil the mixing bowl. Return the dough ball to the bowl and cover tightly with plastic wrap. Leave in a warm spot to rise for 2 hours. Preheat the oven to 180 degrees C.
4. After 2 hours, punch the dough down and cut into 3 pieces, if you're saving the other two then wrap them up in plastic wrap and freeze them. Roll one piece out into a big flat disc and place on an oiled baking tray. Bake for 10-15 minutes, until lightly golden on top. Take out of the oven and set aside.
5. Whisk the condensed milk and cocoa powder in a pan and put it over a medium heat. Cook for about 10-15 minutes, until the mixture thickens and starts to pull away from the edges of the pan. Remove from the heat and stir the margarine through.
6. Spread over the pizza base. Top with slices of cream cheese and wedges of fresh strawberries. Sprinkle the edges with chocolate sprinkles. Serve hot or cold.

Also part of the Vegan Virtual Linky Potluck.


Thursday, 19 December 2013

Chocolate Coconut Kisses (Beijos De Coco Com Chocolate)


A very simple and easy recipe, beautiful chocolate truffles made with fresh coconut and plump juicy golden raisins. If you can get fresh coconut then it's worth it, but if you can't just use dried and it will still be delicious. Only four ingredients, and even more fun if you have a helper to help you roll them out! They're not as rich and sweet as other truffles, and I dare you to try and stop at just one! They also make lovely gifts (since it's that time of year), just place in a little gift box lined with some tissue paper.

Ingredients
2 1/2 cups freshly grated coconut flesh (about 1 coconut)
1/3 cup golden raisins, chopped
1/2 cup castor sugar
200g dark chocolate, chopped up

To Make:
1. Combine the grated coconut, sugar and raisins in a small saucepan and heat over a low heat until all the sugar is melted.
2. Remove from the heat and add the chopped dark chocolate, stir until the chocolate is completely melted.
3. Set the mixture aside to cool, then refrigerate for 10 minutes to help it firm up.
4. Roll bit of the mixture out into bite sized balls and put into little patty pans (or roll in cocoa).
5. Keep in the fridge until ready to serve.

Makes about 24 kisses.


This post is also part of the December Sweet Adventures Blog Hop. The theme for this month is Heavenly Holiday Truffles, which is right up my alley. I love truffles and I love experimenting with different flavours, here are some of my other truffle recipes - they're all vegan of course:


Tuesday, 3 September 2013

Chinese Five Spice Chocolate Cupcakes


It's day 3 of Vegan Mofo and thus far I'm managing to keep up with posting! My theme this year is My Spice Rack. I've got so many spices piled up in my kitchen that I thought I had better start thinking of ways to use them all up! Yesterday I posted a Spicy Chickpea Salad with Olive Hummus Dressing which used 4 spices from my shelf. Today, only one, but it's an interesting one!

Chinese Five Spice
Chinese Five Spice is a blend of star anise, fennel seeds, cassia, black pepper and cloves. It is used in many Asian recipes but usually in combination with meat, although it can be added to stir fried vegetables. In place of the meat, it could be used as a rub or a marinade for tofu or other meat substitutes. But I wanted to do something a bit different with it. So I made dessert, a bit unusual! The zing of the Five Spice gives these Chocolate Cupcakes something pretty special and a couple of my friends went pretty crazy over these babies. Start of adding just a 1/2 tsp of five spice to the mix and then taste it. If you can't really taste the Chinese Five Spice then add some more and taste again. I ended up using a whole teaspoon, but it's something you can make to taste.

Reference: Hemphill, 2006
For my month of spices I'm using Spice Notes and Recipes by Ian Hemphill as my reference tool to learn about spices and for all the information above. Thanks Ian for writing such a great and informative book! 


Chinese Five Spice Chocolate Cupcakes

Ingredients
1 cup oat milk (or soy milk)
1/2 cup sugar
1/3 cup canola oil
1 tsp vanilla extract
1 cup wholemeal plain flour
1/2 teaspoon baking powder
1/2 teaspoon bicarb soda
1/2 cup cocoa powder
1 teaspoon Chinese Five Spice (or to taste)

To Make
1. Preheat the oven to 180 degrees C.
2. In a large bowl whisk together the oat milk, sugar, canola oil and vanilla extract.
3. Add the remaining ingredients and whisk until all combined.
4. Fill your cupcake baking tray with liners and fill them 3/4 full of batter.
5. Bake for 23 minutes, or until a skewer inserted in the middle comes out clean.
6. Allow to cool. To serve, dust with icing sugar or ice with a chocolate buttercream icing or a chocolate ganache - whatever you feel like!

Makes 12 cupcakes.

Chinese Five Spice Chocolate Cupcakes pictured here with my

Tuesday, 20 August 2013

Chocolate Cranberry Cashew "Cookie Dough" Balls


A quick little recipe for you for this month's Sweet Adventures Blog Hop. The theme this month is "Cookie Monster", but I'm on a bit of a health kick at the moment and I'm currently feeling really good about myself. So the last thing I want to eat is biscuits. I tried my hand at a healthy alternative though - healthy vegan cookie dough bites. Raw, vegan, no flour but with a bit of sugar (nobody's perfect). They make a lovely healthy sweet snack.


Use the links below my recipe to check out the other biscuit-y entries in this month's hop!


Chocolate Cranberry Cashew Cookie Dough Bites

Ingredients
2/3 cup raw cashew pieces
1 tbsp dried coconut
2 heaped tbsp rolled oats
2 tsbp cocoa powder
3 tbsp maple syrup
1 tsp vanilla extract
1 tbsp dried cranberry pieces (if you have whole dried cranberries, chop them up a bit) 
2 tbsp chopped dark chocolate pieces (about 20g)

To Make
1. Place the cashews, coconut and oats in a food processor and process until they form a flour consistency.
2. Add the cocoa, maply syrup and vanilla extract and pulse until the mixture all comes together.
3. Transfer to a bowl and stir through the cranberry and chocolate pieces.
4. Roll out into balls using your hands and chill for at least 10 minutes before eating.

Makes 10 balls.


Friday, 28 June 2013

Grapefruit Waffles with Chocolate Dipped Strawberries (for someone you love!)


I'm coming up to my anniversary soon, so I thought I'd bring a little romance onto the blog. After being with someone for many years and living together for most of that time, it's easy to feel like the romance is dead sometimes. After all, you don't often tend to make a special effort with someone when you spend every evening and every morning with them anyway. There are fewer romantic dates, fewer mushy text messages going back and forth and, sometimes, a lack of spontaneous romantic gestures. We always try and do small unexpected nice things for one another though, because it is a really lovely feeling to make somebody that you love smile.

Special breakfast is a nice way to remind someone that you love them. My partner gets up stupidly early to go to work almost every day, though, so I don't really get many opportunities. We've both been incredibly busy lately but the other day we had a fluke day that we were both home from work and we had deliberately made no other plans for the day. So, I felt I should seize the occasion to get up and make him breakfast in bed. Not just any breakfast either - grapefruit waffles with chocolate coated strawberries! I ask you - is romance dead?! :)


Yes, a decadent and sweet breakfast - I don't advise having this one for breakfast too often. I've used yellow grapefruit because I had a big bag of them bequeathed to me from someone's tree. You can also use pink grapefruit. The grapefruit adds a fantastic fresh zingy aspect to the sweet waffles, so I recommend try it. If, however, you're making these for someone who hates grapefruit, you can substitute some freshly squeezes orange juice in it's place. 

All in all they take about 15 minutes to make, which is not very long for someone you love! Try these for birthdays, anniversaries, mothers or fathers day, Valentines day or (my favourite) any day of the week because nobody needs an occasion to tell someone you love them. Or just make them for yourself - because it's also important to love yourself, right? 

Vegan Grapefruit Waffles with Chocolate Dipped Strawberries

Ingredients
150g dark chocolate
6 strawberries, washed and dried completely
1 1/4 cups wholemeal flour
3/4 tsp baking powder
3 tbsp sugar
1/2 cup soy milk
1/2 cup freshly squeezed grapefruit juice (with the pulp!)
2 tbsp canola or vegetable oil
Maple Syrup (fo' drizzlin')


To Make:
1.  Mix the dry ingredients for the waffles together in a bowl. Make a well in the middle and gently stir in the soy milk, grapefruit juice and oil.
2. Melt you chocolate by chopping it up and placing it in a completely dry metal mixing bowl (glass or ceramic is ok too, it just will take longer to melt). Fill a separate bowl with boiling hot water and suspend the metal bowl over the top so that the steam from the hot water heats the metal. This will melt the chocolate evenly. Stir as it melts. 
3. Make sure your strawberries are completely dry. Once the chocolate is melted, coat the strawberries in it and then place them on a non stick baking sheet on a plate. Continue with your remaining strawberries and then place the plate in the fridge while you cook the waffles so they can set. You'll have some chocolate left over, keep it suspended over the hot water to that is stays melted while you cook your waffles.
4.  Heat up your waffle iron (be sure to spray with oil to prevent sticking) and make the waffles according to the instructions of your waffle maker. Make sure you re spray the waffle maker between each waffle.


5. Once the waffles are cooked, get 2 plates and place 1 waffle on each plate then drizzle maply syrup over the waffles. Top with another waffle and drizzle the remaining melted chocolate over the top. Place the chocolate dipped strawberries on top and eat it straight away!


Makes 2 servings (because you deserve some too, right?)

This recipe makes enough for 4 waffles (this may vary depending on the size of your waffle maker) and 6 chocolate dipped strawberries. 


Tuesday, 26 March 2013

Koko Rice (Samoan Chocolate Orange Rice Pudding)


I've been a little bit slack getting the posts up this month, so now at the end of the month I find myself with a whole bunch of Samoan recipes to post! So, over the next couple of days prepare to see quite a few posts while I try and fit them all in. This one is simple, luscious, rich and chocolatey - and what more could you want?

It's a rice dish called Koko Rice. It would traditionally be made with Samoan Koko, which reportedly is quite rich and without any bitterness. They use it in Samoa to make drinking chocolate and this delicious rice dish. Without this special ingredient available to me, I opted for real dark chocolate instead. Traditional versions also use orange leaves to give an orangey flavour to the rice, but not having any of those either I've used strips of orange peel to give it the orange flavour (and it worked very well!).


Koko Rice
Ingredients
1 cup dry rice
1 long piece of fresh orange peel (just use your potato peeler to peel off a good strip)
4 cups water
1 x 400ml can of coconut cream
1/2 cup sugar
100g chopped dark chocolate

To Make
1. Place rice, orange peel and water in a large saucepan and bring to the boil.
2. Once boiling, reduce heat to as low as it will go and cover with a lid. Let it simmer for 20 minutes, or until rice is completely cooked and it looks nice and thick.
3. Add the coconut cream, sugar and chopped chocolate. Keep over a low heat, stirring constantly, until the chocolate is completely melted. Once the chocolate is melted, it is ready to serve.

Serves 6. 

~NOTE: Traditionally this would be served hot, but it was also quite nice cold. We had plenty of leftovers which we ate cold or heated up briefly in the microwave. If you do store leftovers, it will thicken a lot as it cools and end up looking more like the pictures in this post. If you eat it hot straight off the stove then it will be a bit runnier than in these pictures.


This month I'm featuring lots of delicious food from Samoa.
Check out my other recipe posts:


Friday, 16 November 2012

Almond & Goji Berry Chocolate Snaps


Sometimes the simplest sweet treats are really the best - not to mention being a lot less effort! I guarantee that if you spend ten minutes whipping these divine chocolate snaps up for guest they will be praising your ingenuity and calling for more.


This recipe post is for the eat the alphabet challenge, which I almost didn't end up entering, but got in a little late with these in the end. The theme letters are U, V and W. Quite a challenge. I decided to discount any ingredients which had "wild" or "white", because it felt a bit like cheating, but after discounting that the pickings were slim. My first thought was watermelon (coming into season), watercress and water chestnuts. All great options, but then I had an inspired thought.

Ever eaten Goji Berries? They're an ingredient we use in Chinese Herbal Medicine often (isn't it great when medicine tastes so delicious?). Well, their Chinese name is Gou Qi Zi, but their English name is Wolfberry - which starts with a W!

A quick note before we get to the nitty gritty of this recipe: I used a rather obscure ingredient in mine - pickled plum flavoured salt which a friend of mine brought back from Japan. I don't expect many other people have this ingredient lying around in their pantry, so I've written this recipe using coarse regular salt.


Ingredients
100g 70% cocoa dark chocolate
2 tbsp coarsely chopped almonds
2 tbsp wolfberries (goji berries)
Coarse salt flakes

To Make
1. Melt the chocolate in a double boiler (I just use a metallic bowl with it's bottom resting in some boiling water) until no lumps remain. 
2. Lay out a sheet of greaseproof paper over a tray or plate.
3. Divide the melted chocolate into 8 rounds on the baking paper and sprinkle the tops with almonds and goji berries (press them down gently to make sure they stick in the chocolate). Then sprinkle a pinch of salt over the top and place the plate in the fridge.
4. Leave in the fridge until the chocolate has completely hardened again, at least 20 minutes.
5. Serve. Too easy!

Makes 8 (serves 4).


Thursday, 15 November 2012

Gingery Chocolate Truffles


Yes, it's the latest in my series of amazing and easy vegan chocolate truffles! You can also check out the other varieties:
Cracked Pepper Chocolate Truffles
Jalapeño Chocolate Truffles
Truffles in 3 Flavours: Smoky Paprika, Strawberry Gum and Double Sesame (with amazing Tahini centres!)
Chokladdarraksbolls (Swedish Chocolate Arrak Balls!) 

What is next? Super gingery chocolate truffles. You can adjust the gingery-ness according to taste preference, I personally love them super gingery and can highly recommend it.

Gingery Chocolate Truffles

Ingredients:
250g of dark chocolate, coarsely chopped
¼ cup of soy milk
6-7 pieces of glace ginger, chopped finely (you could also use crystalised)
1-2 pinches ground ginger (depends how gingery you want it, add more or less to taste)
Cocoa powder for dusting (optional: to make it even more gingery add a pinch of ground ginger to your rolling cocoa)

How to make:
1. Heat the soymilk in a small saucepan until small bubbles appear and steam rises off the pan.
2. Take off heat, add the chocolate and ground ginger and stir vigorously until the chocolate has melted and the ganache is smooth.
3. Stir through the chopped glace ginger. Place in a container and leave to chill in the fridge for 8 hours or overnight.
4. Remove ganache from the fridge. Place about ¼ cup of cocoa powder on a small bowl, and using a teaspoon or a melon baller (these are perfect!), place a spoonful of the ganache into the cocoa, tossing it in the cocoa until covered. Then dust your palms with some of the cocoa and roll the ganache piece into a ball, and place on a serving plate/whatever plate you like. Repeat until you run out of ganache.

Note: If you're doing it on a warm day they you're going to want to keep these babies in the fridge as much as possible!

Makes about 30 truffles (depends how big you roll them)


Thursday, 1 November 2012

Choc Banana Ice Cream Pie (Vegan & Sugar Free!)


Today is the day they vegans have their picnic!

It's the Vegan Virtual Potluck today and I have been very excited about it ever since I signed up. I can't wait to see what everybody else is bringing to the potluck - 103 bloggers will be contributing this year. So sit back and work your way through them all. Each post is linked to the next post so you can start at appetisers and work your way through to dessert. To start from the beginning and work your way through head to veganbloggersunite.com for the host post (with the most). If you've already worked your way through all the recipes before me then you must already be very full, but I hope you left some room because this is worth it!


Cooking for an event with a whole host of other vegan cooks from around the world, I knew that I wanted to bring something special because every vegan blogger already knows how to make vegan chocolate cakes, vegan cupcakes of all varieties and all the more common forms of desserts. I also wanted to make it something a bit healthy, and preferably free from processed sugars. It's true that fruits and vegetables naturally contain sugar, so nothing with fruit or vegetables in it is ever completely sugar free.


I've been meaning to try the chocolate ice cream posted by JJ at 84th & 3rd for the Death By Chocolate Blog hop for some time, so I decided to use it as the ice cream layer for my pie. It's made from avocado, banana and cocoa and that is it. So elegant that I had to try it. She calls it chocolate ice cream - but I've called mine chocolate banana ice cream because I can tell you that you can definitely taste the banana! You can't taste the avocado though, so no worries there!

You need to be a little bit organised and have a bit of time to prepare this - but the great thing about it is that it lives in the freezer. So you can make it as far in advance as you like and it keeps forever in the freezer. The first step you need to do it to freeze your bananas. Quick tip - peel the bananas first! It's perfect for using up the super brown bananas that you sometimes discover in your fruit bowl!

Ingredients
1 large ripe avocado (but not over ripe!)
2 frozen bananas
1/4 cup cocoa powder
1-2 tbsp kahlua (optional, contains sugar)
1 cup pitted dates, chopped
1/3 cup macadamia nuts
1/4 cup rolled oats
1 tbsp cocoa

To Make
1. Place the avocado, banana and cocoa in a food processor and process until smooth and creamy. Add the kahlua to taste (if using).
2. Transfer to a dish (a loaf tin is a good size and shape for the smallish amount of ice cream that this makes) and place in the freezer. Set your oven timer for half an hour and when it beeps get the ice cream out and give it a good stir, make sure you break up all the ice crystals that are forming at the edges. Do this every half hour 3 times.
3. While your ice cream is chilling, you can make the base. If you have a really good food processor then you can just put the dates in whole and add the nuts, oats and cocoa all at the same time. Because my food processor is a bit old and crap I started with the oats, nuts and cocoa and then I added the chopped dates a few at a time so that it didn't get overloaded. Process all 4 ingredients until fairly fine.
4. Grab a 19-20cm diameter spring form cake tin. Pour out your processed base and use your hands or the back of a spoon to press it down firmly and evenly all over the bottom of the tin. Place the base in the fridge now until  your ice cream is done (it should be in there at least half an hour).
5. After you've taken out and stirred the ice cream 3-4 times, pour it over the base and smooth over the top. Place back in the freezer and leave in the freezer for at least 2-3 hours (easiest just to leave overnight!).

Serving Tips
~Just before serving, take out of the freezer and leave to sit at room temperature for about 5 minutes (10 minutes in cold weather) to let it soften slightly
~ To ensure easier cutting and neat slices, heat the knife under hot water and then dry it with a tea towel just before cutting. If you are cutting lots of slices, you may have to do this several times.
~If you like, you can decorate with dark chocolate shavings - however, unless you have sugar free chocolate it may then cease to be sugar free :) Healthier garnishes would include fresh or frozen berries or cherries. Or maybe even some slices of banana.


Makes 1 x small pie. 
~If you want to make a bigger one, double the recipe and use a 23cm springform cake pan.

What's next for dessert? Time to move on to the next Potluck Offering. 


Hit this button to go to the previous post (Super Vegan Crepes by Bacon is Not an Herb) or click here:


Hit this button to go to the next post (Delectable Date Squares by In Fine Balance) or click here:


Now I'm going to sit back with a glass of wine and work my way through the 102 other dishes at this potluck! It's going to be a big night, I hope you'll join me!


Wednesday, 31 October 2012

Chocolate Skeleton Cookies for Halloween

My years of study and my medical degree have all been leading up to this moment - skeleton biscuits. The science nerd in me desperately wanted to have intense attention to detail and anatomical accuracy, but it very soon became apparent that that wasn't going to be possible! Both because of the disproportionate nature of my biscuit cutter and the difficulty of piping small details.


When I was a kid I was one of the only people I knew that went trick or treating for Halloween. This was because we had American neighbours who would organise it in our street and they did a great job of it. Today, mostly because of the rapid Americanization of this country, Halloween trick or treating is becoming slightly more common. But, it poses a new problem for Aussie households, because it's difficult to know if you'll get any kids knocking on your door expecting lollies. 

When I was a kid, our neighbours organised a great system. We would write a little note saying that we would be coming around trick or treating and attached a balloon. People who were happy for us to come to their door would attach the balloon to their letterbox and we only went to the houses that had a balloon out the front. This made it safer for us kids, and easier for the households because if they didn't want to be bothered with us then we didn't come to their door.

Not celebrating any sort of Halloween generally in this country, last year I didn't even know it was Halloween when we heard a little knock on the door and the excited voices of some children. A rapid inventory in my head revealed to me that we had absolutely nothing in the house that we could give them. So, we kept very still and quiet and pretended that we weren't home until they went away. Cowardly? Perhaps. But what could I say to them?

This year I decided to be prepared so I bought some lollies. The problem, however, is that I have no idea how may (if any) kids will knock on my door. So I made some little bags of lollies but if more than 6 kids come knocking on my door then I don't know what I'll do. If less than 6 kids knock on my door then I'll be left with lollies that I don't want which will probably end up in the bin! It's a conundrum really, and makes me think that when I have children I will certainly reinstate the balloon system so that my neighbours will know that 1) my kids are coming and 2) roughly how many kids will be coming!


Even though I don't celebrate Halloween, I decided to give these chocolate skeleton biscuits a try. Why? Three reasons:
1) I thought they would look really cool!
2) The vast majority of my readers are Americans, so I thought they might like them :)
3) If no kids come knocking on my door then at lease I am perfectly happy to eat all these up (unlike most lollies).

In honour of my American readers I have even gone so far as to name these 'cookies'.

Chocolate Skeleton Cookies

Ingredients
1/3 cup canola oil
1/3 cup sugar
1/8 cup pomegranate molasses (of you don't have this then substitute treacle or blackstrap molasses)
1/4 cup rice/soy milk, plus 1 tbsp
1 1/2 cups wholemeal flour
1/2 tsp baking powder
1/2 tsp bicarb soda
1/3 cup cocoa

Icing
38g (approx.) nuttelex (or other non dairy margarine)
1/2 cup soft icing mixture
1/2 tsp vanilla extract

NOTE: I iced my skeletons with a simple buttercream, but if you would rather use a glaze which will set hard (which you would want to if you were wrapping these up to give as a gift, then use the glaze recipe from my Super Gingery Gingerbread People Biscuits)


To Make
1. Whisk the canola oil, sugar, molasses and 1/4 cup milk together. 
2. . Add one cup of flour and whisk through. After this you will want to put the whisk aside and get a wooden spoon because the mix will get too stiff.
3. Add the bicarb, baking powder, cocoa and the other half a cup of flour and mix thoroughly with a wooden spoon. Add the final tbsp of rice milk and knead into a ball (easiest if you just get your hands dirty).
4. Wrap the biscuit dough up in plastic wrap and flatten slightly into a thick disk. Refrigerate for about an hour and a half (or as long as it takes before you have time to make them - you can leave in the fridge for up to 2 days), but make sure you take it out of the fridge 10 mins before using to soften it up a bit.
5. Preheat the oven to 170 degrees C.
6. Flour your benchspace and roll out the dough to about 1/2 cm thick (keep the piece of plastic wrap aside though as you will use it again). Use a person shaped biscuit cutter to cut out the biscuits and transfer them carefully to a tray lined with baking paper (you will want to do this with a thin spatula). Continue until you can't fit any more out of your rolled dough.
7. Grab up all the little extra bits of dough and put them back in the plastic wrap. Wrap tightly and knead a bit before flattening out into a disc shape again (this will smoosh all the pieces together). The roll this piece out and cut some more.
8. Keep repeating step 7 until as many biscuits are cut out of the dough as possible. 


9. Bake each batch for about 7 minutes (if you know your oven is very hot you will probably want to reduce that to 6 mins, or reduce the temp) and then transfer to a cooling rack. Allow to cool completely before icing.


Icing
1. Combine the nuttelex, icing mixture and vanilla in a bowl. Cream together and spoon into a piping bag with a small round tip. Pipe your best skeleton outline onto the biscuits.


Variation
If you don't want to roll out the people shaped biscuits and pipe the skeletons on, you can just roll these into regular round biscuits and then pipe some spiders, bats or spider webs on. It's a bit less effort but still looks pretty cool.