Showing posts with label banana. Show all posts

Thursday, 12 June 2014

Whiskey Soaked Fig & Apricot Banana Bread


I love it when I forget about my bananas and stumble upon them a week later deliciously brown and bursting with extra banana-y flavour. It means one thing - banana bread. It's great because it really is compulsory, otherwise the bananas will go to waste, so I have no choice but to bake a loaf. Banana bread is also wonderful for experimenting with. This time I had a bottle of whiskey that was taking up space in my booze cupboard but only had a couple of tablespoons left in it, so I decided I had better use that up too (to make more space for other things!). 

If you're a banana bread lover, make sure you check out my super special Chai Banana Bread.


Whiskey Soaked Fig & Apricot Banana Bread


Ingredients
1/4 cup chopped dried apricots
1/4 cup chopped dried figs
3 tbsp whiskey (you can also use brandy or rum)
1 banana, mashed well (should make about 1/2 cup, a bit more or a bit less is fine)
1/2 cup sugar
1/3 cup canola oil (to make a healthier loaf you can substitute 1/3 cup apple sauce and 1 tbsp canola oil)
2/3 cup soy milk
1/4 tsp cinnamon
1 1/4 cups wholemeal flour
1 tsp baking powder
1/2 tsp bicarb soda
1/4 cup almonds, halved

To Make
1. Preheat the oven to 180 degrees (if your oven is fan forced then reduce to 170).
2. Place the chopped apricots and figs in a bowl with the whiskey and let soak for about 20 minutes.
3. Combine the banana, sugar, oil, soy milk and cinnamon in a large mixing bowl and whisk to combine.
4. Sift in the flour, baking powder and bicarb into the batter and mix well. You'll have lots of little wholemeal husks left in your strainer after sifting, but you can just throw those in too.
5. Stir in the soaked fruit and the almonds. If there is any whiskey left in the bottom of the bowl just throw that in too. 
6. Line a 22cm/9inch long loaf tin and line with greaseproof baking paper. Pour in the batter and bake for 40-50 minutes, or until a knife inserted into the middle comes out clean.

Makes 1 loaf.

I've entered this dish in the Vegan Virtual Linky Potluck.

Thursday, 22 August 2013

Lychee & Banana Cake with Coconut Rum Cream (Vegan & Sugar Free)


Sometimes I buy silly amounts of things when they're really cheap. Guilty. At the end of last summer (yes, I know, a while ago now!), my supermarket sold off huge tubs of lychees really cheap. I love lychees, but I don't have them often because they're generally a bit expensive. So I went a bit stupid and bought four huge packets. I didn't actually have any plans for them so I shelled them all (it took me about an hour) and put them in plastic containers in my freezer so that they would be there when inspiration struck. I forgot about them for a while.

Then, I was faced with the challenge of making a sugar free birthday cake. I'm happy cooking sugar free because I'm keen to eat less sugar myself, but what made this difficult was that it also had to be free of dried fruits including dates! Dates are the go to ingredient for the sugar free cake maker so my initial thoughts of an easy chocolate date cake evaporated. Then I remembered the lychees in my freezer - one of the most naturally sweet fruits you can buy! Combined with banana, it made a perfect birthday cake. Definitely sweet enough but not sickly sweet, my partner (who generally doesn't like cake because it's too sweet) loved this cake better than any other cake I've made..... and I've made a lot of cake.

For the icing I used whipped coconut cream with rum extract (because I looked at the ingredients and couldn't find anything which looked like sugar) - but if you're not being strict about your sugar than go ahead and add a splash of the real stuff instead!

Lychee & Banana Cake with Coconut Rum Cream

Ingredients
1 cup very ripe mashed banana
1/2 cup canola oil
1 cup lychee juice (from the lychees you just shelled ideally - or from the can if you bought it in natural juice or a bottle if you can find unsweetened lychee juice)
1/2 cup unsweetened oat or soy milk
1 cup drained lychee flesh, roughly chopped
2 1/2 cups plain wholemeal flour
2 tsp baking powder
1/2 tsp bicarb soda
1/2 tsp salt

1 can coconut cream, left in the fridge overnight (or longer)
1 tsp rum extract (or actual rum, if you prefer)

To Make
1. Heat the oven to 180 degrees.
2. Whisk together the banana, canola oil, lychee juice and oat milk. Stir the lychee flesh through.
3. Sift in the flour, baking powder, bicarb soda and salt and mix well.
4. Grease a medium sized cake tin well and pour the batter in. Bake for 1 hour, or until a skewer inserted in the middle comes out clean. Turn out onto a cooling rack and allow to cool completely.
5. When you open the tin you will notice that the top is a very solid thick cream. Scoop out all of the solid thick cream on top (you can reserve the rest of it to use in another meal – like a smoothie or a curry).
6. Put the thick cream into a bowl and mix well using a hand held electric mixer. Move the beaters up and down to try and get as much air into the cream as possible. Add the rum extract and beat until it pretty much resembles thick cream.
7. Spread the cream over the top of the cake. If you've got some more lychee flesh you can decorate the top with fresh lychee.

Thursday, 1 November 2012

Choc Banana Ice Cream Pie (Vegan & Sugar Free!)


Today is the day they vegans have their picnic!

It's the Vegan Virtual Potluck today and I have been very excited about it ever since I signed up. I can't wait to see what everybody else is bringing to the potluck - 103 bloggers will be contributing this year. So sit back and work your way through them all. Each post is linked to the next post so you can start at appetisers and work your way through to dessert. To start from the beginning and work your way through head to veganbloggersunite.com for the host post (with the most). If you've already worked your way through all the recipes before me then you must already be very full, but I hope you left some room because this is worth it!


Cooking for an event with a whole host of other vegan cooks from around the world, I knew that I wanted to bring something special because every vegan blogger already knows how to make vegan chocolate cakes, vegan cupcakes of all varieties and all the more common forms of desserts. I also wanted to make it something a bit healthy, and preferably free from processed sugars. It's true that fruits and vegetables naturally contain sugar, so nothing with fruit or vegetables in it is ever completely sugar free.


I've been meaning to try the chocolate ice cream posted by JJ at 84th & 3rd for the Death By Chocolate Blog hop for some time, so I decided to use it as the ice cream layer for my pie. It's made from avocado, banana and cocoa and that is it. So elegant that I had to try it. She calls it chocolate ice cream - but I've called mine chocolate banana ice cream because I can tell you that you can definitely taste the banana! You can't taste the avocado though, so no worries there!

You need to be a little bit organised and have a bit of time to prepare this - but the great thing about it is that it lives in the freezer. So you can make it as far in advance as you like and it keeps forever in the freezer. The first step you need to do it to freeze your bananas. Quick tip - peel the bananas first! It's perfect for using up the super brown bananas that you sometimes discover in your fruit bowl!

Ingredients
1 large ripe avocado (but not over ripe!)
2 frozen bananas
1/4 cup cocoa powder
1-2 tbsp kahlua (optional, contains sugar)
1 cup pitted dates, chopped
1/3 cup macadamia nuts
1/4 cup rolled oats
1 tbsp cocoa

To Make
1. Place the avocado, banana and cocoa in a food processor and process until smooth and creamy. Add the kahlua to taste (if using).
2. Transfer to a dish (a loaf tin is a good size and shape for the smallish amount of ice cream that this makes) and place in the freezer. Set your oven timer for half an hour and when it beeps get the ice cream out and give it a good stir, make sure you break up all the ice crystals that are forming at the edges. Do this every half hour 3 times.
3. While your ice cream is chilling, you can make the base. If you have a really good food processor then you can just put the dates in whole and add the nuts, oats and cocoa all at the same time. Because my food processor is a bit old and crap I started with the oats, nuts and cocoa and then I added the chopped dates a few at a time so that it didn't get overloaded. Process all 4 ingredients until fairly fine.
4. Grab a 19-20cm diameter spring form cake tin. Pour out your processed base and use your hands or the back of a spoon to press it down firmly and evenly all over the bottom of the tin. Place the base in the fridge now until  your ice cream is done (it should be in there at least half an hour).
5. After you've taken out and stirred the ice cream 3-4 times, pour it over the base and smooth over the top. Place back in the freezer and leave in the freezer for at least 2-3 hours (easiest just to leave overnight!).

Serving Tips
~Just before serving, take out of the freezer and leave to sit at room temperature for about 5 minutes (10 minutes in cold weather) to let it soften slightly
~ To ensure easier cutting and neat slices, heat the knife under hot water and then dry it with a tea towel just before cutting. If you are cutting lots of slices, you may have to do this several times.
~If you like, you can decorate with dark chocolate shavings - however, unless you have sugar free chocolate it may then cease to be sugar free :) Healthier garnishes would include fresh or frozen berries or cherries. Or maybe even some slices of banana.


Makes 1 x small pie. 
~If you want to make a bigger one, double the recipe and use a 23cm springform cake pan.

What's next for dessert? Time to move on to the next Potluck Offering. 


Hit this button to go to the previous post (Super Vegan Crepes by Bacon is Not an Herb) or click here:


Hit this button to go to the next post (Delectable Date Squares by In Fine Balance) or click here:


Now I'm going to sit back with a glass of wine and work my way through the 102 other dishes at this potluck! It's going to be a big night, I hope you'll join me!


Friday, 12 October 2012

Vegan Chai Banana Bread


Can you believe it's been snowing in some places near me today?! Snow in October! 

Today has been windy and stormy and rainy. The kind of rain which soaks all of your "covered" outdoor areas as well. It's the kind of day for staying late in bed, drinking lots of tea, having hot soup for lunch and baking. Baking is a lovely thing to do on a cold windy day. The oven helps warm up the house and at the end you get a nice still-warm baked treat to devour. Preferably with a cup of tea.


I recently did a clean out of my cupboard and found that I had 48 different types of tea, I'm serious - 48! I decided that I had better not buy any more tea until I had consumed some of what I already have. I am pretty crazy about tea, but even to me 48 seemed excessive. Even though I drink several cups of tea a day, I decided that it would take me too long to work through them just by drinking. So I decided that it was time to do more baking with tea and to experiment with some new fresh iced tea drinks (if the weather ever warms up enough!).

One of my 48 types of tea was this beautiful Tulsi Chai Masala, which my friend brought back from India as a gift for me. It's quite different to other Chai Masala that I've had, it's a blend which is very strong on cinnamon. So I thought that this strong spice would make it perfect for baking. If you've read much of this blog before then you'll also know that I really don't get into breakfast. So I settled on Chai Banana Loaf - to serve the joint purpose of using up some of my teas and getting me excited about breakfast. It didn't disappoint. 


Ingredients
2-3 heaped tsp chai masala (this depends on how strong your chai is)
2/3 cup boiling hot water
1 banana, mashed well (should make about 1/2 cup, a bit more or a bit less is fine)
1/2 cup sugar
1/3 cup canola oil (to make a healthier loaf you can substitute 1/3 cup apple sauce and 1 tbsp canola oil)
1/4 tsp ground cardamom
1/4 tsp ground cloves
1/4 tsp cinnamon
1 1/4 cups wholemeal flour
1 tsp baking powder
1/2 tsp bicarb soda

To Make
1. Preheat the oven to 180 degrees (if your oven is fan forced then reduce to 170).
2. Steep the chai masala in the boiling hot water for at least 10 minutes. You can leave for longer if you want a stronger flavour. Strain and allow the tea to cool.
3. Combine the banana, sugar, oil, tea and spices in a large mixing bowl and whisk to combine.
4. Sift in the flour, baking powder and bicarb into the batter and mix well. You'll have lots of little wholemeal husks left in your strainer after sifting, but you can just throw those in too.
5. Line a 22cm/9inch long loaf tin and line with greaseproof baking paper. Pour in the batter and bake for 40-45 minutes, or until a knife inserted into the middle comes out clean.

Makes 1 loaf.


Tuesday, 26 June 2012

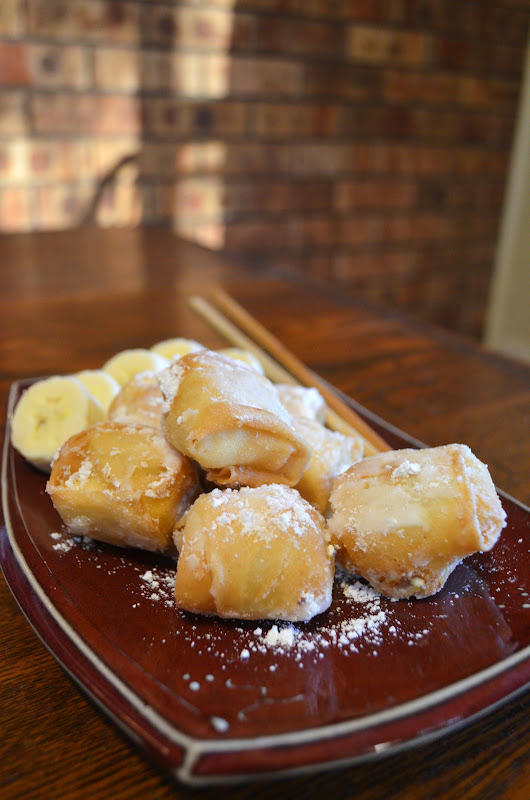
Num Chet Chien (Banana Nuggets!)


Deep fried desserts are not something that we should all have every day, but you just can't deny that they are incredibly delicious and sometimes you just have to sit back and enjoy life right? I think so anyway! You can kid yourself that since they're fruit-filled they're healthy, but the truth is all you need to know is that it's not nearly as bad for you as this. But don't worry about any of the stuff that I've just written - just make these for dessert tonight. They're easy, quick and will blow you and your guests away. That's all you need to know!

Ingredients
1 banana, peeled and chopped into 12 disks
6 spring roll wrappers, thawed if frozen
Vegetable oil, for deep frying (you'll need heaps to deep fry, but don't worry you can just pour it back in the bottle after it's cooled down and use it again for other cooking)
Icing sugar, for dusting

That's it! Too easy!
Here are some variations that I've tried which are also amazing:
1) Add a small chunk of dark chocolate with the piece of banana
2) Add a slice of cream cheese with the piece of banana (it goes all melty and yummy)

To Make
1. Cut each spring roll wrapper in half. 
2. Brush the piece of wrapper with water to soften it. Place a piece of banana at one end and roll it up just like you were rolling a spring roll - don't worry about making it too neat.
3. Continue with all the rest of the banana pieces and wrappers.
4. Heat a lot of oil in a wok, pan or, if you're an American, the deep fryer you have on your counter (jokes - I love Americans!)
5. Take a small square of the wrappers or a cube of bread to test if the oil is hot enough - if the oil fizzles around it and it crisps up quickly then the oil is hot enough. 
6. Deep fry the wrapped bananas in the hot oil for about 4-5 minutes or until they're browned slightly. Remove and drain on paper towel.
7. Roll them in the icing sugar and eat them immediately while they're nice and hot!

Makes 12 (serves about 2 people).


Thursday, 21 June 2012

The Easiest, Stickiest and Yummiest Banana Rum Pie Ever!


This delicious homely sticky mess is part of the "Sweet as Pie" Sweet Adventures Blog Hop - this month hosted by a blogger who I'm very fond of and who I'm exited to hear is making a fabulous and exciting move to a beautiful new place - Heather at The Capers of the Kitchen Crusader. Best of luck to you!


I've been pretty busy myself lately, planning and organising a trip overseas which we are embarking on in about 11 days! It's super exciting, but the result is that I'm often not in the mood to cook up elaborate and fiddly dishes after a long day out doing shopping and an evening spent on the phone trying to book accommodation across a language barrier. Of course, saving money to spend on our trip also means that I'm not keen on spending too much money on fancy ingredients as well! I always try and pull something out for the Sweet Adventures Blog Hop though, as the Hostesses are some of my favourite bloggers. 

So, I wanted the easiest, yummiest pie I could whip up in about 10 minutes and not have to buy too many ingredients for. It turns out that the quickest, yummiest and easiest pie here is also probably the best comfort food I've ever invented. Here are my rules of comfort food: 

1) It has to be really quick and easy - because nobody wants to be cooking for ages and doing something hard when they're feeling down, it's just not going to happen
2) If it's sweet then it should also be messy. Nothing makes you feel better than making a bit of mess while you eat something amazing
3) It should involve some kind of alcohol
4) It has to be slightly healthy, but not feel too healthy. Now, I know that a lot of people might disagree with me on this one but really it is true. If you eat something laden with fat and cream and all sorts you will end up feeling worse when you have eaten it then you did before - both physically and mentally. Comfort sweets should be sweet and delicious but not a total binge.

This pie fulfils all these requirements perfectly! It's made of only 4 ingredients and they're ones that you're likely to have around in your freezer/pantry/fruit bowl/booze cupboard anyway. It took be about 5-10 minutes to put together and then baked for 20 while I watched a show on my laptop. Perfect.

I was going for super quick and rustic - so I didn't trim my puff pastry square into a circle which would have made a neater pie. If neatness is important then you may want to do this, but I don't like to waste the pastry and I though it looked fine.


Ingredients
1 sheet ready rolled puff pastry (cheaper brands are generally vegan friendly)
2 tbsp dark rum (I used vanilla rum, but any will do)
1/2 cup brown sugar
2 ripe bananas, peeled and thinly sliced (do this just before putting them on the pie so they don't go brown)

To Make
1. Preheat your oven to 160 degrees C.
2. Thaw your pastry completely and then place it on a baking tray lined with non stick baking paper.
3. Set aside 2 tsp of the brown sugar and mix the rest with the rum to make a thick paste.
4. Spread the sugar paste over the pastry - you don't have to go all the way to the edges though as you will fold these over.
5. Layer the slices of banana over the pastry, leaving a small amount of space around the edges to fold over. One you have filled up the pastry sheet you will still have about half a banana left so just add a second layer around the middle of the pie.
6. Fold the edges over the top of the banana layer, you'll have to fold them over themselves a bit too so that the square sheet becomes a round pie. Sprinkle the brown sugar that you set aside over the top.
7. Bake in the oven for 20 minutes. I recommend that if your oven as a "bottom only" setting, that you use this setting for the last 5-8 minutes to make sure that the pastry cooks on the bottom as well.
8. When you pull it out the sugary rum paste will have melted everywhere, so spoon any syrup that has run out of the pie back on to the top and then let it rest for 5-10 minutes.
9. Cut and serve warm.

Serves two, perfect with vanilla ice cream or just as it is!


Tuesday, 21 February 2012

Rainbow Banana Pancakes with Bourbon Syrup


This weekend is the Sydney LGBTI Mardi Gras! A celebration of how far we have come in our acceptance of other people's life choices and a reminder of how far we still have to go to deliver full equality to all people regardless of sexual preference or gender! To celebrate Mardi Gras I've made incredible rainbow pancakes - it's pretty much like eating a rainbow! A delicious rainbow.

This recipe is part of the Holiday Recipe Club's Mardi Gras Blog Hop. Each blog hop participants are given three ingredients and a holiday to celebrate with the challenge of making a dish for this occasion using at least one of the ingredients. Last month's valentine's day blog hop I used the theme ingredients of Strawberries and 'Heavy Cream' to make an amazing Vegan Strawberry Cherry Sago Trifle. 

I always try and use at least two of the three ingredients and this month the ingredients include banana and bourbon. So - I decided on rainbow banana pancakes with bourbon syrup. You might think bourbon syrup sounds a bit odd, but actually when you think about it bourbon is a very sweet spirit -it basically tastes like whiskey with a couple of tablespoons of sugar added. In fact the guy at the bottle shop when I bought the bourbon told me that somebody had once given him whiskey with sugar added and he couldn't distinguish it from bourbon. Unfortunately, this proved an expensive theme ingredient for me because I can tell you that bourbon is not the kind of thing I keep around the house so I had to go out and buy some! It made an absolutely delicious syrup though.


Ingredients
1 1/2 cups soy milk
1 tsp apple cider vinegar
1 1/2 cups soda water or mineral water
2 cups wholemeal flour
1 banana, mashed into a smooth paste
Red, yellow, green and blue food colouring
6 tbsp nuttelex (or other non dairy margarine)
1 cup bourbon
4 tbsp raw sugar
Fresh blueberries and banana, to garnish


To Make:
1. Whisk the soy milk and vinegar together and set aside to curdle.
2. Add the soda water and mashed banana to the soy milk and whisk together.
3. Slowly add the flour, whisking as you go until a thick pancake mix is made.
4. Get 5 small bowls and ladle equal amounts of the pancake mix into each of them (should be about 2 full ladles).
5. In the first bowl mix 1/2 tsp of green food colouring.
6. In the second bowl mix 1/2 tsp of yellow food colouring
7. In the third bowl mix 1/2 tsp blue food colouring
8. In the fourth bowl mix 1/2 tsp pillar box red food colouring
9. In the fifth bowl mix 1/4 tsp yellow food colouring and 1/4 tsp red food colouring to make orange.


10. In a frypan melt 2 tsbps nuttelex and divide the first coloured mix into 3 pancakes. Fry on a medium heat until bubbles start to appear in the pancake and then flip over and cook the other side.
11. Repeat with the other colours, adding 1 tbsp nuttelex to the pan between each batch.
12. Whilst the pancakes are cooking heat the bourbon in a small saucepan and then add the sugar. Stir until it is all dissolved and then lower the heat and simmer for about 10 mins. Then turn off the heat and allow the sauce to stand for at least 5 mins before using - this will allow it to thicken.
13. Pile the pancakes into a stack (I did red, orange, yellow, green, blue - but it's really up to you!)
14. Pour the syrup over them and garnish with fresh banana slices and blue berry.

Serves 3.


~This recipe is dedicated to A-dizzle~