Showing posts with label cake. Show all posts

Wednesday, 27 May 2020

Vegan Pear and Rhubarb Cake


We get veggie boxes delivered these days, although I'm hoping that one day we'll grow so much fresh food that we won't really need to. I love the lucky dip nature of it, it's different every week and you figure out what you're going to make when it comes. Surprisingly though, it comes with pears pretty much every week. Much as I love them I've struggled to use them up in such quantity, leading to experimental cooking like this. This creation turned out fantastic!


Vegan Pear and Rhubarb Cake
Ingredients
3 ripe pears
4-5 rhubarb stalks
1 cup soy milk
1/3 cup canola oil
1/2 cup sugar (I use raw)
1 tsp vanilla extract
1 1/4 cups wholemeal flour
3/4 tsp baking powder
1/2 tsp bicarb soda
1 tbsp chia seeds
1 tbsp brown sugar

To make:
1. Preheat the oven to 180°C.
2.  Core 2 of the pears and chop into 1cm or so cubes, don't worry about peeling the skin. Chop the rhubarb stalks into 1cm lengths.
3. In a large mixing bowl, whisk the soy milk, oil, sugar and vanilla together.
4. Add the flour, baking powder, bicarb soda and chia and mix well to combine.
5. Grease a loaf tin (or a small round tin) well and line with baking paper.
6. Pour in the batter. Slice the remaining pear and use it to decorate the top with whatever pattern you like. Sprinkle the brown sugar over the top.
7. Bake for 45 minutes, or until a knife (or skewer) inserted into the middle comes out clean.
8. Cool in the pan and then use the sides of the baking paper to lift it out and serve.

Makes 1 loaf or 1 small cake. To make a full size cake you'll need to double the recipe.


Thursday, 23 February 2017

Vegan Basbousa


Last year was a very quiet year on Gormandize. I don't know how so many women seem to accomplish so much while raising tiny babies, but I salute them. I couldn't even begin to get my head around doing all the stuff I used to do before my baby came along. Caring for a tiny human, trying to keep my house moderately clean and working 2 half days a week already seems like an overwhelming amount to do. A lot of my personal interests have been put on hold.

Next week, my beautiful cheeky daughter turns one. I'm hoping this year to start exploring some of the things that used to occupy my time before her and this blog is one of them. Over the past few years I've put up about 380 free vegan recipes for you all to enjoy. That is a phenomenal database of delicious food. It has taken up a lot of time and resources! I won't be able to dedicate nearly as much time, effort and money to producing recipes for you all as I used to, but this blog will live on.

I've got a new project that I'm working on for Gormandize and I'm also going to be bringing you some new recipes this year. I hope you enjoy what I've got in store.

I'm starting you off with a firm favourite. I love this dish. I must have made it countless times. I hope you enjoy it as much as I do :)

Wishing you a prosperous Year of the Rooster!


Basbousa (Egyptian Semolina & Coconut Cake)

Ingredients
1/2 cup nuttelex (or other vegan margarine)
3/4 cup raw sugar
75g dessicated coconut (unsweetened)
1 cup semolina
1 tsp baking powder
1/2 cup plain wholemeal flour
3/4 cup almond milk
1 tsp vanilla extract
Whole blanched almonds, to decorate

Syrup:
2/3 cup caster sugar
2/3 cup water
2 tbsp lemon juice

To Make:
1. Start with the syrup, so it has time to cool. Place the sugar, water and lemon juice in a saucepan over a medium heat and stir until all the sugar is dissolved. Bring to the boil and then reduce the heat and let it simmer for 6-8 minutes, until it thickens. Remove from the heat and allow to cool. Once cool, chill in the refrigerator while you make the cake.
2. Preheat the oven to 180 degrees C. 
3. Melt the nuttelex in a saucepan and then add all the remaining ingredients except the blanched almonds, stir well to combine. 
4. Grease a square baking dish well and pour the batter into it, spreading it out evenly.
5. Bake in the oven for 30-35 minutes, until the top is golden. Remove from the oven and score lines diagonally across the surface. Pour the chilled syrup over the hot cake and then decorate each piece with a blanched almond in the centre. Allow to cool slightly and then serve either warm or chilled. 

You can check out my the other delicious Egyptian & Egypt-inspired recipes here. 

Friday, 27 February 2015

Jamaican Ginger Cake


The first great thing about this cake it how easy it it. Mix everything in a bowl, bake and then sprinkle with icing sugar and serve. I love finding cakes which don't need any kind of icing or fancy decoration, because it's so much less work :) The rich taste of this cake doesn't need any icing, glaze or drizzle - it's perfect just how it it. The second great thing about this cake is that it tastes like a million dollars in your mouth. It's got a double it of ginger - fresh and ground - and luscious molasses to give it that dark and sticky quality. The flavours are reminiscent of gingerbread, but the consistency is soft, moist and sticky. It looks plain and unassuming, but I think it's probably my favourite of all the cakes I've made for all the countries I've featured (that's a big call, but I'm making it!).


Jamaican Ginger Cake
Adapted from Feast Magazine Issue 35 (September 2014)

Ingredients
160g vegan margarine or butter
200g dark brown sugar
90g castor sugar
2/3 cup apple sauce
4-5cm piece of fresh ginger, peeled and finely grated
100g blackstrap molasses
100ml oat or soy milk
300g plain flour (I prefer wholemeal, but you can use either)
1/2 tsp bicarb soda
1 tsp baking powder
1 tbsp ground ginger
1/2 tsp ground cloves
1 tsp allspice
Pinch salt
Powdered sugar, to serve

To Make
1. Preheat oven to 170 degrees C. Lightly grease a 22-23cm cake tin and line with baking paper.
2. Beat margarine and both sugars together using electric beaters for about 5 minutes, until smooth and thick. 
3. Add the apple sauce a bit at a time and beat in. Then beat in the molasses, grated fresh ginger and milk. Fold in the flour, bicarb soda, baking powder, salt and spices. 
4. Pour into the prepared cake tin and bake for 1 hour, or until a skewer inserted in the middle of the cake comes out clean. Cool slightly in the pan and then invert onto a cooling rack and allow to cool completely. 
5. Sprinkle the cool cake generously with powdered sugar. If you like an extra ginger hit, mix a pinch or two of ground ginger in with the powdered sugar that you sprinkle on the top. 
6. Eat it. Preferably with a cup of tea.

Makes 1 x 23cm diameter cake. 


Sunday, 28 December 2014

Burmese Sticky Rice Cake


Time to share with you another delicious recipe from the lovely cuisine of Myanmar. This sticky rice cake is so more-ish because it's incredibly tasty and not too sweet! Flavoured with peanuts, sesame seeds and coconut with the use of brown sugar to make a caramelised sticky treat. This is a nice one to get out for your new year celebrations, it's nice to bring in the new year by trying something new :)


Burmese Sticky Rice Cake

Ingredients
1 1/2 cups Thai sticky rice
2/3 cup brown sugar
1/3 cup sesame seeds
1/4 tsp salt
1/3 cup chopped peanuts
1/3 cup raisins (optional)
2 1/4 cups water
Handful of peanut halves
1/4 cup unsweetened desiccated coconut

To Make
1. Rinse the sticky rice with cold water and place in a large non stick saucepan. Add the brown sugar, sesame seeds, salt, chopped peanuts, raisins and water and bring to a boil. Once boiling, reduce the heat to the lowest setting and let cook, covered, for about 25 minutes. When it is done cooking it will have absorbed almost all of the water. Remove from the heat and let sit, covered, for 10 minutes.
2.  Lightly grease a 9 inch by 9 inch (or similar) size dish and line the bottom of it with non stick baking paper. Gently stir the rice and transfer to the prepared dish. Press down lightly to evenly distribute and compress the rice. Sprinkle the peanut halves and coconut on top and gently press down so that they stick to the top.
3. Let stand for 30 minutes or so and then cut into squares to serve. Do not refrigerate. Store any leftovers on an airtight container at room temperature.

Makes 1 x 9 in by 9 in rice cake, approximately 20-25 slices.


This month I'm featuring vegan recipes from Myanmar (Burma).
Check out my other Burmese recipe posts:

Wednesday, 18 June 2014

Sweet Corn Cake (Vegan) with Lemon Glaze


This one isn't really an Panamanian recipe, but it was inspired by Panama month. Actually it was inspired by this Sweet Corn Ring recipe, but this recipe is a savoury recipe whereas I wanted to make an actual cake. Corn is so sweet that it really makes a natural choice for desserts, even though most people wouldn't think of it. Adding lots of lovely puréed sweet corn means you don't need nearly as much sugar, and the end result is perfectly balanced in sweetness. And don't worry, it doesn't feel like eating vegetables for dessert - it feels like eating cake! Cake with delicious tangy lemony glaze.

Sweet Corn Cake with Lemon Glaze

Ingredients
1 cups corn kernels (either fresh or tinned, drained & rinsed)
2 cups soy, almond or oat milk
2/3 cup canola or rice bran oil
1/2 cup sugar
2 1/2 cups wholemeal flour
2 tsp baking powder
1 tsp bicarb soda
1 cup soft icing mixture
2-4 tbsp fresh lemon juice

To Make
1. Preheat the oven to 180 degrees C.
2. Purée the corn kernels and place in a bowl. Stir in the soy milk, oil and sugar.
3. Add the flour, baking powder and bicarb soda.
4. Pour the batter into a greased ring shaped baking tin. Bake for 45 minutes, or until a knife inserted into the middle comes out clean.
5. Turn out onto a cooling rack and cool completely before glazing. While it's cooling, you can make the glaze by putting the icing mixture into a small bowl and gradually adding lemon juice until you have it just think enough to drizzle, but still quite thick (if it's too thin it'll just run right off the cake and pool on the plate).
6. Once the cake is completely cool, drizzle all over with the glaze.


This month I'm featuring recipes from Panama.
Check out my other Panamanian recipe posts:

Sunday, 8 September 2013

Vegan Chocolate Buttercream Icing


A couple of days ago I posted these gorgeous and quite unusual Chocolate Five Spice Cupcakes for my Veganmofo theme of "My Spice Rack". I posted the cupcakes recipe but I didn't post the chocolate buttercream icing. I had quite a few people ask me for the vegan chocolate icing from these pictures so I thought I would oblige. I don't use a recipe for icing. When I was a kid my mother taught me how to make icing and I've made it that way ever since. I never measure quantities, I just mix it until it tastes right. But I can give you a general recipe that you can adapt in any way you like. This is my basic chocolate icing, plus I've added a few ideas for variations down the bottom. You can be as creative as you like, just have fun. It's not healthy, but it sure it delicious!

Easy Vegan Chocolate Buttercream Icing

Ingredients
1 cup margarine (I use Nuttelex)
3 cups soft icing mixture
2 tsp vanilla extract
2 tbsp cocoa powder

To Make
1. Cream the margarine and vanilla together with an electric mixer or with a butterknife (or a spoon for that matter).
2. Add the cocoa and 1 cup of the icing mixture. Mix well.
3. Continue to add the soft icing mixture bit by bit until it is all added. Now here is the important bit - taste test it and make sure it doesn't have any of that oily margarine taste left. If it does add a bit more icing mixture until it tastes perfect.
4. Spoon or pipe generously on top of your cake or cupcakes.

This recipe makes quite a bit, as it is designed for generous piping. If you're not piping it on you can probably make a half batch.

Variations:
~ Add 1/2 tsp mint extract to make choc mint icing
~ Swap 1 tsp vanilla extract for 1 tsp orange extract and add some fresh orange zest to make jaffa icing
~ Add 2 tbsp finely chopped dark chocolate for chocolate chip icing
~ Use kirsh or cherry brandy instead of vanilla extract and top with cherries for black forest icing
~ Add 1 tbsp frangelico and an extra 1/2 cup soft icing mixture
~ Swap the vanilla for strong coffee or kahlua for mocha icing

There are so many more things you could do with this, there are just a couple I came up with on the spot. If you've got some great ideas I would love to hear them.

Thursday, 22 August 2013

Lychee & Banana Cake with Coconut Rum Cream (Vegan & Sugar Free)


Sometimes I buy silly amounts of things when they're really cheap. Guilty. At the end of last summer (yes, I know, a while ago now!), my supermarket sold off huge tubs of lychees really cheap. I love lychees, but I don't have them often because they're generally a bit expensive. So I went a bit stupid and bought four huge packets. I didn't actually have any plans for them so I shelled them all (it took me about an hour) and put them in plastic containers in my freezer so that they would be there when inspiration struck. I forgot about them for a while.

Then, I was faced with the challenge of making a sugar free birthday cake. I'm happy cooking sugar free because I'm keen to eat less sugar myself, but what made this difficult was that it also had to be free of dried fruits including dates! Dates are the go to ingredient for the sugar free cake maker so my initial thoughts of an easy chocolate date cake evaporated. Then I remembered the lychees in my freezer - one of the most naturally sweet fruits you can buy! Combined with banana, it made a perfect birthday cake. Definitely sweet enough but not sickly sweet, my partner (who generally doesn't like cake because it's too sweet) loved this cake better than any other cake I've made..... and I've made a lot of cake.

For the icing I used whipped coconut cream with rum extract (because I looked at the ingredients and couldn't find anything which looked like sugar) - but if you're not being strict about your sugar than go ahead and add a splash of the real stuff instead!

Lychee & Banana Cake with Coconut Rum Cream

Ingredients
1 cup very ripe mashed banana
1/2 cup canola oil
1 cup lychee juice (from the lychees you just shelled ideally - or from the can if you bought it in natural juice or a bottle if you can find unsweetened lychee juice)
1/2 cup unsweetened oat or soy milk
1 cup drained lychee flesh, roughly chopped
2 1/2 cups plain wholemeal flour
2 tsp baking powder
1/2 tsp bicarb soda
1/2 tsp salt

1 can coconut cream, left in the fridge overnight (or longer)
1 tsp rum extract (or actual rum, if you prefer)

To Make
1. Heat the oven to 180 degrees.
2. Whisk together the banana, canola oil, lychee juice and oat milk. Stir the lychee flesh through.
3. Sift in the flour, baking powder, bicarb soda and salt and mix well.
4. Grease a medium sized cake tin well and pour the batter in. Bake for 1 hour, or until a skewer inserted in the middle comes out clean. Turn out onto a cooling rack and allow to cool completely.
5. When you open the tin you will notice that the top is a very solid thick cream. Scoop out all of the solid thick cream on top (you can reserve the rest of it to use in another meal – like a smoothie or a curry).
6. Put the thick cream into a bowl and mix well using a hand held electric mixer. Move the beaters up and down to try and get as much air into the cream as possible. Add the rum extract and beat until it pretty much resembles thick cream.
7. Spread the cream over the top of the cake. If you've got some more lychee flesh you can decorate the top with fresh lychee.

Saturday, 27 April 2013

Hollandse Stroopkoek (Dutch Beer & Syrup Cake)


Another sweet treat from the orange land of The Netherlands! This one looks pretty innocent and plain. It looks just like a normal fruitcake. But it's more. It's so much more. It has quite a delicate texture, which is unusual for a fruitcake, and the flavours of the two main ingredients really contribute to a cake unlike any I've ever had before.

If you're thinking, 'I don't like beer that much', then don't let the beer put you off this cake. I'm not a big fan of drinking beer either. Yes, you can taste the beer in this cake, but it doesn't taste like drinking a beer! It simply adds a rich and hearty element to the cake - a slight bitterness to complement the sweet treacle.


I made quite a small cake for this one - as I was only having a couple of people over to help me eat it. It was so nice that I probably wouldn't have minded a full sized one, it would have meant that I had lots of leftovers! But probably best that I didn't! It doesn't rise much and makes quite a flat and dense cake. This is perfect really, because you only need fairly small slices (each slice packs a flavour punch!). I made it to fit a small 20cm diameter cake tin. If you want a full sized cake then you'll probably want to make about three times the recipe.


Hollandse Stroopkoek
Adapted from godutch.com
Ingredients
1 cup wholemeal flour
1  tsp baking powder
1 1/2 tsp allspice
1/2 tsp salt
1 tbsp treacle or stroop
1/4 cup Nuttelex (or other vegan marg)
3/4 cup beer
80g raisins
50g currants
1/3 cup walnuts
2 tbsp slivered almonds

To Make
1. Preheat the oven to 180 degrees.
2. Combine the flour, baking powder, allspice and salt in a large bowl.
3. Place the treacle and Nuttelex in a small saucepan and melt over a low heat until completely melted. Remove from the heat and gradually mix in the beer.
4. Add the beer mixture to the flour gradually, stirring.
5. Stir the raisins, currants, walnuts and almonds through the batter until evenly distributed.
6. Grease and line a 20cm diameter cake tin and pour in the batter.
7. Bake for 40 minutes, or until a knife inserted into the centre comes out clean.
8. To serve, sprinkle with icing sugar.

Makes 1 x 20cm diameter cake. I recommend serving with a cup of tea!


This month I'm featuring lots of delicious food from The Netherlands.
Check out my other Dutch recipe posts:

Wednesday, 14 November 2012

Triple Threat Vegan Coconut Cake


Coconut cake looks and sounds very unassuming and not particulary special. Don't let that fool you! This coconut cake is special with a capital spec. It's my second Indonesian inspired recipe to go up this month, and my first sweet offering. A small heads up, if you are allergic to coconut then Indonesian month might not be your month, as it's all loaded with coconut!

So, why is this cake a triple threat? Yes, it can sing, dance and act, but there's more. It's not just a cake with some coconut, oh no, it's a cake with coconut, coconut cream and coconut oil. It's also drizzled generously with coconut glaze, so maybe it's a quadruple threat? The result of this combination is really triple the goodness - the texture of the cake is exceptional. It's moist and dense and packed with flavour.


Triple Threat Vegan Coconut Cake

Ingredients
1/3 cup coconut oil
1/3 cup palm sugar (liquid)
1 x 400ml can coconut cream (minus 1 tbsp for the glaze)
2 tsp vanilla extract
1 cup wholemeal flour
1/2 tsp baking powder
1/2 tsp bicarb soda
1 cup dessicated coconut (you could probably sub fresh grated coconut if you have it)

And for the glaze:
1 tbsp coconut cream (just reserve it from the can you used for the cake)
1 cup soft icing mixture
Pinch of cinnamon (optional)


To Make
1. Preheat the oven to 170 degrees C.
2. Heat the coconut oil over a low heat until melted. Remove from the head and place in a large mixing bowl.
3. Add the palm sugar and stir well.
4. Shake up the can of coconut cream well before use. Open it and set aside 1 tbsp of it to use for the glaze. Add the rest to the bowl along with the vanilla extract. Whisk to combine.
5. Add the flour, baking powder and bicarb and whisk through. Finally, stir through the dried coconut.
6. Line a well grease medium square baking dish with greaseproof paper on the bottom and pour the batter in.
7. Bake for about 30 minutes or until springy to touch and a knife inserted into the centre comes out clean.
8. Set aside to cool while you whip up some glaze.
9. To make the glaze: place the icing mixture and 1 tbsp of coconut cream in a small bowl and stir well with a fork or spoon until smooth.
10. Once the cake is completely cool, cut into slices and drizzle the glaze liberally over the top. Ready to eat!

*TIPS*
~ If your coconut cream comes out of the can a little lumpy, don't worry. Just whisk it well when you add it to the bowl to get rid of lumps
~ If you're going to make this cake in advance, I recommend NOT storing it in the fridge. Putting this cake in the fridge will cause the coconut oil to solidify making the cake much harder. I advise storing it in an air tight tupperware container in the cupboard, and the same goes for any leftovers.


This month I'm featuring lots of amazing recipes from Indonesia!
Check out my other Indonesian recipe posts:


Monday, 15 October 2012

Vegan Frankfurter Kranz (German Bundt Cake with Cherry Jam and Rum Buttercream)


I generally have a rule that I never post more than one recipe a day. Today I am breaking that rule big time! Why? Because all my blogging events have happened to fall on exactly the same day. Today. Today I will be posting four recipes!

Firstly, at 8am this morning entries opened for the infamous Chopped/Vegan challenge hosted by vegan cooking guru Isa Chandra Moskowitz. The challenge was to create brunch dishes using butternut pumpkin, fresh rosemary, popcorn and apricot jam - quite a challenge but I really did enjoy it! Here are my two entries: Pumpkin Rosemary Popcorn Crumble and Lemon Rosemary Popcorn Cupcakes with Pumpkin Apricot Glaze. It was so much fun cooking with this unusual combination of ingredients and I have to say the results were actually quite delicious!

Secondly, it's time again for the Sweet Adventures Blog Hop, this month hosted by Jennifer from Delicieux with a 'High Tea' theme.

Thirdly, the Eating the Alphabet Blog Hop is kicking off as well featuring the letters S and T, I've put up these lovely Balsamic Strawberry and Cucumber Sushi Rolls.


Whenever I think of high tea I always think of tiny mini cakes and bundt cakes. I'm not sure what it is about cakes cooked in a ring shape that makes me think of sitting on a balcony drinking tea at a white table strewn with doilies. This month is also German Food month, so I am pleased to be able to combine this Sweet Adventures Blog Hop with my theme for the month and bring you Frankfurter Kranz - a German bundt cake which translates to Frankfurt Crown. It's not hard to see why, it does look rather like a crown.


I'll give you a heads up though! It's very sweet. Vanilla cake + cherry jam + buttercream + sugared almonds equals a whole lot of sweet! I thought it was fantastic though, so don't let this turn you off, just make sure you invite some friends around to help you eat it!

Thanks again to the lovely hostesses of the Sweet Adventures Blog Hop. Here are my entries from the previous months:

August's Berry Hop - Sugar Free and Vegan Raspberry Fudge
July's Nut Hop -  Best Ever Vegan Carrot Cake  (I got this one in just in time, but it never appeared on the link list so you may have missed it!)
June's Pie Hop - Easy, Sticky, Messy Banana Rum Pie
May's Tea Hop - Thai Red Tea Vegan Jelly with Poached Apples
April's Lemon Hop - Lemon Curd 'Cake Sandwiches'
March's Layers Hop - Rhubarb and Apple Sago Parfait
February's 'Love' Hop - African Almond, Pistachio and Orange Blossom Bites
January's Choc Hop - Black Forest Shots & Truffles in 3 Flavours: Paprika, Tahini & Strawberry Gum
December's Festive Hop - Chocolate Ice-Cream Christmas Pudding


Vegan Frankfurter Kranz

Ingredients

The Cake
2 cups soymilk
2 tsp apple cider vinegar
2/3 cup canola or rice bran oil
3/4 cup sugar
1 tbsp vanilla extract
1/2 cup almond meal
2 cups wholemeal flour
2 tsp baking powder
1 tsp bicarb soda

The fillers and toppers*
1 cup nuttelex (or other non dairy margarine)
3 cups soft icing mixture
1 tsp vanilla extract
1 tbsp vanilla rum (if you don't have vanilla rum just use plain dark rum - but don't use vanilla white rum!)
Black cherry jam
1/3 cup castor sugar
2/3 cup blanched almonds

*This recipe for buttercream makes enough to do a crumb coat and a top coat of icing, which is a good idea for a layer cake, as there will be plenty of crumbs to get though the icing. If you don't want to do a crumb coat then you can probably make about 2/3 of the icing quantity.

To Make:
1. Preheat the oven to 180 degrees.
2. Combine the soy milk and vinegar in a large bowl and whist until frothy. Set aside to curdle.
3. Add the oil, sugar and vanilla to the soy milk and mix well.
4. Add the dry ingredients and whisk to combine.
5.  Pour into a well greased bundt tin and cook for 30-35 minutes, or until a knife inserted into the middle of the cake comes out clean. Let cool in the pan for 15-20 mins and then turn out onto a cooling rack to cool completely.
While it's cooling you can:
6. Cream the margarine, icing mixture, vanilla and vanilla rum together to make the buttercream.
7. Lightly toast the blanched almonds in a pan or a grill/oven.
8. Heat the castor sugar in a small saucepan until completely dissolved. Remove from the heat and stir the almonds through it until completely coated with the sugar. Then spread out onto a sheet of greaseproof paper and put in the fridge to harden up.
Now that the cake is cooled you can:
9. Cut the cake into 3 fairly even layers (the top one will obviously be smaller, don't stress).
10. Spread a generous amount of cherry jam onto each layer. Then top with a layer of your rum buttercream.


11. Reassemble your layers and you're ready to ice it.
12. Spread a layer of the buttercream icing all over the cake, don't worry about making it too neat because this is the crumb coat or 'undercoat'. Then put the cake in the freezer for about 10 minutes.
13. Take it out and do the top layer. Make this layer nice and neat and smooth it out as much as you can. 
14. Roughly chop/break/smash your almond brittle and decorate the top with it liberally.

Makes 1 ring cake.

This month I'm featuring lots of amazing recipes from Germany!
Check out my other German recipe posts:


Thursday, 27 September 2012

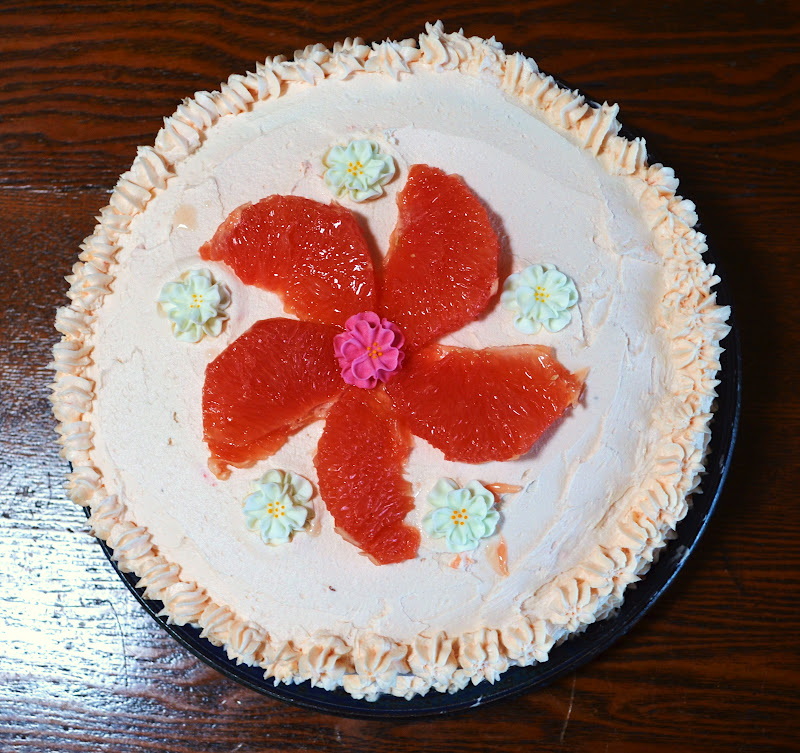
Spring Vegan Ruby Grapefruit Cake


I'm excited about spring, it makes me truly happy inside! The sun is shinning, my heater is off and I've actually been able to wear some t-shirts. It's early days yet, so my light cardigans are also getting their workout, but it's still enough to make me happy and excited. I don't like winter at all, and I hate being cold! 

So, when charged with making a cake for my grandmother's birthday gathering, I felt the need to make something fruity to celebrate spring! Gorgeous big ruby grapefruits have come into season at my local supermarket, so I used them as my inspiration. The cake is deliciously sweet and tangy, whilst being moist and rich with flavour. I do, however, apologise about my icing and piping efforts in these photos, I know it's not my best work! I was in a bit of a hurry to get out of the house so I did a slightly slapdash job of it. That didn't matter though because the cake was absolutely delicious, and lucky my gradmother absolutely loves grapefruit! This was lucky, and is probably something you should check before making it for someone!!

Ingredients 
1 cup canola oil
1 1/2 cups raw sugar
2 1/4 cups soy milk
1 1/2 cups fresh ruby grapefruit juice (throw the pulp from juicing in there too!)
1 tsp vanilla extract
3 cups plain wholemeal flour
3 tsp baking powder
1 tsp bicarb soda

Icing
1 cup vegan margarine (nuttelex)
3 1/2 cups soft icing mixture
1/4 cup fresh grapefruit juice
2 tsp vanilla extract
3-4 drops pink food colouring (optional)

Plus:
Fresh grapefruit slices for decorating (this is optional, but HIGHLY recommended, as the fresh grapefruit really makes it special)
Sugared flowers (optional, just because it's spring!)

To Make
1. Preheat the oven to 180 degrees C.
2. Combine the oil, sugar, soy milk, vanilla and grapefruit juice in a large mixing bowl and whisk until combined (you can also just stir with a wooden spoon, but a whisk really gets the job done nicely!).
3. Sift in the dry ingredients and mix together to combine. Don't over stir, just make sure it is all nicely combined.
4. Grease a 23cm diameter cake pan (preferably springform) and line the bottom with baking paper. Pour in the batter.
5. Bake for 1 hour, or until a knife inserted into the centre comes out clean.
6. Remove from the oven, run a sharp knife around the outside edge of the tin to separate any bits of the cake that may have stuck to the tin. Allow to cool in the tin for about 20 minutes and then remove the sides of the pan and gently transform the cake to a wire cooling rack to cool the rest of the way.
7. To make the icing, combine the margarine and soft icing mixture and beat with electric beaters until combined. Add the vanilla, grapefruit juice and food colouring and beat until it forms a light fluffy icing. If it is a little soft in consistency you can add a bit more icing sugar to make it firmer and easier to pipe.
8. Once the cake is completely cool cover the top and sides in icing. You can pipe borders or just leave it smooth. Decorate the top with slices of fresh grapefruit.

Makes 1 large cake.


Looking for great vegan cakes? Try some of these!


Thursday, 30 August 2012

Vegan Kladdkaka (Gooey Swedish Chocolate Cake)


Only 2 days left of August! The year is going by so fast, we're almost into all the months that end with "ber" and to me that means that Xmas is practically here. There are also only 2 days left in Swedish Food month on this blog, which is sad in a way - although I'm sure my body won't mind eating less carbs, rich foods and chocolatey creamy desserts! It is just as well that Sweden month fell in winter, as I'm not sure how I would have coped with the rich and heavy foods during Sydney's summer months!

I've left my favourite Swedish dessert of the month until last. It's absolutely deliciously decadent! Kladdkaka is essentially a rich chocolate cake which is left slightly undercooked, so that the outer edge is chewy like a brownie and the inside is still gooey. It is very easy to make and is one hell of a fantastic comfort food! It's just like a big gooey chocolate brownie. What is not to love about that?

Ingredients
1 1/2 cups wholemeal flour
1 1/2 cups sugar
1/4 cup almond meal
1/8 tsp nutmeg
150g nuttelex (or other non dairy margarine)
2 tbsp golden syrup
1/2 cup almond milk (you can sub soy milk)
100g dark chocolate (vegan variety), chopped up
Chopped almonds to garnish (or other nuts if you like)

To Make
1. Preheat the oven to 180 degrees.
2. Combine the flour, sugar, almond meal and nutmeg in a large mixing bowl.
3. Put the nuttelex and golden syrup in a saucepan and put over a low heat to melt.
4. Stir in the almond milk and heat until it is almost simmering, the milk should be hot but not simmering.
5. Remove from the heat and stir through the chopped chocolate. Stir continuously until all the chocolate has melted.
6. Pour the chocolate mixture into the dry ingredients and mix well.
7. Grease a 22-23cm springform cake tin and line the bottom with greaseproof baking paper.
8. Pour the batter into the tin and bake for 20-22 minutes. The edges should be cooked and a skewer/knife should come out clean when inserted. The middle will be gooey.
9. Allow to cool a little. Sprinkle with chopped nuts. Can be eaten warm or cold, great served with vanilla ice cream.

Makes 1 cake.

~TIPS~
~ Remove the sides of the springform pan and then just serve it still resting on the base. As the middle is gooey it is not very stable and your cake may not respond well to being moved, so just leave it on the base to serve.


This month I'm featuring lots of amazing recipes from Sweden!
Check out my other Swedish recipe posts:


Wednesday, 25 July 2012

Best Ever Vegan Carrot Cake


This have been very quiet on this blog lately - my apologies! I do, however, have an excellent excuse. I have spend the last three weeks in Sri Lanka having the most amazing holiday, thus not being able to post. If you keep your eye on the blog in the next few days you'll see lots of great pictures of all the curries I ate and a wonderful cooking class I took in Unawatuna (on Sri Lanka's south coast). First though, here is something very un-Sri Lankan!

I flew in last night and after a very long day of flying and today I slept until 12:40pm! Sounds bad, I know, but actually it was only 8am in Sri Lanka, so I didn't feel so bad! When I finally got myself out of bed I jumped back on my blog to see how it had fared in my absence. I was pleasantly surprised to see that the blog had quite a lot of hits still - thanks guys! I was also pleasantly surprised to find that I had about 3 hours left to enter the July Sweet Adventures Blog Hop - Nuts About Sweets.


Luckily I had this incredible vegan carrot cake in the archive, which is packed full of tasty walnuts! I'm a long time lover of carrot cake, but there are a lot of awful ones out there! I had it a lot as a kid but not as much as an adult. One night I had a real craving for carrot cake while I was out with friends so I decided to have a decidedly un-vegan moment (I'm only human! It happens sometimes) and bought a piece of carrot cake from a bakery on King St in Newtown. It was dreadful. Dry and bland cake covered in a thick icing which pretty much tasted like butter with a little bit of sugar. It was devastating and I threw most of it in the bin - all it did was make me crave real carrot cake more!!

So I knew I had to make a better one! It had to be my mother's recipe, so I decided to do a vegan version. It was incredible, the absolute best carrot cake I have ever eaten! So here it is - easy and delicious!

Ingredients

The Cake
1 cup oil
1 ½ cups sugar
1 teaspoon of cinnamon
1 teaspoon of salt (optional)
3 cups grated carrot
1 1/3 cups apple sauce
2 teaspoons baking soda
1 cup chopped walnuts or pecans
2 cups wholemeal flour

The Icing
1 tsp vanilla
60g nuttelex
125g vegan cream cheese
2 cups soft icing mixture

To Make
1. Mix sugar, oil and apple sauce well. 
2. Add dry ingredients (sifted), carrots and nuts. Mix well.
3. Pour into a greased and lined cake tin
4. Bake at 120 degrees celcius for 1 hour.
5. Remove and allow to cool for 20 minutes or so in the tin before turning out onto a cooling rack to cool completely.
6. Cream the vanilla, nuttelex and cream cheese together using an electric beater or a knife. Mix in the icing mixture and mix until completely smooth and fluffy. Ice the cake however you like.


Wednesday, 13 June 2012

Vegan Rocky Road Layer Cake


I’ve been blogging for exactly one year this month. It’s been a great experience thus far and I’m learning loads as I go. Like most bloggers I started off with some recipes which had really dodgy photos and this vague idea that maybe my blog could be awesomely successful without me putting that much effort into it. More than a hundred recipes, a new camera and hours of work later, I’ve managed to build my blog into something that I’m really happy with and proud of.

But the best thing I discovered about blogging was the unexpected friendships that sprung out of it with other bloggers. It has been wonderful to connect with other food lovers all over the world and have fun exploring food with your new friends. One such friend I have been happy to make is Erin from Big Fat Baker, and I was very happy when she asked me to write a guest post for her.

This cake is one that I made for my mother’s birthday recently, and it was a creation I just had always wanted to try. You may notice that my rocky road contains absolutely no marshmallows. There are two main reasons for this:
  • Marshmallow are a cheap way to fill out rocky road so that you don’t have to put in so much of the decadent and luscious ingredents
  • Marshmallows are made from gelatine – which is made from boiling up all the skin, crushed bones, connective tissues, organs and sometimes intestines of slaughtered animals. Now, I’m a vegan, but that aside, I don’t know who would really want to put that in their bodies!
Check out the recipe at Erin's blog here and make this wonderment for yourself!

Friday, 25 May 2012

Mexican Car Bomb Cupcakes


Corona, tequila and lime in a cupcake - what more could you ask for in life?

Does anybody else do To Do Lists? I'm all over them, I think it's my control-freak tendencies. I always get up in the morning and write myself a list that looks something like this:

1. Clean kitchen
2. Clean out Uli's hutch
3. Clean bathroom and ensuite
4. Prune mulberry tree
5. Finish making trousers
6. Make something for Holiday Recipe Club
7. Blog recipe
8. Finish writing application
9. Write journal article
10. Make strawberry dress
11. Cut out Mah Jong dress
12. Vacuum house

Generally it's a ridiculously long list of things which I'll never possibly manage to get done. By the end of the day my list usually looks like this:

1. Clean kitchen
2. Clean out Uli's hutch
3. Clean bathroom and ensuite
4. Prune mulberry tree
5. Finish making trousers
6. Make something for Holiday Recipe Club
7. Blog recipe
8. Finish writing application
9. Write journal article
10. Make strawberry dress
11. Cut out Mah Jong dress
12. Vacuum house

At least I get some things done. However, as you can see the good news is that I managed to cook something to blog :) Today's Holiday Recipe Club ingredients are pork, watermelon and beer. Pork is obviously out, and watermelon is a bit ridiculous at this time of year - being incredibly out of season and not that appealing when it's freezing and windy. So that left beer. Lots of possibilities, but I couldn't really settle on anything.

What I ended up with were these cupcakes inspired by a drink called a Mexican Car Bomb. It's not a cocktail as such, it just means you take your corona and add a shot of tequila to it. I love Corona, it's delicious with lime and it's vegan friendly to boot! Using beer (or other carbonated drinks) in cupcakes makes for such a light and springy cake. These cupcakes are laced with corona and tequila with zingy lime icing on top. They're also perfect accompanied by a corona!


Ingredients

The Cake
1 cup Corona
1/4 cup tequila
3/4 cup sugar
1 tsp vanilla extract
1/2 tsp lime zest
1/3 cup apple sauce
1 1/4 cups wholemeal plain flour
1/2 tsp baking powder
1/4 tsp baking soda
1/2 tsp salt

The Icing
1/2 cup vegan margarine (I use Nuttelex)
2 tsp lime juice
1 tsp lime zest (or as much as you like, I like to use more to make it extra limey)
1 tsp tequila
pinch of salt
1 cup soft icing mixture
Lime slices to decorate

To Make
1. Preheat the oven to 180 degrees.
2. Combine the Corona, tequila, sugar,vanilla, lime zest and apple sauce. Don't over mix it though, as you'll loose some of the carbonation of from the Corona.
3. Sift in the flour, baking powder, baking soda and salt and mix to combine.
4. Fill cupcake liners almost to the top and bake for 20 minutes, at which time a knife should come out clean when inserted into the middle.
5. Put on a cooling rack and allow to cool completely. While they are cooling you can make the icing.
6. Cream the margarine, lime juice and zest, vanilla and tequila together. Beat in the soft icing mixture until the icing is nice and fluffy. Ice cakes when they are completely cool and decorate with fresh slices of lime.

Makes 10 cupcakes.


Tuesday, 17 April 2012

Vegan Lemon Curd Cake Sandwiches


I've been doing a lot of blog hopping at the moment, in fact I had three over three days. It started with my own blog hop - The Soup-Off Challenge which was my first ever so I was a bit worried about whether it would work. It turned out to be a flop unfortunately, but c'est la vie! Next time I will know just to sit back and enter other people's hops rather than have any of my own. Nevertheless, I made an awesome soup which you should check out here - Green Tea Noodle Soup with Leek and Shitake Mushrooms.

Then, the very next day I participated in the Eat-the-Alphabet Blog Hop, a monthly group which featured E and F as the letters this month. The idea is to base the dish around a fruit, vegetable, bean, grain or pulse that starts with E or F. I made Vegan Fig and Red Wine Ice Cream - yum!

So, I almost didn't get time to make anything for the Sweet Adventures Blog Hop, which this month is lemon themed and hosted by a favourite blogger of mine, Delicieux.  But I decided that I should try and get something in because I believe in supporting the blogging community by trying to make the culinary projects of other bloggers a success.


Lemons are a delicious theme! I don't know anybody who doesn't love lemon desserts. Several ones immediately spring to mind: lemon cake, lemon tart, lemon cupcakes, lemon meringue pie, lemon pudding, lemon pie etc. All delicious and classic recipes. However, I like to challenge myself with themes which is why I decided to invent something completely new which (to my knowledge) has never been done before. My answer was....
The Cake Sandwich.

These gorgeous tea party delights look very unassuming. In fact, they look like fairly plain and boring brown bread sandwiches. However, they are actually made from light lemony cake filled with wonderfully tangy lemon curd. They are perfect for a tea party because they combine two classic afternoon tea/tea party elements - cakes and triangle sandwiches. They can be almost completely prepared the day before and just assembled on the day - plus they are finger food so don't require plates or forks (=less washing up!).

Also - the lemon curd was to die for.


On another note - I've been nominated for the Best Australian Blogs 2012 People's Choice Award - you can vote for me by hitting up this link: http://www.sydneywriterscentre.com.au/bloggingcomp/peopleschoice.html


Lemon Curd Cake Sandwiches
Vegan Lemon Curd Recipe from vegnews.com


Ingredients
Lemon Curd:
Zest of 1 lemon
1/2 cup fresh lemon juice (should be about 2 lemons - note: zest lemons before juicing!)
3/4 cup coconut milk
3 heaped tbsp cornstarch
1/2 cup sugar
1 tsp vanilla extract
1/8 tsp turmeric

Cake:
Zest of 1 lemon
2 tbsp lemon juice
1 cup soy milk
1/2 cup sugar
1/3 cup apple sauce
1 tbsp canola oil
1 tsp vanilla extract
1 tsp orange essence
1 1/4 cups wholemeal plain flour
1 tsp baking powder
1/2 tsp bicarb soda

To Make
Lemon Curd (must be made a day in advance)
1. Zest the lemon. (You may as well go ahead and zest the other lemon as well and set it aside for later as you will need it for the cake.) Then juice the lemons.
2. Combine all the ingredients in a small saucepan and stir well.
3. Place the saucepan over a medium heat for 2 minutes, stirring continuously, to bring to a warm temperature (at no point should it simmer/boil - it it starts to simmer turn it down immediately).
4. Reduce the heat to low and continue stirring constantly. Leave over the low heat for 7 minutes. Remove from heat and transfer straight into a clean empty glass jar (don't leave it sitting in the hot saucepan).
5. All to cool and then refrigerate over night before using.

The Cake (can be made a day in advance)
1. Preheat the oven to 180 degrees.
2. Mix the lemon zest, lemon juice and soy milk together and allow it to curdle for a few minutes.
3. Add the sugar, apple sauce, canola oil and extracts and mix well.
4. Sift the remaining ingredients into the batter and mix well.
5. Lightly grease a square 20cm x 20cm baking dish and line it with baking paper (mine was actually 21cm x 21cm, so don't worry about a few cm difference). Pour the batter in and smooth the top over evenly.
6. Bake for 25 minutes, or until golden on top and a skewer comes out clean.
7. Allow to cool completely before using.

Assembly
1. Take out your cooled cake and cut it into even quarter squares. Then cut each square along both diagonals so that you have 4 small triangles in each quarter. If you are having difficulty visualising what I just described then here is a (not to scale) drawing:

2. Cut each small triangle in half lengthways (like you would slice open a bread roll) so that now you have two small pieces of cake which look just like brown bread. Now here is the clever trick - you want it to look just like brown bread so you need to spread the lemon curd (the sandwich filling) on the darker "crust" of the bread so that the middle bits of the cake are facing out. (If you find that a bit confusing just have a look at the pics of the finished products - you will see the softer middle parts of the cake form the look of the bread whilst the top and bottom edges of the actual cake face inwards with the lemon curd filling.
3. Continue filling sandwiches until you use up all the cake (you will have lemon curd left over but that's just a bonus!).
4. For best results refrigerate the made sandwiches for about 10 minutes to help them stay together.

Serve with tea of course! 
Makes 16 triangle sandwiches (and 2 small jars of lemon curd).