Showing posts with label walnuts. Show all posts

Thursday, 30 October 2014

Blueberry & Avocado Salad with Candied Walnuts


Living in Australia, trips to Europe are a big deal. It's the other side of the world - the flights are long, exhausting and expensive! But I was adamant to make it over there last year to visit a dear friend. I was thrilled to escape the Sydney winter and spend my time strolling around beautiful cobblestone streets in a European summer. I've already posted a few post from my travels, you can check them out here:

Sweets in Sweden - A Photographic Diary
Wild Blueberries on the Stockholm Archipelagoes
A Day in Riga - Buildings, Berries & Black Balsam

You might notice a recurring theme - loads of fresh berries! We were so spoilt for fresh berries throughout our trip. Check out these gorgeous berries piled high in stalls on the side of the streets in Riga (Latvia):


In Australia punnets of blueberries or raspberries are always an expensive treat - even when they're in season. So it's no wonder that I ate them to my hearts content and came home with a mind full of berry inspiration! Now, Northern Europe is heading into winter and sunny Sydney is almost in summer, which means blueberries here are about as cheap as they'll ever get. So I took my inspiration from these gorgeous pictures and the memories of all those yummy berries & picked up a couple of punnets of blueberries to experiment with. 

Blueberry & Avocado Salad with Candied Walnuts

Ingredients
4 tbsp brown sugar
4 tbsp water
1/2 cup walnut halves
2 cups baby spinach
1 large ripe avocado
1 punnet blueberries
1 tsp extra virgin olive oil
1 tsp soy sauce
2 tsp fresh lemon juice
2 tsp balsamic vinegar
Cracked black pepper

To Make
1. To make the candied walnuts - combine the brown sugar and water in a small saucepan and heat over a medium heat until the sugar is dissolved to form a simmering syrup. Add the walnut halves and stir continusouly while the syrup simmers. Cook for at least 5 minutes, or until the liquid has all cooked away and you are left with the coated walnuts. Transfer the walnuts to a sheet of non stick baking paper, breaking up any clumps, and place in the fridge to harden.
2. Line a salad bowl with the baby spinach leaves. Top with cubes of the avocado and then the fresh blueberries.
3. Combine the olive oil, soy sauce, lemon juice and vinegar and whisk well until combined. Drizzle over the avocado & blueberries.
4. Top with candied walnuts and a generous amount of cracked black pepper.

Serves 2-4 as a side salad or as part of a buffet.


Also featured in the Vegan Virtual Linky Potluck.

Saturday, 17 May 2014

Nigvzis Torti (Georgian Walnut Raisin Torte)


This dessert is translated as a torte, generally a torte is a multi layered cake, layered with icing or cream. This is a bit of a different type of torte! It's still multi layered.... but almost all the rest of it is different :) The layers instead of light sweet cake are made of a denser pastry type dough. It's rolled out and layered with crunchy walnuts and super sweet raisins tossed in sugar and cinnamon. The whole thing is wrapped up in the top later of dough like a pie and then glazed with a grape juice syrup. The result is a delicious, crumby tea-cake like dessert which is not too sweet but with bursts of sweetness from the raisins. It was unlike anything that I have ever made or eaten before, truly! Even after years of writing for this blog and experimenting with different cuisines from all over the world - I still stumble upon things which are unlike any other I've made. It's one of the things I love about blogging.

In the end I took to calling it a pie instead of a torte, because of the cute way it's all wrapped up in the pastry. The traditional recipes use green grape juice for sweetener, which is commonly used as a sweetener in Georgian cuisine. In Australia though, I wasn't able to find it. The only grape juice available was red grape juice, which would have had a very different taste and appearance. So, I just blended some green grapes and strained the skins out.

Unless you're a Georgian, this might be quite unlike any recipe you've ever made either - but it's worth it. I thought it was delicious and went a treat with a hot cup of tea. It makes quite a big pie so invite a group of friends around for afternoon tea, or else just halve the recipe :)

Nigvzis Torti (Georgian Walnut Raisin Torte....Pie)

Ingredients
225g vegan margarine
1 cup sugar
1 cup plain or vanilla vegan yoghourt
3 1/2 cups plain flour
1/2 cup green grape juice (I used fresh)

Filling:
2 cups shelled walnuts
2 cups raisins
1/2 cup of sugar
1 generous tsp ground cinnamon

To Make:
1. Cream together the margarine and 1/2 cup of the sugar in a bowl and then beat in the yoghourt. Add the flour and stir well. Form into a ball of firm dough and then chill for about 5 hours (or overnight).
2. Preheat the oven to 180 degrees Celsius. Toast the walnuts in the oven for 5-8 minutes, or until lightly browned (keep your eyes on them!), chop up the walnut and allow them to cool.
3. Toss the cooled walnuts with the remaining filling ingredients until the raisins and walnuts are coated in the cinnamon sugar.
4. Divide the dough into four even pieces (keeping the unused dough in the fridge until you're ready to use it). Roll the first piece into a disc about 20 inches in diameter and place it on a paper lined baking tray. Spread 1/3 of the filling mixture over it, leaving about an inch free around the edges.
5. Do the same with the next 2 portions of dough, and the remaining 2/3 of filling. When you roll out the last portion make it a little larger than the others, as it has to wrap around the whole thing. Place it over the top and tuck the edges in all around the pie, making a neat little dome. Cut five slits in the top to let the steam escape as it cooks. Cook the pie in the oven for 50 minutes. When done, remove from the oven and let it cool for 10 minutes while you make the syrup.
6. Combine the grape juice and the remaining 1/2 cup sugar in a small saucepan and place over a medium heat. Simmer for 4-5 minutes, until a thickish syrup forms. Brush all over the cooked pie and let the whole thing cool to room temperature. 

Makes 1 large pie. Serve with tea!


This month I'm featuring recipes from Georgia.
Check out my other Georgian recipe posts:

Wednesday, 7 May 2014

Lobio (Georgian Kidney Bean Salad)


I've had a strange fascination with Georgia for some time. Why strange? Because really I don't know anything about the country at all! But, in 2007 they entered Eurovision for the first time with this incredible song (watch it!) by Sopho. I love the Eurovision meets Bjork style, I loved her stunning red dress (which continues it's detail on her back and arm!) and, hey, you can't go wrong when there are men dancing with swords. I loved this song so much that I immediately decided that I loved Georgia and wanted to go there. Such is the powder of Eurovision! So, Georgia has a special place in my heart - even though I know next to nothing about it except that the capital Tbilisi. Sadly, I haven't yet had the chance to travel there to find out more, but recently I got an email from a reader requesting Georgia as a featured country on my world food challenge. I couldn't have been happier, in fact I was so excited by the idea that I moved it up the list in front of some other countries which had been requested earlier (sorry, other countries but the heart wants what the heart wants!).

Just in case you've never heard of this tiny country, here is what it looks like:


So what did I learn about Georgia? Well, one thing was that finding vegetarian dishes was a piece of cake, there was loads of them. So I had a really fun and easy time putting together a savoury menu for Georgia and it was all really delicious. The sweets I found harder, I only found one or two at all on the internet so had a much more limited sweets menu. I'd love to hear from some Georgians if you have a wonderful traditional dessert that I missed!

I also learned that the cornerstone of many of their dishes was walnuts! There were walnuts in everything, sweet and savoury! There also seems to be a lot of kidney beans in the savoury dishes, so I ate my fair share of them this month.

This first recipe I'm sharing with you brings both of those ingredients together, it's a typical Georgian salad called Lobio. It makes a great cold weather salad as well as warm weather, because of the lovely cooked beans and the warming hint of chilli. It's perfect for a potluck but is also great spooned into a salad wrap or piled on your veggie burger, it's just very versatile and a great source of protein.

Lobio (Georgian Kidney Bean Salad)

Ingredients
1 1/2 cups dried kidney beans, soaked for 48 hours and drained
1/2 Spanish onion, finely diced
1 jalapeño chilli, finely minced (you can remove the insides if you want it milder)
2 garlic cloves, finely minced
2 tablespoons finely chopped fresh coriander
1/3 cup walnuts, broken into small pieces
3 tbsp white wine vinegar
2 tbsp olive oil
Salt and pepper to taste

To Make
1. Place the kidney beans in a large saucepan and cover with water. Bring to a boil and then lower the heat and simmer for 20-30 minutes, or until the beans are just tender. Once cooked, drain and rinse with cold water. Set aside to cool and dry out.
2. While the beans are drying you can prepare all your other ingredients. Combine the Spanish onion, chilli, garlic, coriander, walnuts and kidney beans in a bowl.
3. Place the vinegar, olive oil and salt and pepper in a jar, put the lid on and shake until well combined. Pour this dressing over the bean salad and stir well to combine. Adjust seasoning to taste (add more salt, pepper, coriander or garlic to taste).
4. Serve garnished with walnuts and fresh coriander (optional).

Serves 4-6.


This month I'm featuring recipes from Georgia.
Check out my other Georgian recipe posts:

Monday, 30 September 2013

Khoshaf


I'll end this month of delicious spicy and Egyptian food with a simple but beautiful dish. This is Khushaf  or Khoshaf, a traditional Egyptian dish which is often made during Ramadan to break the fast. It's good for Ramadan because of the high amount of sugars to give you energy during the day and the protein from the nuts.

It's like a compote, but not cooked. Or perhaps like a fruit salad, but made with dried fruits and nuts. It's very quick and easy to make and makes a delicious dessert, breakfast or snack at any time of the day. It's a lot healthier than a lot of other things you could have for dessert and conveniently you make it the day before, so it is a stress free dessert to serve up to guests.

You can soak the fruit in apple juice instead of water if you want to make it sweeter - but in my opinion it is sweet enough! You can also substitute other types of nuts, if you like.


Khoshaf

Ingredients
1/2 cup raisins (I used golden)
1/2 cup whole prunes
1/2 cup halved dates
1/2 cup sliced dried apricots
1/2 cup halved dried figs
1/2 cup walnuts
1/2 cup dry roasted almonds (you can just used blanched if you prefer)
Water, to cover

To Make
1. Place all the dried fruit and the nuts in a bowl.
2. Cover with about 6 cups water, the fruit should be covered by at least 2 inches.
3. Leave in the fridge over night to soak. Check to make sure that there is enough water - if the fruit has absorbed all of the water then you'll need to add more. There should be plenty of syrupy juice left in the bowl after the fruit have absorbed as much as they can.
4. Eat! We just ate it as it is, but you could also serve over ice cream or with yoghourt.

Serves 6.

This month I'm featuring lots of delicious food from Egypt.
Check out my other Egyptian recipe posts:

Friday, 6 September 2013

Vegan Makowiec (Polish Poppy Seed Strudel)


I made this delicious poppyseed strudel during Polish food month (July 2013) but didn't get time to post it, so I'm bringing it out for Vegan Mofo and my Spice Rack theme. Poppy seeds are possibly not actually a spice (although I guess that depends on your definition) but they're kept with my spices so I'm including them in the list.

Poppy Seeds
Two varieties of poppy seeds are commonly consumed - white and blue poppy seeds. Blue poppy seeds are most commonly seen in European/Western cuisines - they're the ones you'll find sprinkled on bread rolls, pastries and in your orange and poppyseed cake. White poppy seeds have a slightly milder flavour but otherwise are fairly interchangeable - they're more commonly found in Indian, Asian and Middle Eastern dishes. Both types of poppy seeds are gathered from the same poppy that produces opium, however the ones used in cooking have virtually no narcotic content (just 50 ppm). Poppy seeds contain a relatively high amount of oils, so can easily become rancid if they are old or stored improperly. Try to buy small quantities of poppy seeds (only as much as you need) from shops which have a high turnover and store any remaining ones in an airtight container.

Reference: Hemphill, 2006
For my month of spices I'm using Spice Notes and Recipes by Ian Hemphill as my reference tool to learn about spices and for all the information above. Thanks Ian for writing such a great and informative book! 


Makowiec (Polish Poppy Seed Strudel)

Ingredients
Pastry:
1/4 cup soy milk, warmed
2 tsp active dry yeast
1/4 cup sugar
1/4 cup canola oil
1/2 tsp salt
1/3 cup apple sauce
2 cups plain flour

Filling:
3/4 cup poppy seeds
1/4 cup soy milk
2 tbsp vegan margarine
1 cup sugar
zest of 1 orange
1/2 tsp vanilla extract
1/2 cup raisins
1/2 cup walnut halves, broken up

Soy milk, for brushing the top
Whole poppy seeds, to garnish

To Make
1. Cover the poppy seeds in hot water and soak over night. Then drain and grind in a food processor.
2. Whisk together the warm soy milk and the dry yeast and set aside for 10 minutes, until foamy (if this does not foam up, your yeast may no longer be active and you may need to buy some fresh stuff).
3. Add the 1/4 cup sugar, oil, salt and apple sauce to the yeast mixture and mix well to combine.
4. Add the flour and mix until a dough forms. Turn dough out onto a floured surface and knead for 6 minutes by which time you should have a smooth ball of dough. Return to the bowl and cover with a tea towel. Let sit in a warm spot for 1 1/2 hours to rise.
5. To make the filling: combine the soy milk, margarine, sugar, ground poppy seeds, orange zest and raisins in a saucepan and place over a medium heat.  Cook until thickened, stirring frequently. After about 4-5 minutes it should be quite thick, remove from the hear and stir the vanilla extract through.
6. Heat the oven to 180 degrees.
7. Turn the dough out onto a floured surface and roll out into a big rectangle. Spread the filling over the rectangle of dough, leaving about 1 1/2 cm around the edge. Sprinkle the walnuts on top.


8. Roll up into one big log (starting from the longer side of the rectangle) and place seam side down on a baking tray lined with baking paper. Brush the top with milk and sprinkle with poppy seeds.
9. Bake for 20 minutes, or until golden brown on top. Allow to cool, then slice and serve.


Check out my other Polish recipe posts from Poland Month:


Tuesday, 30 July 2013

Kluski Z Makiem (Polish Poppyseed Pasta Dessert)


I'm crazy about pasta! It's just the most delicious and comforting thing to eat, and so convenient to cook. anyone who knows me will know that probably my favourite thing to eat is a big bowl of pasta with a glass of wine to accompany it. But.... pasta for dessert? I've never tried it before, but when I found it for Polish food month I really had to try it! To be honest, this is not 100% traditional! The traditional polish dish would be made with hand made noodles, but I've used supermarket packet pasta to be quick (and a bit lazy!). It was actually very delicious, although it felt strange to have pasta for dessert!

As you read this, I'll be hanging out in funky Helsinki!

Kluski Z Makiem

Ingredients
300g dried pasta (large shapes)
2 tbsp vegan margarine (Nuttelex)
1 cup poppy seeds, soaked over night
1/2 cup raisins
1/2 cup sugar
Zest of 1 orange
Zest of 1/2 lemon
1/2 cup chopped hazelnuts
1/2 cup chopped almonds
1/2 cup maple syrup
Walnut pieces, to garnish

To Make
1. Cook the pasta al dente, according to the instructions on the back of the packet (although you'll probably want to cook it for about 1 minute less than it says on the packet so that it's not overcooked).
2. Combine the poppy seeds, margarine, raisins, suagr and zest in a saucepan with 1 tbsp water. Heat over a low heat until the sugar and margarine are melted. Simmer gently for about 5 minutes.
3. Dry fry the chopped almonds and hazelnuts in a pan over a medium heat, stirring frequently, until slightly browned and toasted.
4. Combine the cooked pasta, poppyseed mixture and toasted nuts and mix well. Add the maple syrup and stir until all the pasta is well coated.
5. Cool to room temperature and garnish with walnut pieces to serve.

Serves 4.


This month I'm featuring lots of delicious food from Poland.
Check out my other Polish recipe posts:

Friday, 26 July 2013

Polish Surówka z Marchewki (Carrot and Apple Salad)


This simple Polish salad is an absolutely perfect accompaniment to the heavier and creamier dishes which I've been serving up for Polish food month(s). When you're eating Pyzy with Creamy Mushroom Sauce or delicious Golabki, you're keen to have a light, fresh and healthy salad on the side! I'll be honest, I made this salad based on a vague description of a salad on the wikipedia Polish Cuisine page, so I'm not sure how authentic it is (you can never really trust wikipedia!). Either way, it's a winner :)

Guess what I'm doing today while this post is scheduled to go up? I'll be spending a day strolling around the Art Nouveau Buildings in Riga, the capital of Latvia! I'm really excited about it.

Ingredients
4 carrots
2 green apples
4 tbsp grapeseed or sunflower oil
Juice of 1/2 lemon
Salt and pepper to taste
Walnuts, to garnish

To Make
1. Coarsely grate the carrot and place in a bowl. Peel the apples and grate them too. Add to the carrot.
2. Add the oil, lemon juice and salt and pepper. Mix well.
3. Garnish with broken walnut pieces and serve.

Serves 8 as a side salad. Halve the recipe to serve 4.


This month I'm featuring lots of delicious food from Poland.
Check out my other Polish recipe posts:


Saturday, 27 April 2013

Hollandse Stroopkoek (Dutch Beer & Syrup Cake)


Another sweet treat from the orange land of The Netherlands! This one looks pretty innocent and plain. It looks just like a normal fruitcake. But it's more. It's so much more. It has quite a delicate texture, which is unusual for a fruitcake, and the flavours of the two main ingredients really contribute to a cake unlike any I've ever had before.

If you're thinking, 'I don't like beer that much', then don't let the beer put you off this cake. I'm not a big fan of drinking beer either. Yes, you can taste the beer in this cake, but it doesn't taste like drinking a beer! It simply adds a rich and hearty element to the cake - a slight bitterness to complement the sweet treacle.


I made quite a small cake for this one - as I was only having a couple of people over to help me eat it. It was so nice that I probably wouldn't have minded a full sized one, it would have meant that I had lots of leftovers! But probably best that I didn't! It doesn't rise much and makes quite a flat and dense cake. This is perfect really, because you only need fairly small slices (each slice packs a flavour punch!). I made it to fit a small 20cm diameter cake tin. If you want a full sized cake then you'll probably want to make about three times the recipe.


Hollandse Stroopkoek
Adapted from godutch.com
Ingredients
1 cup wholemeal flour
1  tsp baking powder
1 1/2 tsp allspice
1/2 tsp salt
1 tbsp treacle or stroop
1/4 cup Nuttelex (or other vegan marg)
3/4 cup beer
80g raisins
50g currants
1/3 cup walnuts
2 tbsp slivered almonds

To Make
1. Preheat the oven to 180 degrees.
2. Combine the flour, baking powder, allspice and salt in a large bowl.
3. Place the treacle and Nuttelex in a small saucepan and melt over a low heat until completely melted. Remove from the heat and gradually mix in the beer.
4. Add the beer mixture to the flour gradually, stirring.
5. Stir the raisins, currants, walnuts and almonds through the batter until evenly distributed.
6. Grease and line a 20cm diameter cake tin and pour in the batter.
7. Bake for 40 minutes, or until a knife inserted into the centre comes out clean.
8. To serve, sprinkle with icing sugar.

Makes 1 x 20cm diameter cake. I recommend serving with a cup of tea!


This month I'm featuring lots of delicious food from The Netherlands.
Check out my other Dutch recipe posts:

Wednesday, 25 July 2012

Best Ever Vegan Carrot Cake


This have been very quiet on this blog lately - my apologies! I do, however, have an excellent excuse. I have spend the last three weeks in Sri Lanka having the most amazing holiday, thus not being able to post. If you keep your eye on the blog in the next few days you'll see lots of great pictures of all the curries I ate and a wonderful cooking class I took in Unawatuna (on Sri Lanka's south coast). First though, here is something very un-Sri Lankan!

I flew in last night and after a very long day of flying and today I slept until 12:40pm! Sounds bad, I know, but actually it was only 8am in Sri Lanka, so I didn't feel so bad! When I finally got myself out of bed I jumped back on my blog to see how it had fared in my absence. I was pleasantly surprised to see that the blog had quite a lot of hits still - thanks guys! I was also pleasantly surprised to find that I had about 3 hours left to enter the July Sweet Adventures Blog Hop - Nuts About Sweets.


Luckily I had this incredible vegan carrot cake in the archive, which is packed full of tasty walnuts! I'm a long time lover of carrot cake, but there are a lot of awful ones out there! I had it a lot as a kid but not as much as an adult. One night I had a real craving for carrot cake while I was out with friends so I decided to have a decidedly un-vegan moment (I'm only human! It happens sometimes) and bought a piece of carrot cake from a bakery on King St in Newtown. It was dreadful. Dry and bland cake covered in a thick icing which pretty much tasted like butter with a little bit of sugar. It was devastating and I threw most of it in the bin - all it did was make me crave real carrot cake more!!

So I knew I had to make a better one! It had to be my mother's recipe, so I decided to do a vegan version. It was incredible, the absolute best carrot cake I have ever eaten! So here it is - easy and delicious!

Ingredients

The Cake
1 cup oil
1 ½ cups sugar
1 teaspoon of cinnamon
1 teaspoon of salt (optional)
3 cups grated carrot
1 1/3 cups apple sauce
2 teaspoons baking soda
1 cup chopped walnuts or pecans
2 cups wholemeal flour

The Icing
1 tsp vanilla
60g nuttelex
125g vegan cream cheese
2 cups soft icing mixture

To Make
1. Mix sugar, oil and apple sauce well. 
2. Add dry ingredients (sifted), carrots and nuts. Mix well.
3. Pour into a greased and lined cake tin
4. Bake at 120 degrees celcius for 1 hour.
5. Remove and allow to cool for 20 minutes or so in the tin before turning out onto a cooling rack to cool completely.
6. Cream the vanilla, nuttelex and cream cheese together using an electric beater or a knife. Mix in the icing mixture and mix until completely smooth and fluffy. Ice the cake however you like.


Sunday, 1 April 2012

Peach, Date and Walnut Bircher Muesli


I have a confession to make. I'm not good at eating breakfast. I beat myself up about it a lot because I know how important breakfast is. I'm always telling my patients how important it is to have breakfast and yet each morning I struggled to get inspired to eat and I usually end up skipping it. But now, I'm trying to kick myself in the backside and eat more regularly and get a healthy routine happening. The big first step is making sure I have breakfast every morning.

There are two main reasons I don't ever want to eat breakfast. Firstly, I never feel hungry in the mornings (this may be something to do with the fact that I usually have a big dinner). Secondly, I just don't like many breakfast foods. As a vegan I don't eat eggs, milk or yoghourt. That cuts out a lot of traditional breakfast foods. I'm also not big on eating a lot of wheat because it just isn't the kind of thing I want to fill my body with! All that really leaves me with for breakfast is elaborate things like pancakes (which I don't have the time or energy to make every day). So, I have set myself the mission of coming up with new things for breakfast which will actually excite me and make me want to eat breakfast!


This gorgeous bircher muesli was a fantastic start and made me feel really excited about my new routine! The thing I liked best about it was the fact it takes me 5 minutes to prepare it the night before and then it's just in the fridge waiting for me when I get up - so quick and easy! I loved this so much I decided to make exactly the same thing again for my breakfast the next day.

Ingredients
1 1/2 cups rolled oats
1/3 cup dates, chopped
1 tbsp pepitas 
1 tbsp sunflower seeds
1 cup apple juice
1 large ripe peach
1/3 cup walnuts
2 tbsp slivered almonds, lightly toasted in a dry fry pan or for about a minute in a pre heated oven

To Make:
1. Mix the oats, dates, pepitas and sunflower seeds in a small bowl. Mix the apple juice in and leave to soak in the fridge overnight (or minimum 1 hour).
2. Slice and pit the peach and dice. Break the walnuts up with your hands and mix them and the peaches into the soaked muesli. 
3. Serve sprinkled with toasted slivered almonds.

Serves 2.

You'll be seeing a lot of new breakfast recipes from me I hope! What is your favourite quick and easy breakfast?


UPDATE:
It't been a few months now since I pledged to find and share some yummy vegan breakfast ideas, so here are some links to the ones I had added:

For more great vegan breakfast ideas that are worth getting up for check out:

Thursday, 29 March 2012

Tufahija (Bosnian Walnut-stuffed Poached Apples) with Whipped Coconut Cream


This is the last recipe I will be posting for Bosnia Month, because March is almost over already! I have saved an absolute favourite of mine 'til last the end of the month as well. Bosnia has been so delicious in all aspects, but I have to confess, to me, this has been a dessert month. The Bosnian desserts were just amazing. However, my partner said he personally thought that the Bosnian savoury food was stronger this month and particularly nice - so I guess it's just all awesome :)

These incredible poached apples and the Easy Bosnian Chocolate Walnut Cake are my two favourites from this month. As you may have noticed, walnuts were really quite a theme here! All three of the Bosnian desserts I made this month were packed full of walnuts (see also my Bosnian Walnut Baklava)! So it seems that walnuts may just be the national nut :)

This dessert was so delicious and easy and is super convenient for dinner parties for 2 reasons. 1) you can just use exactly the right amount of apples so that there is one for each guest and you're not piled with a whole lot of leftovers (although not so good if you're not quite sure how many people are coming to your dinner party) and 2) it is mostly done in advance - the apples can been cooked and stuffed well ahead of time and then all you need to do is plate them up and add some whipped cream (coconut of course!).


One quick thing I should note is that for this recipe you will need an apple corer. I've never owned such an implement and have never desired to so I was calling around to all my friends to see if they had one that I could borrow. I was just starting to despair and thinking that I might have to actually buy an apple corer (which I'm sure I would never use ever again), when I discovered that actually my partner's mother has one! It had never even occurred to me to ask him because a) he lives with me and b) he's not much into cooking. Lesson learned - sometimes we forget to ask the most obvious people!

I made 9 apples when I cooked this for my dinner guests, so I doubled the recipe. Unfortunately, with the quantities listed I had quite a lot of leftover syrup. This is a difficult thing to avoid, since you need to have enough liquid in the pan to poach the apples. You can play around with the quantity of syrup depending on the depth and size of your saucepan, as long as you keep the sugar to water ratio at 1:2. You may also be able to reduce the amount of syrup by using a small, deep saucepan and poaching the apples in batches.

If you do have a lot of syrup left over, I used it up making these lovely Apple and Rhubarb Sago Parfaits and a great Apple Syrup Cake (recipe to be posted at some other stage).

Ingredients
4 green apples
2 cups raw sugar
3 cups water
Juice of a lemon
1/2 cup walnuts
2 tbsp raisins
1 can of coconut cream, chilled in the fridge over night (minimum! Optimum would be a few days.)
1 tbsp confectioners sugar (soft icing mixture)

To Make
1. Add the water, sugar and lemon juice to a large saucepan and heat gently until all the sugar has dissolved.
2. While this is heating peel and core your apples. Reserve the peelings to use later. As soon as they are peeled and cored bring the syrup to a low simmer and add the apples (do this fairly quickly, as if you leave the apples sitting around peeled for too long they will go brown).
3. Cover the saucepan and let simmer gently for about 4-5 minutes. The apples should be just soft enough to poke with a fork or knife, but still maintaining their shape. Remove from the syrup with a slotted spoon and place in a container to cool (I recommend doing this with the hole facing upwards to reduce risk of them collapsing as they cool). I actually put mine straight into a muffin baking tray to cool, as the muffin indents in the tray were just the right size and helped the apples keep their shape as the cooled.
4. Continue to simmer the syrup and add in the apple peelings that you reserved earlier. Simmer, uncovered, for about 30 minutes. The syrup should be reduced and thickened. Remove the apple peelings with a slotted spoon and set the syrup aside to cool.
5. While the syrup is simmering you can prep your filling. Roughly chop the walnuts and raisins and mix in a bowl. 
6. Once the apples are cooled stuff the holes in the centre with the walnut and raisin mixture. Do this in the container (muffin pan) that you had them cooling in, so as not to make a big mess on the final plate.
7. Just before serving make the whipped coconut cream: when you open the tin you will notice that the top is a very solid thick cream. Scoop out all of the solid thick cream on top (you can reserve the rest of it to use in another meal – like a curry). Put the cream into a bowl and mix well using a hand held electric mixer. Move the beaters up and down to get as much air into the cream as possible. Add the sugar and beat until it looks just like thick whipped cream.
8. To serve, place an apple on a small plate and drizzle with some syrup and dollop some cream on the side. If there is any leftover walnut filling sprinkle it on the top as garnish.

Serves 4.

Check out our other Bosnian recipes:

Tuesday, 27 March 2012

Bosnian Walnut Baklava


I grew up eating and loving my mother's delicious Greek style walnut baklava. We loved it so much that we used to make it all the time until one day my mother just decided that she just couldn't be bothered hand chopping all those nuts any more and she hung up her pastry brush and never made it again. I still have such fond memories of baklava though!

Baklava to me always means walnuts, which is a big surprise to most of the people I meet because most of the time the only baklava Aussies eat is pistachio baklava bought from the local kebab shop. I have to confess - until I was about 16 I didn't even know that pistachio baklava existed. But when I was 16 I got a great Lebanese boyfriend who introduced me to pistachio baklava. I admit we had several good hearted arguments about which baklava was better!

Even though I generally prefer pistachios over walnuts, to me, walnut baklava has always had my heart! So when I found out that they eat walnut baklava in Bosnia my heart swelled with the idea of making it again!I bought piles of walnuts and steeled myself for a long time chopping, because one thing I have learnt from making baklava in the past is that you MUST chop the nuts very finely, don't be slack and leave them chunky because your baklava will fall to pieces when you try to serve it up! So I started to chop all my walnuts and then I realised that since I used to make baklava with my mother food processors had been invented! So much quicker!

What's your favourite type of baklava?


Ingredients
25 sheets filo pastry, thawed if frozen (should be about 1 box)
5 cups walnuts, ground coarsely
1/2 tsp ground nutmeg
3 cups sugar
2 cups water
Non dairy butter or margarine for brushing, melted

To Make:
1. Lay the filo pastry out ready to use and cover with a damp tea towel (not too damp though!).
2. Mix the ground walnuts and nutmeg together.
3. Brush the bottom of a large baking dish with melted butter and lay a sheet of filo over it. Fold in the edges so that it fits the dish. Brush the top with more melted butter. Repeat, doing 8-10 layers of filo.
4. Spread half of the walnut mix on the top of the pastry.
5. Cover the walnuts with another 5-6 layers of pastry and butter.
6. Spread the remaining walnuts over the top of that.
7. Layer another 8-10 layers of filo pastry over the top, neatening any edges as you go so that it doesn't spill over the top.
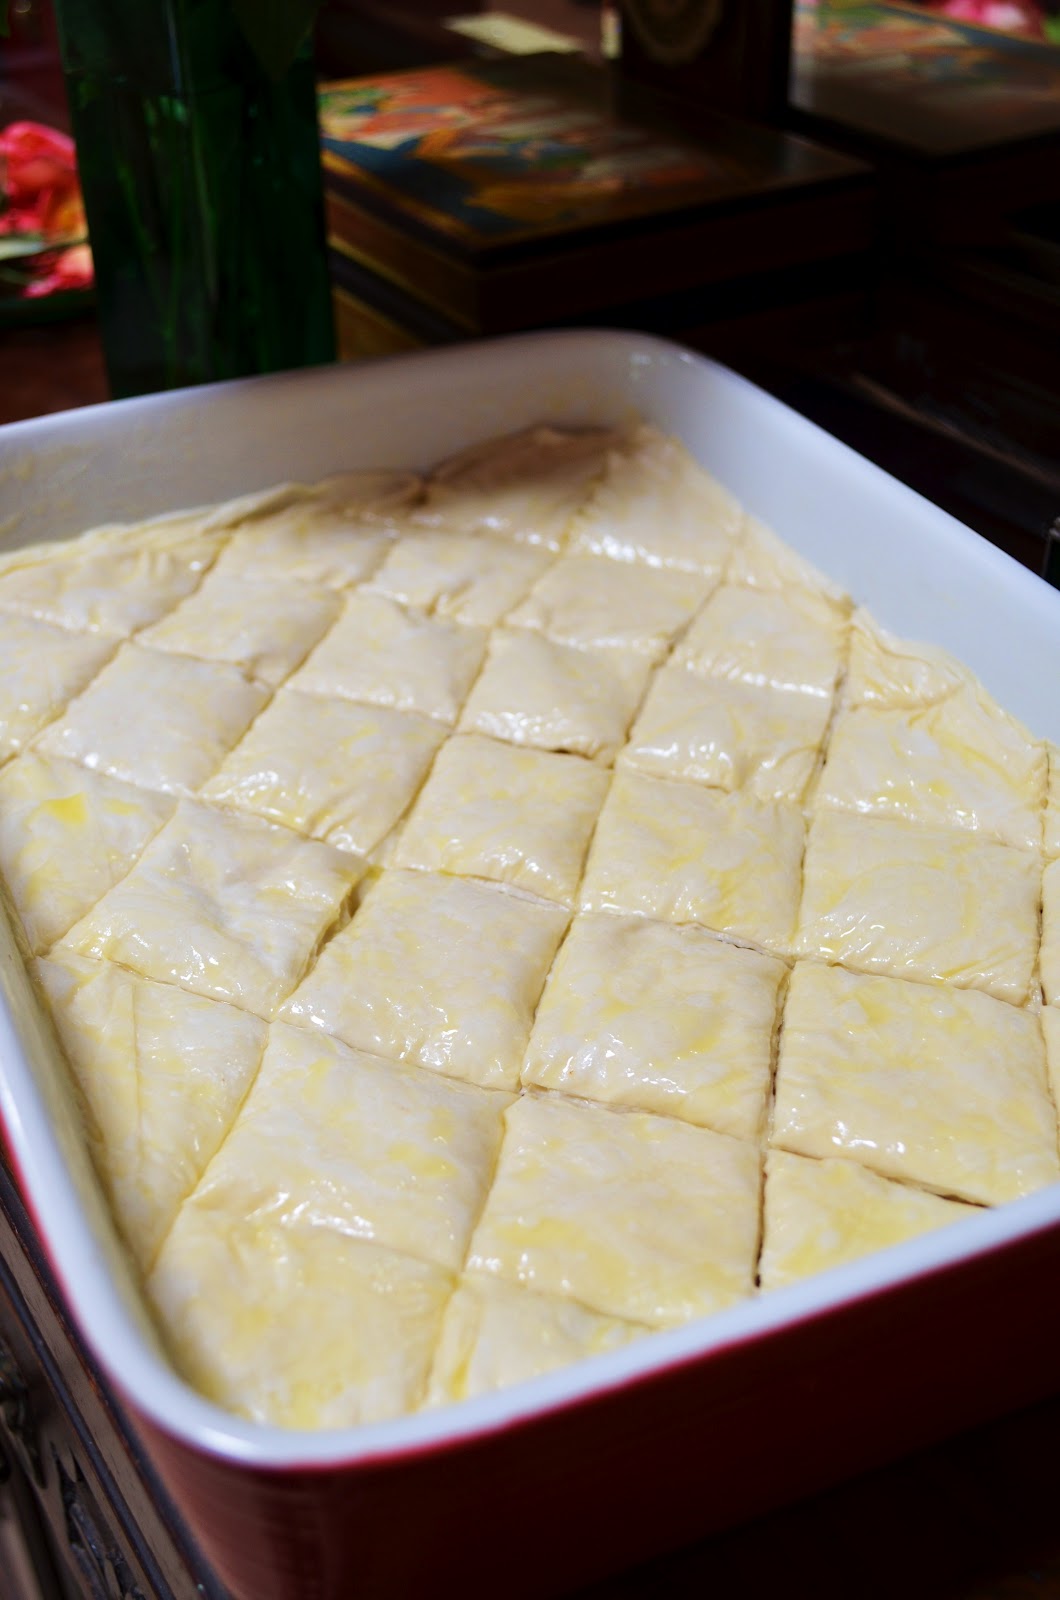
8. Brush the top with plenty of melted butter. Cut the top diagonally into diamond shaped slices, cutting just through the top layers of pastry. Like this:


9. Bake in a moderate oven for 40 minutes, or until golden brown on the top.
10. While it is baking you can prepare the syrup. Put the water and sugar in a saucepan over a low heat, stirring frequently, until all the sugar is dissolved.
11. When the baklava is cooked remove from the oven. Whilst the syrup and the baklava are still hot pour the syrup over the top, covering evenly. Allow to cool.
12. Chill in the fridge over night (or for at least 3-4 hours).

Makes about 30 pieces of baklava.

Check out our other Bosnian recipes:

Tuesday, 13 March 2012

Easy Bosnian Chocolate Walnut Cake


This cake is completely different to any other vegan cake I have ever made! To be honest this made me pretty nervous. I have already got a pretty amazing basic recipe which I base all my vegan cakes and cupcakes on. It makes a light, fluffy and flavourful cake which always makes me happy and wows everybody I bake cake for. So, I was reluctant to try a completely different cake when I'm so happy with the cake I've got now. It's kind of like working hard at the gym and finally getting the awesome fit body you want and then somebody (presumably some sort of magician/witch/genie/gypsy/robot devil) offers you the chance to have a completely new body instead - but you don't know whether it will be worse or better (that is possibly a bit of an extreme parallel to draw - but that just tells you how passionate I am about my perfect cake). Do you take it???

So - last Saturday afternoon I met up with a wonderful friend and decided that I had to get over my nerves and bake this cake. It is based on a cake which I found on several different websites called the "Bosnian Easy Cake". At first glance I couldn't see much about this cake which made it special or particularly Bosnian (perhaps a Bosnian reader can tell me this!!), but it was conveniently vegan! So I decided to make my own version - adding real dark chocolate to make it rich and adding walnuts (because it seems like all the Bosnian desserts I have found are full of walnuts!!).

When we mixed the cake batter together we were worried. Understatement. The batter was dense, thick, oily and heavy. I was having people over to dinner to help me eat this cake so I had a mild panic attack (which mostly consisted of me hopping from one foot to the other and saying "What should I do? What should I do???") and wondered whether I should try and alter the recipe or whether I should trust it and see what happened.

When we pulled it out of the oven and I saw the beautiful dense brownie-like cake I actually jumped from one foot to the other with joy!! It had cooked through! It looked like a cake!! It wasn't a big blob of sticky dough!! My relief was phenomenal. Not only had it worked..... it looked delicious!! It smelt like rich chocolate and baked walnuts, it felt firm and dense under my touch (so different from the light fluffy cakes I usually cook!) with a crunch hard top like a moist brownie! It tasted rich, chocolatey and fudgey with crunchy chunks of walnuts littered through it like hidden treasure. I'm so glad I took the chance and found something new which I will definitely be making again!


Bosnian Chocolate Walnut Cake


Ingredients
2 cups plus 2 tbsp wholemeal flour
1 cup raw sugar
1/2 cup cocoa powder
1 tsp baking powder
1 cup water
1 cup oil
100g dark chocolate
1 cup walnuts, roughly chopped

To Make
1. Preheat your oven to 180 degrees.
2. Mix all the dry ingredients together in a bowl except the walnuts.
3. Make a well in the middle of the dry ingredients and add the wet ingredients except the chocolate. Mix well with a wooden spoon (or maybe you electric mixer - but it is a very thick mix so depends how good your mixer is, I've always been a bit old fashioned and like mixing my cake mixes by hand).
4. Melt the chocolate in a double boiler (if you are already a pro at melting chocolate properly then skip ahead now to step 5). If you don't have a double boiler (who does?) then bring a small amount of water to the boil in a saucepan and balance a ceramic or metal mixing bowl over the top of the saucepan. Chop up the chocolate roughly and add it to the bowl. Stir continuously until the chocolate is almost completely melted. Remove from the heat and continue to stir until the chocolate is completely melted and smooth.
5. Mix the melted chocolate and the walnuts into the cake batter.
6. Grease a medium sized cake tin well (as you can see I used a cute heart shaped one) and line the bottom of the tin with greaseproof paper (I found that it didn't tend to stick to the pan much at all so you needn't be anxious over it).
7. Pour the cake batter into the prepared tin and bake for 40 minutes. Test the cake after 40 minutes by inserting a sharp  knife into the centre of the cake. If it comes out clean the cake is done, if it comes out dirty give it another 5 minutes in the oven.
8. Turn the cake out to cool. When cooled dust with icing sugar and serve.