Sunday, 1 September 2013

Vegan Mofo - A September Full of Food!


This month is a big month on the blog - but I'll keep it brief. Firstly, I'm back to my World Food Challenge (after a couple of months off while I was travelling overseas) and this month I'm going to be cooking up a feast of Egyptian dishes to share with you. So if you know of any delicious (and vegan friendly) Egyptian dishes I should be cooking up please let me know!

This month I'll also be taking part in the Vegan Month of Food (Vegan Mofo) which is pretty exciting. It's a big bunch of bloggers who post endlessly about vegan food for a whole month. It'll be a lot more posts than I usually do (the suggested amount of posts for the month is at least 20, which is a big task), but I've been trying to be prepared in advance to get lots of posts together to share with you all. I've decided to post to a theme this Mofo - My Spice Rack.

I'm mad about spices, I'm constantly collecting new ones to try out. As a result I've got a LOT of spices, half of which I never really use. So this Vegan Mofo I've decided to try and use my spices in ways I have never used them before to try and expand my repertoire and use up some of the spices languishing on my shelf. I'll also include some interesting information about each spice/herb so I can learn more about them along the way. Want to know what I've got on my spice rack? (In no particular order)

Turmeric
Coriander, ground
Coriander, whole seeds
Ginger, ground
Ginger, dried whole pieces
Nutmeg, ground
Cumin, ground
Cumin, whole seeds
Sweet Paprika
Hot Paprika
Smoky Paprika
Cloves, whole
Cloves, ground
Chilli powder
Chilli flakes
Chillis, whole dried
Cayenne Pepper
Cinnamon, ground
Cinnamon quills
Mustard seeds, ground
Mustard seeds, whole
Garam Masala
Chinese Five Spice
Cardamom pods
Cardamom, ground
Fennel seeds
Hawayij (Spice Mix)
Salt
Pickled Plum Salt
Black Pepper
Australian Pepperberry
Wild Mushroom & Black Garlic Salt
Indian Curry Powder
Sri Lankan Vegetable Curry Powder
Sri Lankan Meat Curry Powder
All Spice
Celery seeds
Curry Leaves
Dried Lemongrass
Nigella seeds
Fenugreek
Dried Mint
Mixed Italian dried herbs
Wattleseed
Marjoram
Strawberry Gum
Dried Dill
Black Lime Powder
"Mixed Spice"
Vanilla Beans
Peri Peri spice blend
Poppyseeds
Chaat Masala (Spice Mix)
Baharat (Spice Mix)
Ras El Hanout (Spice Mix)
Sumac
Lemon Pepper
Asafoetida
Star Anise
Lemon Myrtle
Za'atar


Not too bad a list huh? There may be others shoved at the back of my cupboard - who knows? It's a long list so there is no way that I'll be able to get through it in just one month but I'll do as many of them as I can and I guess whatever is left I'll have to try and do next year!

Hope you enjoy this month of food!

Thursday, 22 August 2013

Lychee & Banana Cake with Coconut Rum Cream (Vegan & Sugar Free)


Sometimes I buy silly amounts of things when they're really cheap. Guilty. At the end of last summer (yes, I know, a while ago now!), my supermarket sold off huge tubs of lychees really cheap. I love lychees, but I don't have them often because they're generally a bit expensive. So I went a bit stupid and bought four huge packets. I didn't actually have any plans for them so I shelled them all (it took me about an hour) and put them in plastic containers in my freezer so that they would be there when inspiration struck. I forgot about them for a while.

Then, I was faced with the challenge of making a sugar free birthday cake. I'm happy cooking sugar free because I'm keen to eat less sugar myself, but what made this difficult was that it also had to be free of dried fruits including dates! Dates are the go to ingredient for the sugar free cake maker so my initial thoughts of an easy chocolate date cake evaporated. Then I remembered the lychees in my freezer - one of the most naturally sweet fruits you can buy! Combined with banana, it made a perfect birthday cake. Definitely sweet enough but not sickly sweet, my partner (who generally doesn't like cake because it's too sweet) loved this cake better than any other cake I've made..... and I've made a lot of cake.

For the icing I used whipped coconut cream with rum extract (because I looked at the ingredients and couldn't find anything which looked like sugar) - but if you're not being strict about your sugar than go ahead and add a splash of the real stuff instead!

Lychee & Banana Cake with Coconut Rum Cream

Ingredients
1 cup very ripe mashed banana
1/2 cup canola oil
1 cup lychee juice (from the lychees you just shelled ideally - or from the can if you bought it in natural juice or a bottle if you can find unsweetened lychee juice)
1/2 cup unsweetened oat or soy milk
1 cup drained lychee flesh, roughly chopped
2 1/2 cups plain wholemeal flour
2 tsp baking powder
1/2 tsp bicarb soda
1/2 tsp salt

1 can coconut cream, left in the fridge overnight (or longer)
1 tsp rum extract (or actual rum, if you prefer)

To Make
1. Heat the oven to 180 degrees.
2. Whisk together the banana, canola oil, lychee juice and oat milk. Stir the lychee flesh through.
3. Sift in the flour, baking powder, bicarb soda and salt and mix well.
4. Grease a medium sized cake tin well and pour the batter in. Bake for 1 hour, or until a skewer inserted in the middle comes out clean. Turn out onto a cooling rack and allow to cool completely.
5. When you open the tin you will notice that the top is a very solid thick cream. Scoop out all of the solid thick cream on top (you can reserve the rest of it to use in another meal – like a smoothie or a curry).
6. Put the thick cream into a bowl and mix well using a hand held electric mixer. Move the beaters up and down to try and get as much air into the cream as possible. Add the rum extract and beat until it pretty much resembles thick cream.
7. Spread the cream over the top of the cake. If you've got some more lychee flesh you can decorate the top with fresh lychee.

Tuesday, 20 August 2013

Chocolate Cranberry Cashew "Cookie Dough" Balls


A quick little recipe for you for this month's Sweet Adventures Blog Hop. The theme this month is "Cookie Monster", but I'm on a bit of a health kick at the moment and I'm currently feeling really good about myself. So the last thing I want to eat is biscuits. I tried my hand at a healthy alternative though - healthy vegan cookie dough bites. Raw, vegan, no flour but with a bit of sugar (nobody's perfect). They make a lovely healthy sweet snack.


Use the links below my recipe to check out the other biscuit-y entries in this month's hop!


Chocolate Cranberry Cashew Cookie Dough Bites

Ingredients
2/3 cup raw cashew pieces
1 tbsp dried coconut
2 heaped tbsp rolled oats
2 tsbp cocoa powder
3 tbsp maple syrup
1 tsp vanilla extract
1 tbsp dried cranberry pieces (if you have whole dried cranberries, chop them up a bit) 
2 tbsp chopped dark chocolate pieces (about 20g)

To Make
1. Place the cashews, coconut and oats in a food processor and process until they form a flour consistency.
2. Add the cocoa, maply syrup and vanilla extract and pulse until the mixture all comes together.
3. Transfer to a bowl and stir through the cranberry and chocolate pieces.
4. Roll out into balls using your hands and chill for at least 10 minutes before eating.

Makes 10 balls.


Saturday, 17 August 2013

Chilli Tofu Lettuce Wraps


You saw that last post I did about all the cake I ate in Sweden right? So it shouldn't come as a surprise to hear that now I'm back home I am on a serious health kick! I've been very strict and serious since I got back - absolutely no desserts or sugary things and severely reduced carbohydrates in general. I'm living on a diet of vegetables, fruits, beans, pulses, tofu and healthy fats (such as coconut oil and olive oil).

Just before I left for my trip overseas I received an exciting package in the mail. Bertolli sent me some bottles of their different types of olive oil so that I could experiment with using different types for different uses. I'll confess, I have never in the past given thought to which type of olive oil was better for different styles of cooking. So, although I went overseas immediately afterwards and didn't actually get a chance to use any of it, I was really looking forward to trying it out when I got back.

In a healthy eating plan such as the one I've put myself on over the past couple of weeks it is really important to make sure you're getting some good fats and some proteins into your diet to help you feel full. If you just live on little salads and veggies you're going to find it hard to feel satisfied and you're more likely to fall off the wagon because you're feeling so hungry! Coconut oil, olive oil and avocado are real winners to help you feel satistied after your healthy meal. Olive oil is also a really important element in a vegan diet - because vegans don't get any fats from animal sources (meat, butter, cheese, yoghourt etc.) sometimes vegans actually find themselves in the position that they need to consciously add more fats into their diet. I can tell you though that eating more cake and sugar isn't the healthy way to do it! Try to pick naturally occurring and unprocessed fats!

Bertolli sent me three different types of their olive oil - Extra Virgin, Classic and Light. I had a hankering for a tofu and salad wrap for lunch yesterday but I didn't want to eat the actual bread of a wrap so I went for a lettuce wrap. They fall apart a little bit sometimes but they do the job pretty well and I felt much better after this lunch than after eating the wheat and starchy carbs of a traditional wrap. To add some protein and healthy fats to my lunch I wanted to fry up a bit of chilli tofu.


I fried my chilli tofu in the Light Olive Oil, because it's ideal for frying. It has a light flavour which doesn't detract from the flavour of the chilli tofu and the tofu came out crispy and not oily at all. Even though I used plenty of olive oil in my pan, the light olive oil cooked the tofu without actually coating it all in oil. So most of the oil remained in the pan (and I used this chilli oil to cook something else in later than night), which meant my lunch tasted fresh, healthy and not doused in oil!


Chilli Tofu Lettuce Wraps

Ingredients:
300g hard tofu, drained and squeezed (just squeeze as much of the liquid out of it as you can)
2-3 tbsp Bertolli light olive oil (I used 2 tbsp in a non stick saucepan, if your pan isn't non stick you may need more)
1 tsp chilli flakes
1 small zucchini, sliced into ribbons (use a potato peeler)
1 ripe avocado, sliced
1 medium carrot, grated
Alfalfa sprouts
2 tbsp pepitas
6-8 big iceberg lettuce leaves (you'll need the big softer outer leaves of the lettuce - if you use the crunchy inner leaves your rolls will split apart the moment you roll them)

To Make:
1. Slice the tofu into 1 cm thick slices and pat away any moisture with a paper towel.
2. Heat the light olive oil in a frypan and when it's hot sprinkle the chilli flakes over the oil. Let fry for about 30 seconds.
3. Add the tofu slices and fry until crispy, turning once or twice during the cooking to ensure they're cooked on both sides. Once crispy and golden set aside on a plate (I didn't need to drain mine on paper towel as they were not oily at all - but if your seem a little oily then you can place them on paper towel after frying).
4. In a small saucepan dry fry the pepitas over a medium heat for 1-2 minutes so that they pop and become round. Remove and set aside to cool down.
5. Assemble your wraps: take a big lettuce leaf and add zucchini, carrot, alfalfa, avocado, tofu and pepitas to the middle of it. Roll up as best you can (you may need to employ some toothpicks if they don't hold together well enough).

Makes about 6-8 rolls (this will depend on how much you stuff them).


Making the lettuce wraps is mildly fiddly - so if you can't be bothered doing that then you can always just toss all this together in a salad instead, it's also pretty delicious (although without the added fun/mess of eating the lettuce wraps!). You can make yourself a simple dressing of extra virgin olive oil, soy sauce and lemon juice to go with it. 


A quick note on this post: I received free olive oil from Bertolli to use on my blog, however, I am not being paid for this post nor am I an ambassador for this brand. 

Friday, 16 August 2013

Sweets in Sweden - A Photographic Diary


Coming home from overseas holidays is always a mix of feelings for me. Usually I'm quite glad to get home to my own bed, my own shower, my own kitchen, my veggie garden and my own language. Travel can be so exhausting even when it's the best time of your life! On the other hand when you're away seeing amazing things, eating awesome new foods and spending your afternoons relaxing in cafes watching people go by, it's hard to come to terms with the idea of going back to the old normal and (comparatively!) boring everyday life back home. This trip it was especially difficult to come home - Europe was summery, delicious, full of great people and wonderful things to see. Coming home to winter and all the boring things that so often fill our time ("We'd better go and see the bank about that account", "I really should call that store and chase up that refund they haven't given me yet", "The car insurance is due", "Oh, you've been called for jury duty.....again") was so not appealing - especially as we were having unseasonably warm and sunny weather in Sweden, Denmark & Norway.

But - back I am! It's not so bad, really. I'm actually really happy to be back at work (which some may find it hard to believe - but really I love my job!), the weather has actually been really nice (more like spring than winter) and we're having some gatherings for my upcoming birthday. It's also probably good for my waistline to be home - because oh my goodness we ate a lot of food. The food was so amazing! Particularly in Sweden, Denmark, Tallinn (Estonia) and Riga (Latvia). Yes, we indulged a lot. After all, I'm only going to have the chance to taste all these things once right?

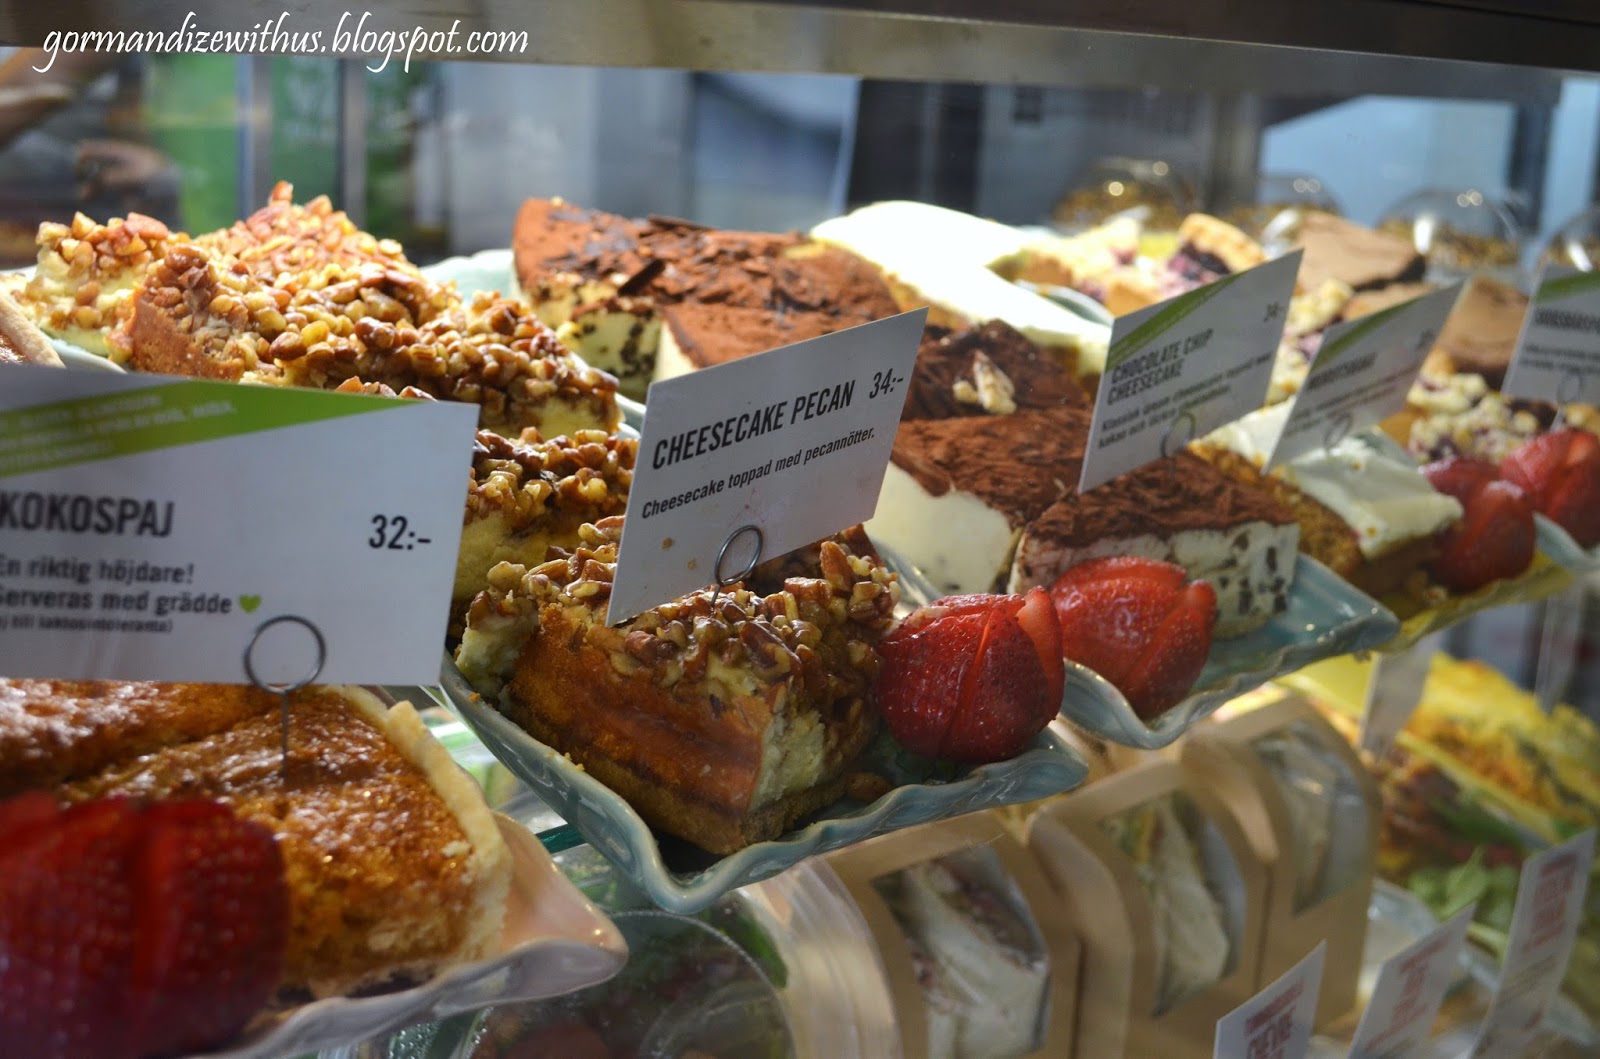
I remember having a conversation with a friend of mine who had studied in Sweden when I was doing Swedish Food Month on the blog. She said "the Swedes have an insane sweet tooth - and their sweets are soooo good!". She was right - there were amazing cakes and tarts everywhere you went. I've put together a photographic diary for you.

A quick note: These cakes are not very vegan friendly - but I think every one of them could easily be made vegan (and I'll be giving it a go, you can be sure!). So if you're one of my vegan readers then just imagine the vegan versions and let your mouths water anyway :)


Firstly - Kladdkaka. The classic Swedish chocolate cake. It's name translates as "Sticky Cake" - rich, gooey and absolutely fantastic. I made a vegan version of Kladdkaka for Swedish Food Month and I'm pleased to say the real thing tasted pretty much the same! I ate quite a bit of Kladdkaka during our time in Sweden!


Chokladdbolls (Chocolate Balls) are another Swedish delight which I made for my Swedish Food Month so I was excited to try the real thing when I got there. Of course, mine were a tad differently because I added some aniseed spirits to it, but otherwise they tasted pretty much the same. Although, now that I have seen the real thing I can see that I rolled mine way too small - next time I'll make them at least twice the size! Here are my vegan Chokladdarraksbolls :)


A speciality of Visby in Gotland, this Saffranspannkaka. The name literally translates as "Saffron Pancake", but it's not a great translation because it's not what we would call a pancake. It's more of a sweet rice pudding which is cooked in a pan and served in slices like a cake. Served with solberry jam and whipped cream, it was something pretty special - I'm also thinking it would be pretty easy to veganize!


Another Visby speciality - Wisbytårta (literally "Visby Cake"). Rich and unbelievably delicious, this tart like cake is served in small slices because it's so rich and is perfect with the fresh raspberries on the side. 


In Göteborg, we found the most amazing cake shop. Piles and piles of cakes and biscuits, rows of pies and tarts and pretty much everything you might want ever. It's almost too much, how could you pick what to have when it all looks so amazing?


The same shop in Göteborg.


The same shop in Göteborg.


In Malmö - another tough choice at an amazing cake shop. I had the Pecan Cheesecake: awesome. 


In Malmö.


In Malmö.

Of course, if you're not in the mood for cake there is always plenty of this too:


And just in case things weren't sweet enough around here, I thought I'd share this with you. Check out the pick'n'mix lollies section of a convenience store in Lund. It was actually bigger than this - there was another whole row that I couldn't fit in the picture. Some choice!!


Friday, 2 August 2013

Grapefruit Mojito (Guest Post by Big Fat Baker)


Today I have another wonderful recipe courtesy of Erin from Big Fat Baker (isn't she awesome?!). This one positively makes my mouth water just looking at it! It's a perfect spring cocktail, and even though it's not quite spring yet (only one more month to go!!) in Australia, it's a good time to sit back and sip a cocktail and pretend that it's spring already! Of course, if you're living in the Northern Hemisphere (like Erin!) then this is perfect for you on your long hot summer afternoons! As you read this I'll be nearing the end of my trip and just arriving in Tallinn to spend a couple of days.

It is summertime in the US and the heat is really kicking in. Cold fruity drinks are the perfect way to cool off.

Grapefruit is a tangy alternative from some of the sweet fruits, and it’s great with mint. Can’t have grapefruit? Try a mix of lemon and lime juice.

This cocktail is beautiful and simple. All you really need is some juice, mint, sugar and rum. If you like bubbles in your drink, or want to make a kid friendly version, try adding a splash of soda water.

Grapefruit Mojito
Yield: 7 - 8, 10 oz drinks

Ingredients:
  • 4-5 cups grapefruit juice*
  • 1 cup mint simple syrup
  • 2 cups white rum
  • 1 cup mint leaves, torn
  • soda water (optional)

* I used fresh squeezed juice = 3 or 4 large grapefruits

Directions:

1. Make Mint Syrup - Boil 1 cup water and 1 cup sugar over medium high heat until the sugar is completely dissolved. Cook for 5 minutes then turn the heat off. Mix in 1 cup torn mint leaves and steep for 5 - 10 minutes (it will just continue to get more minty with time). Strain out the mint, reserve the liquid.

2. In a large pitcher combine the grapefruit juice, simple syrup, and rum. Mix well and taste. Adjust as needed with simple syrup or rum. Chill in the fridge for an hour or two.

3. In a large glass combine; a few torn mint leaves, 1/2 cup ice, and about a cup mojito mix. Stir well and top off with soda water if you like yours bubbly.


Tuesday, 30 July 2013

Kluski Z Makiem (Polish Poppyseed Pasta Dessert)


I'm crazy about pasta! It's just the most delicious and comforting thing to eat, and so convenient to cook. anyone who knows me will know that probably my favourite thing to eat is a big bowl of pasta with a glass of wine to accompany it. But.... pasta for dessert? I've never tried it before, but when I found it for Polish food month I really had to try it! To be honest, this is not 100% traditional! The traditional polish dish would be made with hand made noodles, but I've used supermarket packet pasta to be quick (and a bit lazy!). It was actually very delicious, although it felt strange to have pasta for dessert!

As you read this, I'll be hanging out in funky Helsinki!

Kluski Z Makiem

Ingredients
300g dried pasta (large shapes)
2 tbsp vegan margarine (Nuttelex)
1 cup poppy seeds, soaked over night
1/2 cup raisins
1/2 cup sugar
Zest of 1 orange
Zest of 1/2 lemon
1/2 cup chopped hazelnuts
1/2 cup chopped almonds
1/2 cup maple syrup
Walnut pieces, to garnish

To Make
1. Cook the pasta al dente, according to the instructions on the back of the packet (although you'll probably want to cook it for about 1 minute less than it says on the packet so that it's not overcooked).
2. Combine the poppy seeds, margarine, raisins, suagr and zest in a saucepan with 1 tbsp water. Heat over a low heat until the sugar and margarine are melted. Simmer gently for about 5 minutes.
3. Dry fry the chopped almonds and hazelnuts in a pan over a medium heat, stirring frequently, until slightly browned and toasted.
4. Combine the cooked pasta, poppyseed mixture and toasted nuts and mix well. Add the maple syrup and stir until all the pasta is well coated.
5. Cool to room temperature and garnish with walnut pieces to serve.

Serves 4.


This month I'm featuring lots of delicious food from Poland.
Check out my other Polish recipe posts:

Friday, 26 July 2013

Polish Surówka z Marchewki (Carrot and Apple Salad)


This simple Polish salad is an absolutely perfect accompaniment to the heavier and creamier dishes which I've been serving up for Polish food month(s). When you're eating Pyzy with Creamy Mushroom Sauce or delicious Golabki, you're keen to have a light, fresh and healthy salad on the side! I'll be honest, I made this salad based on a vague description of a salad on the wikipedia Polish Cuisine page, so I'm not sure how authentic it is (you can never really trust wikipedia!). Either way, it's a winner :)

Guess what I'm doing today while this post is scheduled to go up? I'll be spending a day strolling around the Art Nouveau Buildings in Riga, the capital of Latvia! I'm really excited about it.

Ingredients
4 carrots
2 green apples
4 tbsp grapeseed or sunflower oil
Juice of 1/2 lemon
Salt and pepper to taste
Walnuts, to garnish

To Make
1. Coarsely grate the carrot and place in a bowl. Peel the apples and grate them too. Add to the carrot.
2. Add the oil, lemon juice and salt and pepper. Mix well.
3. Garnish with broken walnut pieces and serve.

Serves 8 as a side salad. Halve the recipe to serve 4.


This month I'm featuring lots of delicious food from Poland.
Check out my other Polish recipe posts:


Wednesday, 24 July 2013

Sweet Potato, Pumpkin and Chickpea Soup (Guest Post by The Little Cookbook)


My lovely guest post for today comes from the wonderful Rachel from The Little Cookbook. What a perfect choice for the end of July when it's so cold and rainy and windy. Sweet potato and pumpkin make such warming and satisfying soup for winter! I hope you enjoy this while I'm catching the train from Bergen to Oslo - one of the most spectacular scenic railroad trips in Europe. Thanks Rachel!


Hello! My name Is Rachel and I am super excited to be blogging over here at Gormandize. I blog at The Little Cookbook and whilst my desserts are often wickedly sweet, my weeknight eats are always (okay mostly) yum and frequently vegan – best of both worlds right?


So this soup actually came about through a complete and utter soul destroying craving for tomato soup a few weeks ago, but I had nothing to thicken up my oven-roasted veg. What’s a girl to do?

I’ll tell you what a girl is to do. She will quickly pan fry some canned chickpeas and chuck that in the pot. Done.

So when deciding on my ultimate vegan recipe to help out Keely whilst she’s off travelling, (I’m so jealous!) my mind came back to the amazing tomato soup. But alas it’s winter. Tomatoes are pretty bland at this time of year.

We need to sweet potato and pumpkin the shiz out of this idea.
The chickpeas not only add a beautiful creaminess to the soup but also thicken it up, and add pops of unblitzed chickpea too. Texture is vital to a good soup.

The key to a good pumpkin soup? Half oven roasted; half sweated in delicious butter (vegan butter), if you haven’t got a vegan butter that you absolutely love, use olive oil. Don’t use coconut butter. Or do. You know, whatever.

Sweet Potato, Pumpkin and Chickpea Soup

1 Small pumpkin, half diced/half quartered
2 Sweet Potatoes 1 peeled and diced, one quartered
1 Brown Onion quartered
4 sprigs of rosemary
Olive oil
3 tablespoons of vegan butter (or regular butter/olive oil – see note above)
1 can of chickpeas
1 ½ cup of vegetable stock
½ cup of almond milk
¼ teaspoon of chilli flakes
salt and pepper to season
pistachio dukkah to serve

1. Pre heat the oven to 220 degrees Celsius and set the quartered veggies on a roasting tray. Drizzle with olive oil and season with salt and pepper, place the sprigs of rosemary on the tray any which way.
Roast for 40/60 minutes, until soft, golden and browned around the edges.

2. In a large fry pan melt the vegan butter on a medium heat, once melted add the diced vegetables and turn to a low heat. Cover and leave for 20 minutes, stirring occasionally.

3. When the oven roasted veg is removed and cooled slightly, remove the skin and reserve the potato skins (for wonderful potato skin times).

4. In a large soup pot drizzle some olive oil – about a tablespoon, and set on a medium heat. Drain the can of chickpeas in the time and rinse once. Pour the chickpeas (sans any liquid) into the large soup pot and toss through until the shells pop.

5. Add both the oven roasted veg and the buttered veg to this large pot (sans skins, rosemary and butter) and stir. Pour in the vegetable stock and stir. Allow to simmer for 10/15 minutes, until it feels right. You just want the flavours to really combine.

6. Take off the heat and allow to cool for 10 minutes, then blast with a stick mixer until creamy and smooth. Stir in the almond milk and chilli flakes. Blend further with the stick mixer; don’t go tooo creamy otherwise you miss those pops of chickpea!

Serve with dukkah and potato skins.

To make the potato skins just grill on a high heat both sides for a few minutes.

Friday, 19 July 2013

Crunchy Kale Chips


If you haven't tried kale chips already, then you're in for a treat. They're so easy, they take about 10 minutes to make and you won't have any difficulty eating the whole bowl. I've loved kale for a long time, but these chips were inspired by my friend Catherine from Farmhouse Home who wrote this great post about kale - both the recipes look so good on this post. So the next time I got my hands on a bunch of kale I made kale chips. Then I made them again the next time I had kale. You get the picture, they're awesome.

This is only a "sort of" recipe - you don't really need any quantities. Just grab a bunch of kale and rip it into rough pieces. Toss it in a bowl with a drizzle of olive oil and a light sprinkle of salt and pepper. Toss well so that the pieces are all evenly coated. Spread on a baking tray and bake at 180 degrees C for 10 minutes. Allow to cool and serve with a light sprinkling of salt. 

Hope you enjoy this little "almost" recipe while I'm away. As this post goes up I'm hanging out in Northern Denmark before catching the ferry to Norway to start exploring fjords. I hope it isn't too cold and rainy where you are!